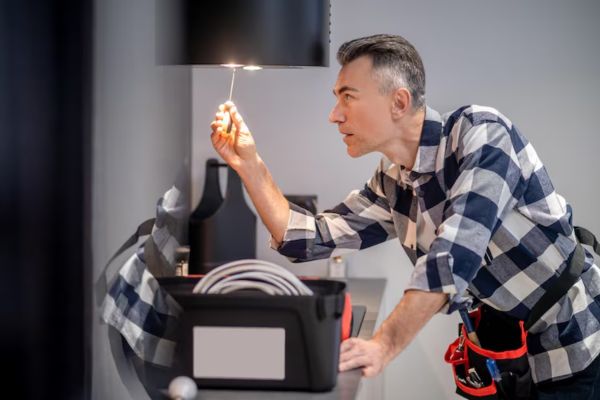
Has your morning shower turned unexpectedly cold? If your water heater suddenly stops producing hot water, one of the most common culprits is a pilot light that has gone out. The good news? Relighting the pilot light is usually a simple fix that most homeowners can do themselves—with the right instructions and a little caution.
The pilot light is a small flame that keeps the gas burner lit in older-style water heaters. When it goes out, your heater can’t ignite the burner, which means no hot water. Learning how to relight the pilot light is a basic skill that can save you time, hassle, and potentially a service call.
In this complete guide, we’ll walk you through exactly how to relight your water heater’s pilot light, step by step, with safety tips and troubleshooting advice so you can confidently restore your hot water.
What Is a Pilot Light and Why It Matters
A pilot light is a small, constantly burning flame that ignites the gas burner when your water heater needs to heat up. Think of it like a lighter that’s always on standby. It’s found on older gas water heaters and some modern models that don’t use electric ignition.
Without a functioning pilot light:
- The burner won’t ignite
- The water in your tank won’t heat
- You’ll be stuck with nothing but cold water
It’s essential for your water heater’s operation, and knowing how to manage it can save you from waiting hours for a technician over a minor issue.
Common Reasons the Pilot Light Goes Out
A pilot light can go out for several reasons—some harmless, others more serious. Here are the most common:
- Drafts or gusts of wind (especially in garages or basements)
- Dirty or clogged pilot orifice
- Thermocouple issues (a faulty thermocouple can mistakenly shut off the gas)
- Moisture buildup or condensation inside the tank
- Gas supply disruptions
- Normal wear and tear on an older unit
The key is identifying whether it’s a one-time glitch or a recurring issue that signals something deeper. Either way, relighting it is often your first step toward diagnosis.

- Resideo 24″ Thermocouple for Gas Furnaces, Boilers, and Water Heaters
- For 30 millivolt systems
- Includes adapter fittings
READ MORE: How to Plumb a Dishwasher Drain
Safety Precautions Before Relighting
Turn Off Gas Supply First
Safety is your top priority when working with gas appliances. Before doing anything, turn the gas control knob to the “OFF” position. This stops the flow of gas and prevents buildup in the burner area.
Never attempt to relight a pilot if:
- You smell gas
- You hear a hissing sound
- You’re unsure how to operate the controls
Gas is volatile. Even a small leak can be dangerous. If you suspect a leak, evacuate the area immediately and call your gas provider or a licensed professional.
Wait Time for Gas to Dissipate
Once the gas is off, wait at least 5 to 10 minutes before proceeding. This allows any residual gas to safely dissipate. You can open a window or door to increase ventilation, especially in enclosed spaces like closets or basements.
While you wait, gather your tools, read the manufacturer’s instructions (usually found on the tank), and prepare for the next steps.
Tools You May Need
Basic Items for the Job
You won’t need much to relight the pilot light, but here’s what helps:
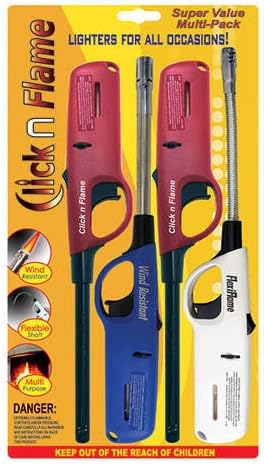
- Long-reach lighter or match (if manual ignition is required)
- Flashlight (to see inside the pilot area clearly)
- Towel or mat (if you’re kneeling on a hard floor)
- Screwdriver (some panels require removal)
Most newer water heaters have a push-button igniter, so you won’t even need a lighter. But older units might require manual ignition, which is where a BBQ-style lighter comes in handy.
Optional Tools for Hard-to-Reach Units
If your water heater is tucked away in a tight corner or low closet, a few extras can make life easier:
- Inspection mirror: Helps see the pilot flame if visibility is poor
- Kneepads: Useful if you’re crouching for a while
- Gloves: For handling dusty or hot surfaces
Make sure you’ve got adequate lighting and a safe, dry working space before you begin.

READ MORE: How to Test a Water Heater Thermostat
Understanding Your Water Heater Type
Standing Pilot vs Electronic Ignition
There are two main types of gas water heaters:
- Standing pilot models: These have a constantly burning pilot flame that you manually relight when it goes out.
- Electronic ignition models: These use an electric spark to ignite the gas and usually reset automatically.
This guide focuses on standing pilot models, but if yours uses electronic ignition and isn’t working, you’ll likely need a service tech or reset procedure—not manual relighting.
If you’re not sure what kind you have:
- Look for a small igniter button or reset switch
- Check the control panel for an LED display or error codes
- Consult the owner’s manual or model label
Reading the Manufacturer’s Instructions
Every water heater is slightly different. Most units have a step-by-step guide printed on the tank, often near the gas control valve. Read this carefully—it will show you exactly where each component is and how your specific model functions.
Look for:
- The location of the pilot
- The ignition type
- The exact relighting steps
- Warning or safety labels
Even if you’re following this general guide, always defer to the manufacturer’s instructions for your exact model.

- Top quality magnetic screwdriver set, 10 professional grade screwdrivers that are designed to serve a multitude of uses.
- Premium materials, the screwdriver bar is made of chromium vanadium steel for durable. Black finish blade with magnetic …
- Cushion grip handle for comfort and control,With ergonomic TPR handle, it helps you to use very easily
Step-by-Step Guide to Relight the Pilot Light
Step 1: Locate the Gas Control Valve
First, find the gas control valve on your water heater. This is usually a small box with a dial or knob labeled “Off,” “Pilot,” and “On.” It’s typically located on the outside of the unit near the bottom, where the gas line enters.
Make sure the dial is turned to the “Off” position. Then wait at least 5 to 10 minutes to allow any lingering gas to dissipate, as mentioned earlier.
This valve controls gas flow to the burner and pilot. It’s also where you’ll hold the button to initiate the pilot lighting process.
Step 2: Turn the Valve to “Pilot”
After waiting the required time, turn the dial or knob from “Off” to the “Pilot” setting. This mode allows a small amount of gas to flow to the pilot light without engaging the main burner.
Some models require you to press down on the dial to allow gas to flow. You should begin to hear a faint hissing sound—this is gas moving toward the pilot.
Keep your hand on the valve or button—you’re not done yet. You’ll need to hold it during the lighting process.
Step 3: Press and Hold While Igniting
With the dial set to “Pilot” and held down, it’s time to ignite the flame.
Depending on your model:
- Manual models: Use a long lighter or match to ignite the pilot. The pilot is usually located behind a small metal access panel at the base of the tank.
- Push-button igniter models: Press the ignition button (usually red or black) several times while holding the gas knob in the “Pilot” position.
Watch through the sight glass or small opening for the flame to catch. It may take several attempts, especially if the pilot line hasn’t been used in a while.
Be patient, but never let gas flow for more than 30 seconds without ignition. If it doesn’t light, stop, wait 10 minutes, and try again.
Step 4: Hold the Button for 30–60 Seconds
Once the flame is lit, continue holding the gas control button for 30 to 60 seconds. This allows the thermocouple (a small safety sensor) to heat up and confirm the pilot flame is steady.
The thermocouple sends a signal that it’s safe to keep gas flowing. If you release the button too early, the pilot flame may go out.
After the holding time, slowly release the button and observe the flame. If it stays lit, you’re ready for the next step.
If it goes out, wait a few minutes and try again. If it keeps failing, your thermocouple may be faulty.
Step 5: Turn to “On” Position and Test
Once you’ve confirmed the pilot stays lit, turn the gas control dial to the “On” position. You may hear a soft “whoosh” as the main burner ignites.
Next:
- Set the temperature control dial (usually nearby) to your preferred setting (typically 120°F/49°C)
- Replace any panels you removed
- Listen and watch for the burner to ignite fully
After a few minutes, the tank will begin to heat. You should have hot water again within 30 to 60 minutes, depending on the size of your tank and your heater’s recovery rate.
READ MORE: What Type of Plumbing Is Not Good in a House?

- 100% split cowhide, 100% cotton lining
- Imported
- Natural Cow Fur (Fur Origin: USA)
Troubleshooting If It Won’t Stay Lit
Possible Causes of Failure
If your pilot light won’t stay lit, several common issues might be to blame:
- Faulty Thermocouple: This small metal sensor detects the pilot flame. If it’s dirty, misaligned, or broken, it won’t signal the gas valve to stay open.
- Clogged Pilot Orifice: Dust, dirt, or corrosion can block the tiny gas outlet, preventing the flame from forming.
- Weak Gas Pressure: If your utility is experiencing low pressure or your line has a leak, the flame may sputter or fail.
- Drafts or Moisture: Cold air or dampness can extinguish a weak pilot.
- Gas Valve Malfunction: In rare cases, the gas control valve itself may be defective and need replacement.
Start by cleaning the pilot area with a soft brush or compressed air. If the problem persists, a thermocouple replacement is a common DIY repair—or a quick fix for a pro.
How to Know When to Call a Professional
If you’ve tried multiple times and the pilot won’t light or stay lit, don’t force it. There could be a deeper issue that requires proper tools or parts.
Call a professional if:
- You smell gas after multiple attempts
- The flame goes out instantly after release
- The burner fails to ignite after the pilot is lit
- Your unit is over 10 years old and has repeated issues
A qualified technician can test the thermocouple, inspect the valve, and ensure your water heater is functioning safely and efficiently.
When You Should NOT Relight the Pilot Light
Smell of Gas or Unusual Sounds
If you smell gas or hear a hissing sound, stop immediately. These are signs of a possible gas leak—a serious and potentially deadly issue.
Steps to take:
- Do not try to light the pilot
- Evacuate the area
- Do not use electrical switches or appliances
- Call your gas utility or emergency services
Safety first. Even a small leak can cause a dangerous explosion if ignited.
Signs of a Damaged Thermocouple or Gas Leak
Don’t attempt to relight the pilot if:
- You’ve relit it several times, and it always goes out
- The flame is yellow, flickering, or irregular
- The thermocouple looks bent, broken, or burnt
- You suspect the gas control valve is faulty
In these cases, a technician can safely diagnose the issue and replace faulty components. Never take risks with gas appliances—especially if you’re unsure.
Conclusion
Relighting the pilot light on your water heater doesn’t have to be intimidating. In fact, with a few simple steps and basic precautions, most homeowners can do it confidently and safely. Whether it’s a one-time issue from a draft or a signal that your thermocouple needs replacing, getting familiar with your water heater can save you from cold showers and costly service calls.
So next time your hot water suddenly disappears, you won’t have to panic. You’ll know how to check the pilot, relight it safely, and get your household running hot again.
FAQs
Q. Is it safe to relight the pilot light myself?
Yes, in most cases, it is safe to relight the pilot light if you follow the proper safety steps—turn off the gas, wait for any residual gas to dissipate, and use the correct relighting technique. However, if you smell gas or feel unsure, call a professional immediately.
Q. How do I know if the pilot light is out?
A cold water tank, no hot water, or the absence of the small blue flame near the burner area are all signs the pilot light has gone out. Most water heaters also have a viewing window or small opening where you can check for the flame.
Q. How long should I wait before trying again if it doesn’t light?
If your first attempt to relight the pilot fails, wait at least 5–10 minutes to let any gas clear before trying again. Never attempt multiple relights back-to-back without waiting—it’s unsafe and can cause a dangerous gas buildup.
Q. Why does my pilot light keep going out?
Common reasons include:
- A faulty thermocouple
- Drafts or wind
- A clogged pilot orifice
- Low gas pressure
- A malfunctioning gas valve
Persistent pilot issues should be looked at by a licensed technician to avoid further problems or safety hazards.
Q. What does it cost to have a professional relight the pilot light?
If you call a plumber or HVAC technician to relight the pilot light, expect to pay around $75 to $150, depending on your location and the urgency of the call. If a part needs replacing (like the thermocouple), the cost may increase slightly.

