If you’re wondering how to plumb a shower valve, you’ve come to the right place. The shower valve is the hidden heart of your shower: the valve body mixes hot and cold water, controls flow, and routes water to the showerhead, tub spout, or handshower. Install it wrong and you’ll get leaks, scalding risk, or poor performance. Install it right and you’ll have years of reliable, comfortable showers.
This guide walks you step-by-step through types of valves, tools and materials, preparation and safety, the actual plumbing steps, common mistakes, whether to DIY or hire a pro, maintenance tips, and FAQs written in plain English by someone who’s spent time behind the tile. Lets deep dive into “How to Plumb a Shower Valve (Step-by-Step DIY Guide)”
READ MORE: How to Fix Low Water Pressure in Your Shower— Step-by-Step DIY Guide
How a Shower Valve Controls Water Flow
Inside the valve body is a cartridge or balancing mechanism that mixes hot and cold water. When you turn the handle, you’re adjusting how much of each supply line enters the valve. Modern valves also limit temperature spikes, protecting you from sudden changes in water pressure elsewhere in the house.
Think of the valve like a traffic cop at an intersection. Hot water comes from one direction, cold from another, and the valve decides how much of each gets through.
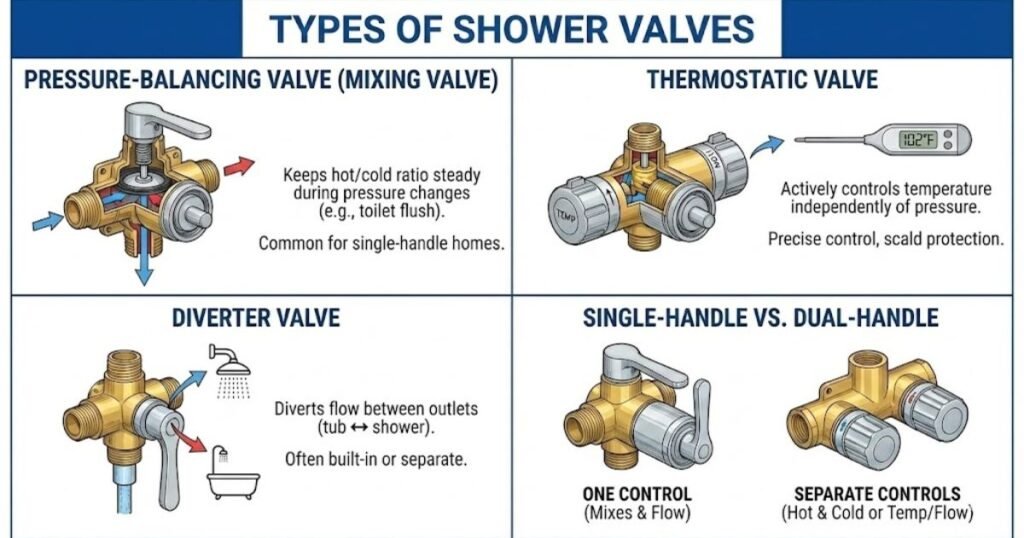
Types of shower valves (and when to use each)
Understanding valve types helps you pick the right one before you cut any drywall.
1. Pressure-balancing valve (mixing valve):
Keeps the hot/cold ratio steady if water pressure on one side changes (like someone flushing the toilet). Good for most homes and is commonly used for single-handle setups.

- MOEN M-PACT COMMON FAUCET VALVE SYSTEM: Update the faucet style in the future without replacing any plumbing
- CONNECTION SIZE: 1/2′ (0.5 inch) IPS connections
- NUMBER OF PORTS: The water valve has 4 ports
2. Thermostatic valve:
Actively controls temperature itself you set a temperature and the valve keeps it constant independently of pressure swings. Best if you want precise temperature control or for households with children/elderly where scald protection is important.

- FUNCTION: Thermostatic Mixing Valve is Designed to Adjust the Flow between Both Hot Water and Cold Water in order to Mai…
- SPECIFICATIONS: US Standard 1/2“ NPT Thread, No Adapter Needed!
- TEMPERATURE: MARKINGS in FAHRENHEIT. Inlet Water Supply Temperature: Cold Water from 39°F -84°F; Hot Water from 122°F -2…
3. Diverter valve:
Diverts flow between outlets (tub spout ↔ showerhead, or between multiple showerheads). Often built into combination valves or as a separate unit.
4. Single-handle vs. dual-handle:
Single-handle mixes and controls flow with one control (simple and space-efficient). Dual-handle setups have separate hot and cold controls or separate temp/flow handles (often used with thermostatic systems).
When choosing, consider safety (anti-scald features), budget, and whether you’re retrofitting or building new. Pressure-balance valves are generally cheaper and easier to retrofit; thermostatic valves cost more and require a bit more precise install.
- The Plumber’s Choice – Built to last from durable stainless steel and brass, our plumber-approved cUPC Certified shower …
- Intuitive operation – Simply lift the handle to adjust volume, turn to find ideal temperature, and lock in settings with…
- Versatile 3-way diverter – Our shower valve with diverter handle maximizes comfort and convenience: easily switch betwee…
READ MORE: How to Plumb a Pedestal Sink
Tools & materials you’ll need
Essential tools
- Pipe cutter (tubing cutter) or hacksaw for copper/PVC/PEX
- Propane torch, flux, and solder (for copper) or PEX crimper/expander and fittings
- Solderless fittings or push-fit connectors (SharkBite) — handy for DIYers
- Adjustable wrench, channel locks, slip-joint pliers
- Phillips & flat screwdrivers, hex keys (for cartridge screws)
- Tape measure and marking pencil
- Level and combination square
- Drill with long bits (to locate valve from shower wall)
- Pressure test kit or hose bib and pressure gauge (see testing section)
Valves & fittings
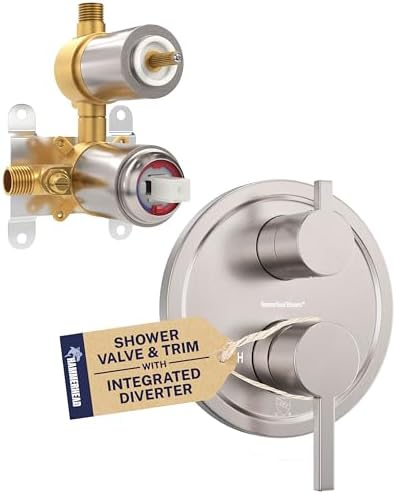
- Valve body (pressure balance or thermostatic) sized for 1/2″ or 3/4″ as required
- Rough-in kit or escutcheon and trim kit matched to the valve
- Copper/PEX/PVC pipe and fittings per your system
- Thread seal tape (Teflon) for threaded fittings
- Mounting straps or stringers to anchor valve to studs
Safety gear
- Safety glasses and work gloves
- Fire extinguisher nearby if you’re soldering
- Respirator/mask if working in dusty demolition
- Knee pads (because you’ll be kneeling)
Pro tips for beginners
- If you’re new to soldering, practice on scrap copper first or use push-fit fittings.
- Take photos as you remove the old valve it helps reconstruct routing later.
- Buy the trim kit after you confirm valve type and depth trim specs vary by brand.

- ►G-Promise’s patented design. Solid metal construction, no worry about snapping off.
- ►One 1/2″ IPS water inlet, two 1/2″ NPT water outlet. Fits well with standard shower head and hose.
- ►The diverter can achieve water flow from either one outlet individually or both outlets simultaneously. This diverter h…
READ MORE: How to Plumb a Shower: Step-by-Step DIY Guide for Homeowners
Before you start: preparation & safety
Turn off the water supply. Shut off the main to the house or the local feed to that bathroom. Open a faucet somewhere to relieve pressure.
Check local plumbing codes and permits. Many municipalities require anti-scald devices in new fixtures and may have rules about rough-in heights or permitted materials. Always check your local building department before starting significant plumbing work. (Codes like the International Plumbing Code define requirements around fixtures and fittings.)
Plan valve placement and rough-in measurements.
- Typical shower valve centerlines are placed around 48–60 inches above the finished floor (varies by preference and code). If a tub spout is involved, valve heights for tub/shower combos often follow standard rough-in dimensions; refer to manufacturer specs and rough-in guides.
- Measure how deep your finished wall (tile + backer + drywall) will be so you can set the valve body at the proper depth for the trim to seat correctly.
Wall access and routing
- Make sure you can access the valve from the back side if possible. If not, plan an access panel or be prepared to cut the wall. For retrofits, many homeowners cut a small square behind the valve to work safely.
Safety reminder
- If soldering, keep combustibles away and use a heat shield against studs; have a fire extinguisher on hand.
READ MORE: How to Plumb a Double Sink
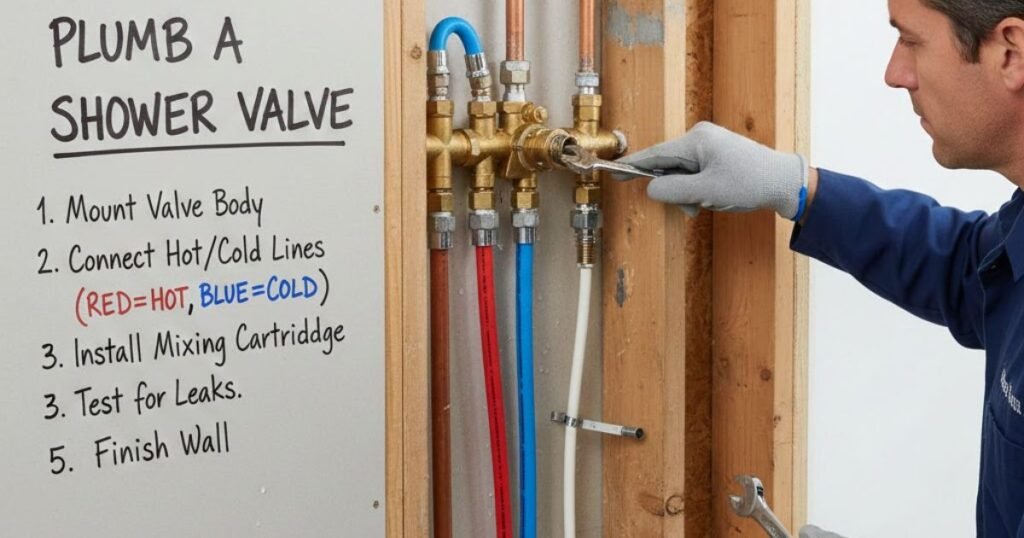
How to Plumb a Shower Valve (Step-by-Step Guide)
Below is a clear, general workflow. Follow your valve manufacturer’s instructions they take precedence for model-specific steps.
A. Removing an old valve (if applicable)
- Cut the water and drain residual pipes.
- Open a small inspection hole in the wall to expose the valve this gives you working space.
- Shut off water at the house shutoff if no local stops exist.
- Disconnect the outlet lines from the valve: for soldered connections, you’ll need to remove or desolder; push-fits can be disconnected with removal tools.
- Remove valve mounting hardware and extract the old body. Photograph locations of hot/cold inlets and outlets for reference.
B. Positioning the new valve
- Locate the valve at the correct height and centerline. Use a temporary mounting block or nail board/stringer between studs if the valve will be mounted within the stud bay.
- Ensure the valve cartridge face will be flush with the finished wall plane (tile + backerboard + thinset). Most valve manufacturers publish the required distance from the finished wall to the valve face measure carefully.
C. Connecting hot and cold water lines
- Label your lines HOT on the left and COLD on the right (as you face the valve) before disconnecting anything.
- For copper: measure, cut, flux, and sweat fittings (or use threaded adapters). Make clean joints and purge flux.
- For PEX: use the appropriate crimps or expansion fittings per manufacturer instructions.
- For retrofits, push-fit fittings (like SharkBite) are acceptable and fast for many homeowners.
- Double-check that hot goes to the hot inlet, cold to the cold inlet, and that the outlet(s) to the showerhead(s) and tub spout are correctly routed.
READ MORE: What Causes Low Water Pressure in One Faucet — Easy Fixes, Costs & When to Call a Plumber
D. Securing the valve body
- Fasten the valve to studs or stringer so it cannot move when the trim is installed. Most valves have mounting ears or tabs; use corrosion-resistant screws.
- Confirm the valve is level and plumb this ensures trim and escutcheon alignment and prevents stress on fittings.
E. Connecting the showerhead and tub spout
- Run the outlet pipe to the showerhead location. Use the correct threaded nipple or adapter at the valve outlet.
- If you have a diverter within the valve, ensure the tub spout and showerhead are attached to their respective outlets.
- For multi-head systems, follow manufacturer directions for balanced flow and any required diverters.
F. Pressure testing before closing the wall
- Pressure test the assembly with water. Turn on the house water, pressurize the lines, operate the controls and check for leaks.
- Many pros also perform an air pressure test using 50–80 psi and a gauge to confirm no leaks over 15–30 minutes.
- Fix any drips or seepage before closing the wall. This step prevents the nightmare of tearing tile later to reach a leaking valve.
READ MORE: How to Measure Plumbing Fittings
Common mistakes to avoid
- Incorrect valve orientation: Valve inlets/outlets labeled on the body must face the correct directions. A reversed hot/cold will cause incorrect temperature behavior.
- Wrong pipe depth (setback): If the valve is too deep or too proud relative to finished wall thickness, the trim won’t seat properly and may leak.
- Poor soldering or loose fittings: Cold solder joints or hand-tight fittings lead to leaks. If you’re unsure about soldering, use mechanical fittings or hire a pro.
- Ignoring manufacturer instructions: Trim kits often require exact valve placement and depth ignoring this leads to costly rework.
DIY vs. hiring a licensed plumber
When DIY is reasonable
- You’re replacing a valve in an accessible wall with PEX or push-fit connectors.
- You’re comfortable with basic plumbing tools, soldering or crimping, and you follow manufacturer instructions and local code.
- You’ll pull permits if required and can perform a pressure test.
When hire a pro
- The job involves complex thermostatic mixing valves, multiple shower heads, or significant rerouting of supply lines.
- Your local code requires a licensed plumber for water-supply modifications or anti-scald installations.
- You’re unsure about soldering, gas flame safety, or testing the system correctly.
- If the valve is in a difficult or inaccessible location (and the wall must be opened widely), a pro will save time and potential rework.
Cost considerations
- DIY parts: valve bodies cost from ~$80 for basic pressure-balance valves to several hundred for thermostatic setups; trim adds more.
- Professional install: labor varies by region but expect several hundred dollars or more, depending on complexity. Factor in permit costs and potential tile repair. If you value time, warranty, and code compliance, a licensed plumber is often worth the expense.
READ MORE: How to Fix Air Pockets in Hot Water Lines: Step by Step DIY Guide
Maintenance tips for shower valves From an Expert
- Prevent leaks: Exercise the valve occasionally (turn on/off) to keep cartridges moving. Replace worn seats or O-rings at the first sign of drip.
- Clean mineral buildup: Hard water can gunk up thermostatic cartridges and screens. Remove and soak parts in white vinegar or a descaler according to the manufacturer’s recommendations.
- When to replace the valve: If you have persistent leaks, fluctuating temperatures, or the cartridge is damaged/worn, replacing the valve body and cartridge is usually the fix.
- Keep spare parts: Buy a spare cartridge for your valve model cartridges wear out and are sometimes cheaper to replace than the whole valve.
READ MORE: How Much Does It Cost to Reroute Plumbing?
FAQs
How long does it take to plumb a shower valve?
For a straightforward replacement with good access, a confident DIYer or pro can do it in 3–6 hours (including pressure testing). Retrofits that require opening walls, rerouting lines, or tiling add time.
Can I replace a shower valve without opening the wall?
Sometimes if the old valve has service stops or accessible connections on the backside, or if you can access it through an adjacent room, you may avoid cutting the shower-side wall. Otherwise you’ll need to open the wall to reach the valve body.
What size shower valve do I need?
Most residential shower valves use 1/2″ inlets/outlets (NPT or sweat). Multi-outlet valves or tub fillers sometimes use 3/4″. Always check the valve’s specifications and match to your supply piping.
Are thermostatic valves worth it?
If you want precise temperature control, scald protection, or you run multiple fixtures at once in the house (pressure swings), thermostatic valves are worth the investment. For standard retrofit jobs on a budget, pressure-balance valves are usually sufficient.
Final checklist before you finish
- Hot and cold lines correctly connected and labeled.
- Valve body secured and level.
- Valve set to the correct setback from finished wall.
- Outlets to showerhead/tub spout connected properly.
- System pressure tested and confirmed leak-free.
- Trim kit matched to valve and installed per manufacturer instructions.
- Building permits closed (if required).
Conclusion
Plumbing a shower valve is a satisfying DIY job when planned and executed carefully. The keys are: choose the right valve for your household (pressure-balance for simplicity, thermostatic for temperature control), measure the valve setback to match your finish, secure and pressure-test the valve before you close the wall, and follow local code and manufacturer instructions. If anything feels beyond your skill level especially working with solder, complex thermostatic setups, or code-required anti-scald installations call a licensed plumber. A safe, code-compliant install protects your home and gives you reliable showers for years.

