Frozen pipes can cause expensive water damage and emergency repairs. This guide gives simple, safety-first prevention steps (insulate, seal drafts, protect outdoor spigots, keep minimal heat), lists the tools and typical costs, and explains when a DIY approach is fine versus when you must call a licensed plumber. Includes a printable seasonal checklist and comparison table of common prevention solutions. Lets deep dive into “Best Practices to Prevent Frozen Pipes: A U.S. Homeowner’s Step-by-Step Guide”
Why frozen pipes are a big deal
- When water in a pipe freezes it expands; that expansion commonly cracks or bursts the pipe once pressure builds, causing leaks and major water damage.
- A single burst pipe can lead to thousands of dollars in repairs (plumbing work, drywall, flooring, and remediation).
- Preventing a freeze is almost always cheaper than repairing a burst pipe and cleaning up water damage.
How pipes freeze
- Water expands as it freezes; ice plugs create pressure between a cold spot and a closed valve, often causing the pipe to crack.
- Heat loss + low temperature + still (standing) water = freeze risk.
- Exposed pipes (uninsulated, exterior walls, unheated spaces) are highest risk.
- A small continuous flow (a trickle) makes freezing far less likely.
Don’t let freezing temperatures put your pipes at risk.
Upgrade to the Google Nest Learning Thermostat for better control and peace of mind all winter long. See Below-

Risk map: high-risk pipe locations in a typical U.S. home
Residential architecture in the United States often creates accidental “refrigerators” where plumbing lines are exposed to sub-freezing temperatures despite the home’s interior being warm. Identifying these zones is the first step in a professional-grade prevention strategy.
Exterior Wall Vulnerability
Pipes routed through uninsulated or poorly insulated exterior walls are at the highest risk for freezing. This is particularly common in older homes where the thermal envelope may be compromised by settle-cracks or degraded fiberglass batts. Kitchen and bathroom sinks located on exterior walls are the primary failure points because the cabinet doors often isolate the plumbing from the home’s primary heat source.
Unconditioned Internal Spaces
Pipes passing through basements, crawl spaces, attics, and garages are highly susceptible to freezing because these areas are typically unheated. In regions like the Gulf Coast and Texas, homes were historically built to facilitate heat release, often resulting in main water lines being routed through ventilated attics above the ceiling insulation. During unexpected “hard freeze” events, these attics reach ambient outdoor temperatures, leading to widespread failures.
Architectural Connection Points
Specific high-risk locations include:
- Foundation Penetrations: Where the main water service enters the home through the foundation wall, often through a poorly sealed rim joist.
- Crawl Space Vents: Open vents intended for summer moisture control can allow “icy blasts” of air to directly impinge upon exposed copper or PEX lines.
- Outdoor Spigots: Hose bibs are directly exposed to the elements. Even if the hose is removed, residual water within the valve body can freeze and expand back into the home’s interior.
Don’t let cold weather catch you off guard.
Use the Honeywell Home Wi-Fi Thermostat to maintain steady indoor heat and reduce frozen pipe risks. See below-

READ MORE: How to Safely Unfreeze PVC Pipes: A Step-by-Step Guide
Seasonal Checklist to Prevent Pipes from Freeze
Below are bite-sized tasks grouped seasonally — do the first block before freeze season, the second during a hard freeze, and the final after any freeze.
Pre-winter (do this 1–2 months before first freeze)
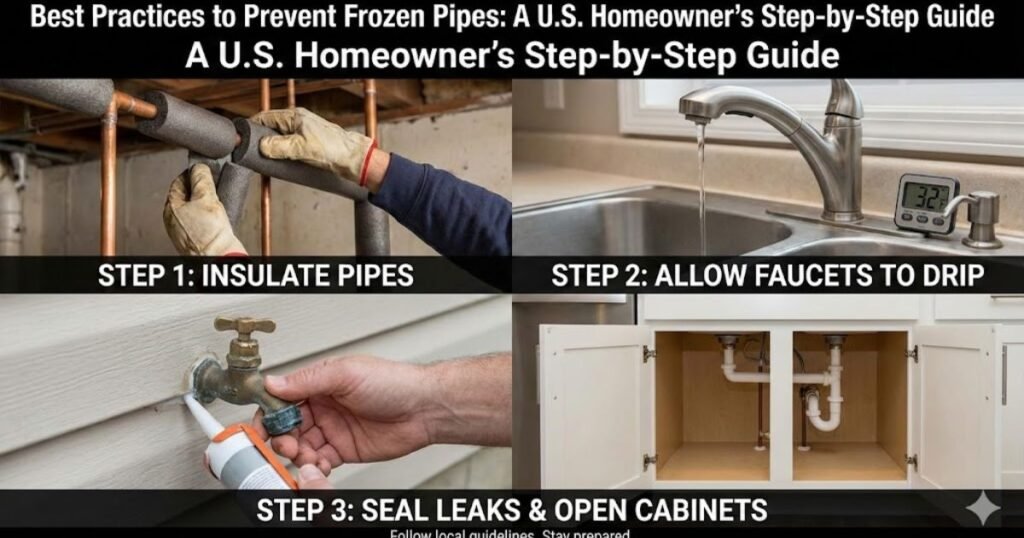
- Insulate exposed pipes: foam sleeves for short runs, and consider professional cavity insulation for walls/attics.
- Install outdoor faucet covers and disconnect garden hoses.
- Seal drafty gaps where cold air meets plumbing (penetrations, foundation seams).
- Install / check heat tape or self-regulating cable on vulnerable runs.
- Set smart thermostat minimum temp (or program away mode) to avoid deep overnight dips.
- Locate and label the home’s main water shut-off valve; ensure it turns.
- Create a quick-action plan: turn off water, call plumber number, move valuables away from susceptible areas.
During a freeze (active precautions)
- Keep indoor temps at or above a safe minimum (many pros recommend at least 55°F / 12–13°C for vacant properties; for occupied homes, 65°F is common for comfort and safety).
- Let faucets on exposed pipes trickle (warm and cold) during prolonged extreme cold.
- Open cabinet doors under sinks to let warm air reach pipes.
- If a pipe is frozen (no water flow), never apply open flame; use safe heat (hair dryer, heat lamp used with care, or warm towels) or call a pro.
Post-freeze checks
- Slowly turn water back on and inspect for leaks after thawing—listen and look for drips.
- Check ceilings, walls, and baseboards for slow leaks or swelling.
- If you find a leak, shut off the main and call a licensed plumber.
| Seasonal Checklist Summary |
| Autumn Baseline |
| [ ] Disconnect garden hoses and store them in a shed/garage |
| [ ] Drain irrigation systems and blow out lines with compressed air |
| [ ] Insulate exposed pipes in attics, basements, and crawl spaces |
| [ ] Seal drafts around pipes entering the foundation with caulk |
| Deep Freeze Active Status |
| [ ] Set thermostat to 55°F minimum (68°F is ideal when home) |
| [ ] Open kitchen and bathroom cabinet doors |
| [ ] Let the farthest faucet drip (5-10 drops per minute) |
| [ ] Keep the garage door closed and minimize opening exterior doors |
| Emergency Response |
| [ ] Know the location of the main water shut-off valve |
| [ ] Have the number of a licensed emergency plumber on speed dial |
| [ ] Stockpile towels and buckets in case of a rupture |
Protect your pipes before the freeze hits.
Wrap them with foam pipe insulation for simple, reliable winter protection. See below-


READ MORE: How to Find a Hidden Water Leak in Your Wall
Materials & Tools for Prevention of Pipes from Freeze
Below are common prevention items, what to look for, and real price examples (retailer + date checked). Prices are retail ranges found via Google-searchable retailers; prices checked Feb 16, 2026.
- Foam pipe insulation (split-foam sleeves) — Good for short, exposed runs. Look for closed-cell foam or elastomeric foam for better thermal performance and longevity.
Example prices: $2–$34 per 6-ft sleeve depending on diameter and material. - Outdoor faucet covers / hose-bib insulation — Quick, cheap protection for hose bibs; foam or hard plastic shells.
Example prices: roughly $3–$20 each retail; multi-packs commonly $10–$25. - Self-regulating heat cable / heat tape — Wraps along pipes and warms itself more where it’s colder; choose UL-listed self-regulating types for safety. For exposed outdoor lines or pipes in attics.
Example prices: small kits start around $20; longer self-regulating cables run $100–$400 depending on length and features. - Caulk / insulation foam / weatherstripping — For sealing air leaks where pipes enter the home. Quality exterior caulk and foam will block cold drafts effectively.
- Smart thermostat & remote temp sensors — Keeps basement/entry temps monitored and can maintain minimums when you’re away.
Example prices: $99–$279 retail (Nest, ecobee models). - General tools: flashlight, multi-meter (to test GFCI outlets and heat tape power), pipe wrap tape, basic pipe wrench (for turning exterior valves when needed), and a hair dryer or heat gun (used carefully) for safe thawing by pros/homeowner.

Comparison of Prevention Solutions of Pipes from Freeze
| Solution | What it is | Best use / where | Ease (1-5) | Typical Cost (Retail) | Lifespan | Pros | Cons |
| Foam Sleeves | Split-foam tubes | Basements, garages | 5 | $2–$30 per 6-ft (Walmart Feb 2026) | 5–10 Years | Inexpensive; very easy DIY | Passive only; can be crushed |
| Heat Cable | Active electric tape | Uninsulated attics; exterior pipes | 2 | $20–$75 (Home Depot Feb 2026) | 3–5 Years | Active heating; prevents deep freezes | Needs power; fire risk if misapplied |
| Faucet Covers | Insulated spigot cap | Outdoor hose bibs | 5 | $3–$17 (Walmart Feb 2026) | 2–4 Years | Installs in seconds; cheap | Only protects the head; not the pipe |
| Air Sealing | Spray foam/caulk | Rim joists; wall gaps | 3 | $5–$15 (Home Depot Feb 2026) | 20+ Years | Permanent; saves energy costs | Hard to reach; can be messy |
| Smart Thermostat | Wi-Fi HVAC control | Whole-home | 4 | $80–$299 (Home Depot Feb 2026) | 10+ Years | Remote alerts; automation | High upfront cost; needs C-wire |
READ MORE: How to Clean Copper Plumbing Pipes
Step-by-step DIY Prevention of Frozen Pipes
1) Install foam pipe sleeves (Easiest — 15–60 minutes / run)
- Why: Low cost, fast thermal barrier for exposed pipes.
- How: Measure pipe diameter & length → buy split foam sleeves matching size → open split, snap over pipe, seal seam with foil tape for long runs and at joints. Insulate elbows with pre-formed pieces or wrap with insulating tape.
- Cost: Typically under $10 per 6-ft basic foam sleeve; premium elastomeric sleeves cost more. (Home Depot/Walmart examples; prices checked Feb 16, 2026).
2) Install outdoor faucet covers (Very easy — 2–5 minutes per spigot)
- Why: Cheap protection for the most obvious exterior vulnerability.
- How: Disconnect hose, slip foam/hard cover over spigot and secure per product instructions. For frost-free sillcocks, also close interior shutoff when leaving for extended periods.
- Cost: A few dollars each or low-cost multi-packs. (Walmart/Home Depot examples, prices checked Feb 16, 2026).
3) Seal drafty holes where pipes enter (Moderate — 30–90 minutes)
- Why: Cold air drafts are a major cause of localized freezing.
- How: Use low-expansion spray foam or caulk around penetrations (follow instructions). For larger access points, use foam backer rod and caulk. Wear PPE.
- Cost: $6–$25 for cans of spray foam or tubes of caulk.
4) Add heat-trace cable to vulnerable runs (Advanced DIY or pro assist — 1–3 hours)
- Why: Active freeze protection for stubborn runs (e.g., in cold crawlspaces).
- How: Buy UL-listed self-regulating cable sized for pipe length. Attach per manufacturer spacing, plug into GFCI protected outlet, and follow thermostat/control instructions. If unsure, have a licensed electrician or plumber install.
- Cost: Kits vary widely: small kits ~$20, full-length self-regulating runs $100–$400 (Home Depot examples).
5) Insulate rim joists and add cavity insulation (Pro suggested for many homes)
- Why: Stops cold infiltration at the foundation and protects plumbing in exterior walls.
- How: For DIY, add spray foam or rigid foam to rim joists; for wall cavities, consider blown-in insulation or foam often best done by insulation pros.
- Cost: Professional jobs vary; per-foot and whole-home averages: $0.50–$5/linear foot or $360–$850 for common home scopes.
When to DIY vs call a licensed plumber for Prevent Frozen Pipes
Good DIY cases
- Adding foam sleeves, installing faucet covers, sealing small draft gaps, programming a thermostat, and safely letting faucets trickle.
- Installing basic foam or tape insulation on easily-accessed runs.
Call a licensed plumber (or electrician) when
- You need to install electrical-powered heat cable and are not confident with wiring or GFCI protection.
- Pipes are frozen and you cannot locate the frozen segment safely, or you discover signs of burst/leak.
- The job requires access behind drywall, in slabs, or involves gas/combination heating systems.
- You suspect a slow leak (hairline crack) after thawing — call a pro to pressure-test and repair.
Red flags / emergency steps (call a plumber now)
- Visible water actively leaking or pooling — shut off the main water and call emergency service.
- Rapidly spreading wet ceiling or wall — risk of collapse and electric hazards. Turn off electricity to that area if safe.
- Signs of a burst inside walls (bulging paint, sudden drop in water supply across multiple fixtures).
- If thawing attempts produce water but you smell sewage or there is discoloration call pros.
What information to give the pro
- Location of the problem (basement, wall behind the kitchen sink, slab, etc.).
- Whether you shut off the main and when.
- Any obvious causes (failed heat tape, GFCI tripped, exterior exposure).
- Your home type (single-family, slab foundation, crawlspace) and approximate age of pipes.
Representative emergency / thawing fees
- Simple thawing service commonly quoted around $100 flat for thawing; emergency call/after-hours fees $100–$300; burst-repair labor & parts vary widely (expect major repairs to range from a few hundred to several thousand depending on location and damage). (Angi thawing & labor estimates; other price guides support this range). (Prices checked Feb 16, 2026).
READ MORE: Is Liquid Plumber Safe for Pipes?
Cost Guide: DIY vs. Professional Costing for Prevent Frozen Pipes
Investing in prevention is always more cost-effective than remediating damage.
| Service / Project | DIY Cost | Professional Cost | Source/Context |
| Pipe Insulation | $50–$150 | $360–$850 | Angi 2026 data: Many homes avg $600. |
| Emergency Thawing | $0 (Hairdryer) | $100–$200 | Flat fee for accessible pipes. |
| Burst Pipe Repair | $30–$100 | $250–$1,500 | Varies by accessibility (wall vs slab). |
| Slab Leak Repair | N/A | $1,500–$4,000 | Requires excavation. |
| Labor Rate | $0 | $45–$200 / hr | National plumber hourly avg $90. |
Professional pipe insulation costs between $0.50 and $5 per linear foot, with total house projects typically falling between $360 and $850. For emergency calls, rates often increase by 50% to 100%, leading to costs between $150 and $300 per hour.
Energy & long-term upgrades (worth the investment)
- Whole-house insulation & air sealing — reduces heat loss and prevents cold pockets near pipes. Upfront cost but big energy savings and freeze protection. (Professional grades vary widely; see Angi/HomeAdvisor ranges).
- Smart thermostat + remote sensors — maintain minimum zone temps and get alerts when temps drop; pays back via energy optimization (Nest, ecobee examples $99–$279 retail).
- Replace old piping in vulnerable areas — copper or modern PEX is more freeze-resilient in many situations; consult a plumber for a targeted replacement plan.
- Permanent rerouting / burying of exterior supply — if outdoor lines freeze often, reconfigure to run through conditioned space.
FAQs
What temperature do pipes freeze in a house?
Pipes typically begin to freeze when the outdoor temperature drops below 32°F, but the “danger zone” for internal pipes is generally when outdoor temperatures reach 22°F or below for more than 4-6 hours.
Is it better to drip hot or cold water to prevent freezing?
You should drip both, or a single faucet that mixes both lines. Hot water lines can actually freeze faster than cold ones in certain conditions (the Mpemba effect) and are often located on the same exterior walls.
Does pipe insulation actually work?
Yes, but with limits. Pipe insulation is a passive barrier that slows the transfer of heat from the water to the cold air. It can buy you several hours of protection but may not prevent a freeze during a multi-day sub-zero event without an internal heat source.
Will opening cabinets prevent frozen pipes?
Yes. Opening kitchen and bathroom cabinet doors allows the home’s primary heating system to circulate warm air around the supply lines and traps, which are otherwise isolated in a cold, dark “pocket”.
How can I tell if a pipe is frozen before it bursts?
The most common sign is a total loss of water pressure or a “trickle” from a single faucet. Other indicators include visible frost on exposed pipes, bulging sections of copper, or unusual odors coming from the drain.
Final Verdict
Preventing frozen pipes is predominantly about preparedness: insulate, seal, protect exterior fixtures, and keep a warm minimum when it matters. Small investments (foam sleeves, faucet covers) plus a bit of seasonal attention prevent big headaches and expensive repairs.

