Lint from clothing fibers is a normal byproduct of washing but when it escapes the washer’s internal filters or pump area it can collect in the drain hose and the standpipe/trap it drains into. Modern high-efficiency (HE) washers use less water, which can mean lint doesn’t get swept away as quickly; combined with damaged lint traps, heavily shedded loads (towels, fleece), or a kinked drain hose, lint builds up and causes slow drains, gurgling, odors, and even occasional backups.
This article is written for U.S. homeowners who want a practical, safe, step-by-step approach to clear lint from a washing machine drain hose from quick checks and safety tips to multiple DIY methods, a comparison table, cost ranges, and clear red flags for when to call a licensed plumber.
What you’ll learn: how to spot a lint clog, the tools to keep on hand, step-by-step removal methods (easy → advanced), estimated time and cost, preventative maintenance, and short scripts and a checklist to hand to a technician if you need a pro. Lets deep dive into “How to Clean Lint From Washing Machine Drain Hose: Step-by-Step”

- Home Essentials: Fireplace chimney brushes includes two high quality synthetic brush head and flexible rods that extend …
- Home Improvement with Simple Instructions: Dryer vent brush can be used with or without any kind of power drill and will…
- Improve Dryer Working Efficiency: Improving cloth dryer working performance by using this cleaning tools to clean the bu…
READ MORE: How to Clean Sediment from a Water Heater
Quick Signs Your Drain Hose is Clogged with Lint
Lint clogs usually start small and get worse slowly. Look for these symptoms:
- Slow drain cycle (washing machine takes longer to empty).
- Water pooling or a small puddle near the washer after a cycle.
- Gurgling or bubbling noises from the washer or nearby drains during drainage.
- Overflowing washer tub or occasional error codes on modern machines (e.g., drain/fail codes).
- Recurring laundry odors or musty smell coming from the washer or drain.
- Laundry that feels damper at the end of the spin cycle (because the washer didn’t fully drain).
- Professional: This professional plumbers snake comes complete with 25 ft Steel, more than enough for most household clog…
- Easy to Use: The sewer snake spring is both flexible and tough to enable you to easily take tight bends, and the large c…
- Multiple Uses for Tackling Clogs: This snake drain clog remover is professional using for various drains such as kitchen…
Electronic Indicators and Error Codes
Modern washing machines utilize pressure sensors and timers to monitor drainage velocity. When the water level does not drop to a specific threshold within a pre-programmed interval (typically 8 minutes for Whirlpool and Maytag systems), the machine will cease operation and display a fault code.
| Manufacturer | Typical Drain Error Codes | Technical Meaning |
| LG | OE | Detected long drain or no drainage. |
| Samsung | 5C, 5E, ND | Drainage issue; often clogged filter or hose. |
| Whirlpool | F9E1, Ld, SUD | Long drain time or excess suds blocking flow. |
| Maytag | F9E1 | Drain cycle exceeded 8 minutes. |
| GE | 18, 353, E22 | Pump filter restriction or fill/drain timeout. |
If only one cycle had a problem, try running an empty rinse/spin first; if the issue is persistent, follow the DIY steps below.
READ MORE: How to Plumb a Washing Machine Drain
Washing Machine Lint Clog: Safety first
Before you begin any work, follow these safety basics:
- Unplug the washer. Always completely disconnect electrical power before touching hoses or the back of the machine.
- Shut off the water supply (optional for drain hose work, but do this if you’ll be moving inlet hoses or replacing parts).
- Wear gloves and eye protection. Lint and trapped water can include detergent residue, grime, and bacteria. Gloves protect your hands and eye protection prevents splashes.
- Avoid chemical drain cleaners for washer hoses. Most chemical drain cleaners are formulated for kitchen or bathroom pipes and use harsh caustics that can damage rubber, corrugated plastic, or the pump components in a washer. They are also ineffective on soft lint balls, which are physical obstructions rather than chemical clogs.
- Work slowly and keep towels/buckets handy. Expect 1–3 quarts of water to come out when you disconnect the hose; have towels and a bucket ready.
- Stop and call a pro if: you detect a strong sewage smell, water is flowing into living spaces, you see visible broken pipes, or you are uncomfortable with any step. Electrical or structural concerns should always be handled by licensed professionals.

- UNIQUE DESIGN – With a distinctive 360 degree rotation, our 18-inch drain snake cleaner, featuring micro-hooks, locks in…
- EASY TO USE – Our easy-to-use drain opener works in 3 steps. Simply insert the wand, rotate the handle, and remove the c…
- DISPOSABLE WANDS FOR EASY CLEAN UP – just dispose of used wands effortlessly. Our snake drain hair clog remover includes…
Washing Machine Drain Hose Cleaning: Tools & materials
Successful remediation depends on having the correct technical equipment. Retail pricing for these items has been verified as of February, 2026.
Essential DIY Tools
| Tool | Technical Purpose | Retail Price Range (Feb 2026) |
| 5-Gallon Bucket | To catch “rogue water” during hose disconnection. | $5.00 – $10.00 |
| Old Towels/Rags | Managing spills and forming seals for vacuum suction. | $0.00 (Recycled) |
| Slip-Joint Pliers | Removing tension-based hose clamps. | $12.00 – $25.00 |
| Screwdrivers | For worm-gear clamps and access panels. | $5.00 – $15.00 |
| Utility Knife | Cutting zip-ties or shortening replacement hoses. | $10.00 – $20.00 |
| Flexible Drain Brush | Scrubbing the internal corrugated walls of the hose. | $8.00 – $18.00 |
| Manual Hand Auger | Mechanically extracting deep or stubborn clogs. | $21.98 – $34.98 |
| Wet/Dry Shop-Vac | Using negative pressure to pull lint out of the hose. | $50.00 – $200.00 |
Notes: If you don’t own a wet/dry vac or a hand auger, consider the cost of buying vs. borrowing/renting. Simple methods (manual removal and brushes) are inexpensive and effective for surface lint.

- HEAVY-DUTY: Powerful 6.5 Peak HP provides extra power for large projects in the garage, shop and on the jobsite
- BUILT-IN BLOWER PORT: Rear blowing port on this wet dry shop vac allows for quick cleaning of leaves and grass clippings…
- OVERSIZED DRAIN: Built-in oversized drain on the wet/dry vac allows for convenient emptying of liquids
READ MORE: Seasonal Plumbing Tips & Tricks: Prep, Protect & Save All Year
How to Unclog Washer Drain Hose: Step-by-step DIY methods
Below are multiple safe methods ordered from easiest to more advanced. For each method you’ll find time, difficulty, required tools, step list, expected results, and tips/warnings.
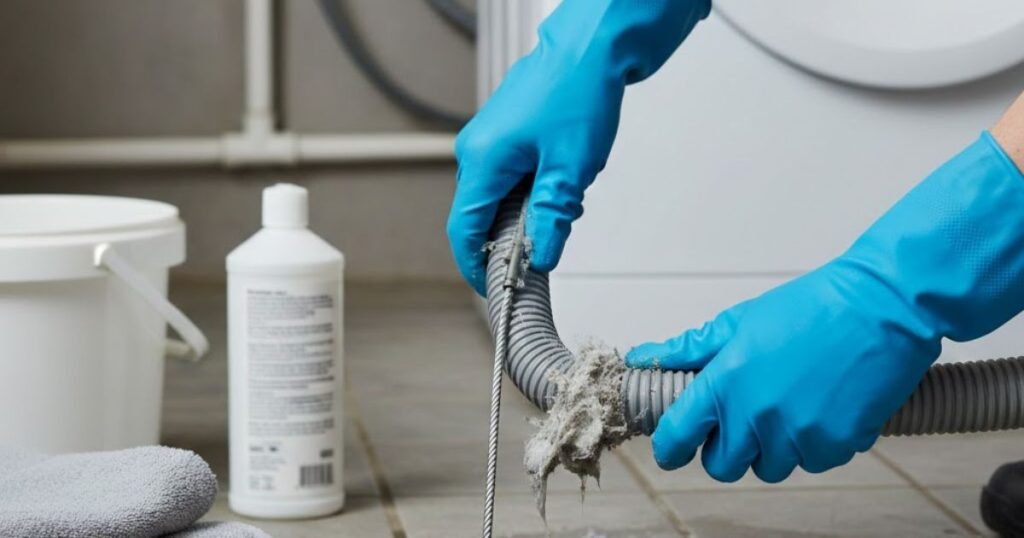
Method A — Basic manual removal (best first try)
Time: 15–30 minutes
Difficulty: 1/5 (easy)
Tools: Bucket, towels, gloves, screwdriver/pliers (for clamps), short brush or rag.
Expected result: Removal of surface lint and minor blockages; often fixes slow drains.
Steps:
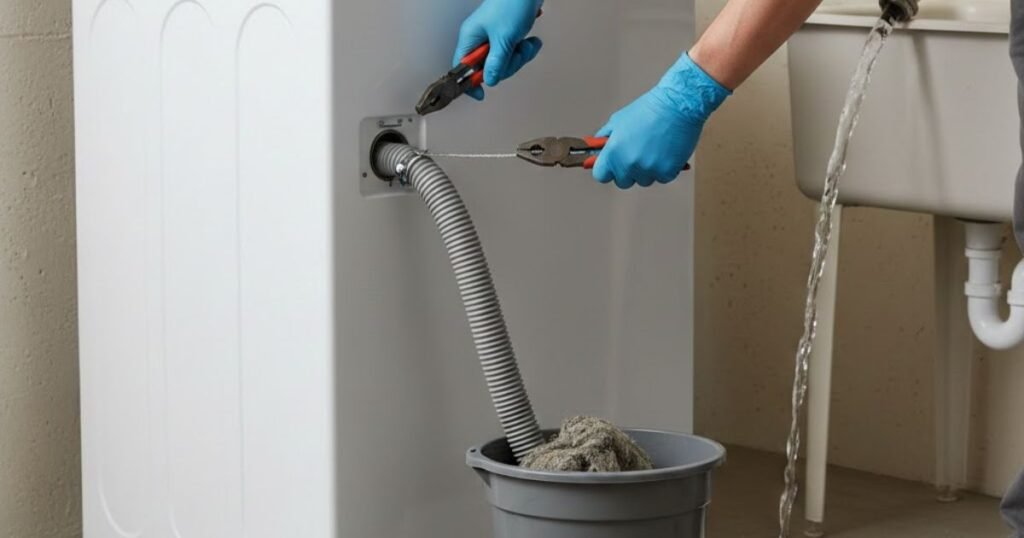
- Unplug the washer and move it away from the wall enough to access the back (or access the hose where it enters the standpipe if easier).
- Place a bucket and towels under the hose connection at the washer and at the standpipe if you’ll remove that end too.
- Loosen the clamps securing the drain hose at the washer and at the standpipe/utility sink. Use pliers or a screwdriver depending on clamp type.
- Disconnect the hose: have the bucket underneath expect water to drain. Slowly pull the hose off.
- Inspect the hose visually and by feel. Use gloved hand to pull out any visible lint balls and debris. Use a short brush or rag to wipe inside the hose end.
- Flush the hose by running water through it (use a garden hose into the hose end or run the washer briefly on a rinse cycle with the hose directed into a deep tub) to dislodge remaining lint.
- Reconnect and secure clamps, test with a rinse/spin cycle and observe drainage.
Tips & warnings:
- If the hose is brittle, cracked, or has deep corrugation damage, replace it (see Method E).
- Don’t force a stubborn knot of lint out by hand; use a brush or Method B to avoid pushing debris deeper.

- High-Performance Motor: Equipped with a powerful 5.5 HP motor, the DeWALT DXV12P Wet/Dry Vacuum offers exceptional sucti…
- Large Capacity: With a 12-gallon tank, this shop vacuum cleaner provides ample space for large pick-ups, reducing the ne…
- Ultra durable rubberized casters allow smooth swiveling for ease of movement.To keep your wet/dry vac looking its best, …
READ MORE: Best Whole House Water Softener System for Home (2026) — Top Picks & Buyer’s Guide
Method B — Long flexible bottle brush / drain brush (recommended next)
Time: 15–45 minutes
Difficulty: 2/5
Tools: Long flexible bottle/drain brush (36–48 in.), bucket, gloves, towels.
Steps:
- Unplug the washer and position towels and bucket as above.
- Disconnect the hose from the washer or from the standpipe so you can reach fully into the length of the hose (disconnecting from the standpipe usually gives better access to where lint collects).
- Insert the flexible brush into the hose and push gently until you feel resistance. Rotate and pull the brush out to bring lint with it. Repeat several times, probing several inches past the bend or kink if present.
- Flush with water to rinse remaining fibers out. You can run the washer on a rinse with hose in a tub to help flush.
- Reattach and test.
Tips & warnings:
- Use a brush sized for the hose diameter; a brush that’s too small won’t remove lumps, too large may snag.
- If the hose connects to a trap or standpipe where the lint sits, try brushing from both ends (washer end and standpipe end).

- STRONG SUCTION: 2 Peak HP to quickly clean-up wet and dry messes
- COMPACT AND PORTABLE: The 2.5-gallon durable polypropylene tank is perfect for small messes and the wheel-base and top h…
- CONVERTS TO BLOWER: Easily blow leaves and larger debris from the garage or windshield with a simple conversion
Method C — Wet/dry shop-vac suction (good for stubborn surface lint)
Time: 30–45 minutes
Difficulty: 2/5
Tools: Wet/dry shop vac, bucket, towels, adhesive tape or rubber gasket for sealing, gloves.
Steps:
- Unplug washer. Ensure wet/dry vac is suitable for water and debris.
- Disconnect the drain hose at one end (the standpipe end usually) and cap or hold the other end so you’re creating suction into the hose.
- Create a seal around the vacuum hose and the washer drain hose end. Use duct tape or wrap a towel tightly so the vacuum gets good suction. Some shop-vacs have small nozzle attachments that fit; if so, use them.
- Switch vacuum to wet mode and run it for 20–60 seconds at a time while slowly moving/repositioning the vacuum adapter to draw lint out.
- Check the vac canister periodically wet & linty debris might collect and reduce suction. Empty as needed.
- Flush the hose after suctioning by running water through it to remove residual fibers.
- Reconnect and test.
Tips & warnings:
- Wear eye/hand protection — suctioning can fling particles and water.
- Be careful with older shop vacs that are not rated for wet pickup.

- ❤【LARGER CAPACITY】Stanley SL18116P Wet / Dry Vacuum has a larger capacity over 22 L, makes small clean-up jobs a breeze …
- ❤【VERSATILE & POWERFUL】Thanks to the 4 peak HP motor, this vac offers powerful enough suction needed to almost any clean…
- ❤【3 in 1 FUNCTION】With this versatile vac you can vacuum both wet liquid spills and dry debris, dust, saw, dirt or blow …
READ MORE: What is a PRV in Plumbing?
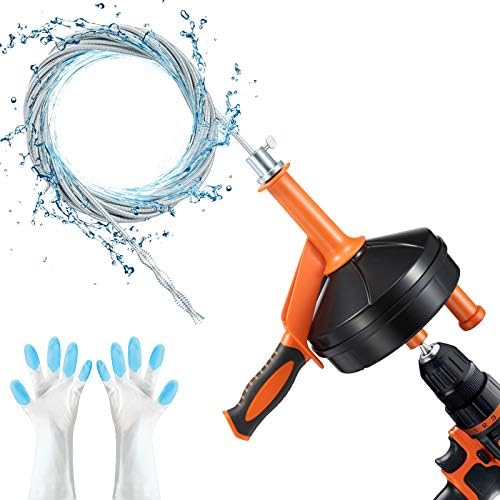
Method D — Small hand auger / plumber’s snake (for deeper, stubborn lint)
Time: 30–60 minutes
Difficulty: 3/5
Tools: Small hand auger (6–15 ft compact drum or handheld snake), gloves, towels, bucket.
Steps:
- Unplug washer and disconnect the hose as before.
- Feed the snake carefully into the hose from the standpipe end. Advance slowly until you feel resistance.
- Turn the drum/handle slowly to twist through the lint mass — but avoid aggressive force which might puncture a thin corrugated hose.
- Withdraw slowly, bringing lint with the cable. Clean the cable between passes if needed.
- Flush with water, reattach, and test
Tips & warnings:
- Use the smallest-diameter, flexible snake available for hoses; avoid motorized or heavy-duty cable in corrugated plastic hoses — those are for main lines, not small discharge hoses.
- If the snake meets metal clamps or sharp edges, stop and reposition to avoid cutting the hose.
Method E — Replace the hose
Time: 20–45 minutes (DIY)
Difficulty: 2/5
Tools: New corrugated discharge hose (6–9 ft), hose clamps, screwdriver/pliers, towels.
When to replace: hose is cracked, brittle, permanently kinked, repeatedly clogging despite cleaning, or shows punctures/tears.
Steps:
- Buy the correct replacement hose — corrugated universal discharge hoses are common and inexpensive. Measure distance to standpipe to choose length (6–9 ft common).
- Unplug the washer and position towels/bucket.
- Remove old hose, clean the connection elbow on the washer and the standpipe.
- Attach new hose to washer outlet and secure with clamp; route to the standpipe avoiding sharp bends or kinks. Attach and secure at standpipe.
- Test with a rinse/spin while watching for leaks.
Tips & warnings:
- Use stainless steel hose clamps for a reliable seal.
- If your installation requires a different style (rigid trap or special adapter), match the hose end or use a small adapter available at hardware stores.
READ MORE: Best Tankless (Non-condensing) Gas Water Heater Reviews & Comparison — 2026 buying guide
Remove Lint from Washing Machine Drain Hose: Comparison table
The following table provides a technical comparison of the primary methods discussed, allowing homeowners to select the best approach for their specific scenario.
| Method | Time Est. | Typical Cost (USD) | Difficulty | Effectiveness | Primary Risk |
| Manual Flush | 15–30 min | $0 (Gloves + Water) | 1/5 | Med (Surface Lint) | Low |
| Bottle Brush | 20–40 min | $8–$15 (Brush) | 2/5 | High (Internal Scum) | Low |
| Shop-Vac Suction | 30–45 min | $0–$18 (Rental) | 2/5 | Very High | Water Mess |
| Hand Snake | 30–60 min | $22–$35 (Auger) | 3/5 | High (Deep Clogs) | Hose Puncture |
| Replacement | 30–60 min | $16–$25 (Hose) | 2/5 | 100% | Improper Height |
| Professional | 1–3 hrs | $125–$450+ | 1/5 | Professional Grade | Financial Cost |
READ MORE: Why is my water bill so high but no visible leaks (Cause, Fix & Costs)
Clean Lint from Washing Machine Drain Hose: When to call a professional
There is a distinct point where DIY efforts reach their limit. In a 2026 economic survey of plumbing services, the “cost of failure” for a botched DIY job (e.g., a burst pipe or flooded basement) far outweighed the cost of a professional service call.
Professional Red Flags
- Evidence of a Main Line Clog: If water backs up into other fixtures (sinks, toilets) when the washer drains, the problem is in the home’s main sewer line, not the appliance hose.
- Standing Sewage: Fecal odors or solid waste backing up into the laundry area is a health emergency requiring professional snaking or hydro-jetting.
- Failed DIY Attempts: If the hose and the pump filter (the “coin trap”) have been cleared but the “OE” or “5C” error codes persist, the issue may be a mechanical failure of the drain pump or a faulty control board.
- Structural Water Damage: If you see “puffy” drywall, warped floorboards, or musty smells behind the machine, a professional is needed to assess the extent of the damage and prevent mold colonization.
What the Professional Provides
A licensed plumber utilizes diagnostic technology that is generally inaccessible to homeowners.
- Sewer Camera Inspection: Using a fiber-optic scope to visually confirm the nature of the clog (e.g., tree roots, collapsed pipes, or massive lint mats). Average cost in 2026: $150 – $500.
- Hydro-Jetting: Utilizing high-pressure water (up to 4,000 PSI) to scrub the internal walls of the main sewer line. This is the only way to completely remove years of lint and grease buildup. Average cost: $350 – $900.
- Motorized Augers: Heavy-duty snakes that can clear clogs deep within the plumbing stack that a hand auger cannot reach.
Washer Drain Maintenance & Habit Changes
Keeping lint out of the drain hose is mostly about prevention and routine checks.
Do these regularly (every 6–12 months):
- Check the drain hose visually for kinks, cracks, or lint buildup at the ends. Replace if brittle.
- Clean lint traps and filters inside the washer if your model has a pump filter or lint trap (consult your owner’s manual for location and instructions).
- Use garment bags for small, lint-prone items (fleece, microfiber, small towels) to reduce fiber release.
- Run a maintenance wash cycle monthly: run an empty hot-water wash with a washing-machine-safe cleaner or a cup of white vinegar to reduce residue and odors.
- Keep the dryer lint trap empty and vent clear; dryer lint that accumulates around laundry areas increases the total lint in the room and can find its way into washer piping during transfers or when using a shared drain.
- Don’t overload the washer. Overloaded loads create more friction and shedding, and may reduce rinse efficiency (so more lint remains).
- Inspect the standpipe and trap where the drain hose sits — lint can accumulate in the standpipe top or in the U-bend trap and should be cleaned if accessible.
Small habits that help:
- Shake towels/outdoor clothes before washing to dislodge loose fibers.
- Use a lint-catcher attachment on the washer discharge if you frequently wash heavy-shedding loads. These inexpensive inline traps capture lint and are cleaned periodically.
- Run a rinse/spin after heavy fabric loads (towels, rugs) to help flush freer fibers.
READ MORE: How to Get Air Out of Plumbing Lines
How to Clean Lint From Your Washing Machine Drain Hose: Pros & cons
| Approach | Pros | Cons |
| DIY Cleaning | Low cost ($0–$35); immediate resolution; empowers homeowner. | Risk of hose damage; potential for water mess; may miss deeper pipe clogs. |
| Professional Service | Diagnostic certainty; guaranteed results; handles complex main line issues. | High cost ($125–$450+); scheduling delays; possible diagnostic fees. |
| Hose Replacement | 100% effective for hose clogs; prevents leaks; relatively inexpensive ($16). | Requires manual labor; risks improper installation height (siphoning). |
Sample troubleshooting checklist
Printable 6-8 step checklist to hand a technician
- Symptom(s): (circle) Slow drain / Gurgling / Pooling water / Sewage smell / Washer error code
- How long it’s been happening: ______ days / weeks / months
- Recent laundry types: (circle) Towels / Fleece / Blankets / Delicates / Heavy shedding loads
- DIY steps already tried: (check) Manual removal / Brush / Shop-vac suction / Snake / Replaced hose
- Visible findings: (note) Hose kinked / Hose cracked / Lint balls removed / Sewage odor / Other ______
- Are multiple fixtures affected? (Y/N) If yes, which: ______
- Preferred contact number: ______
- Permission to access basement/utility area: (Y/N)
Extra phone tip: Ask whether the plumber’s visit includes a diagnostic fee and whether the quoted price includes camera inspection or hydro-jetting if needed.
Conclusion
Lint clogging a washing machine drain hose is common, usually solvable with safe DIY steps, and inexpensive to prevent. Start with manual removal and a long flexible brush, then try shop-vac suction or a small snake for deeper clogs. Replace the hose if it’s damaged or repeatedly clogging. Keep up a six- to twelve-month inspection and use simple habits (garment bags, empty lint traps, routine maintenance cycles) to reduce lint buildup. If you detect sewage, multiple fixtures backing up, structural water, or you can’t restore proper drainage after safe DIY attempts, call a licensed plumber — professional equipment, camera inspection, and expert diagnosis will protect your home and health.
5 FAQs
How do I clean lint from my washing machine drain hose?
Disconnect the hose (after unplugging & shutting off water), use a long flexible brush or shop-vac to remove lint, flush with water, and reattach. If the clog persists or water smells like sewage, call a plumber.
Can lint clog the washing machine drain hose?
Yes — over time lint, fibers and debris can accumulate in the corrugated hose and cause slow drains or backups. Regular inspection and cleaning prevent most problems.
How often should I clean the washing machine drain hose?
Inspect the hose every 6–12 months; clean it if you notice slow draining, odors, or after heavy use of lint-producing loads (like towels and blankets).
Are chemical drain cleaners safe for a washing machine drain hose?
No — chemical drain cleaners can damage rubber/plastic hoses and are often ineffective against fibrous lint. Use mechanical methods (brush, vacuum, snake) or call a pro.
How much does it cost to hire a plumber to clear a washer drain?
For a standard snaking or unclogging, expect roughly $125–$450 depending on your region, complexity and whether a camera inspection or repair is required. For major sewer line work prices are higher.

