A leak behind drywall is one of those home problems that quietly turns into a big and expensive headache: buckled paint, soft drywall, mold, ruined insulation, tripped breakers and surprise insurance claims. This guide shows U.S. homeowners how to find a hidden water leak in wall safely and efficiently whether you want to try low-cost detective work yourself or know exactly when to call a licensed pro. You’ll get early warning signs, a safety-first checklist, DIY detection methods that actually work, realistic cost ranges for repairs, and a comparison table of the best tools and services (with current prices and retailers). I’ll also tell you when a problem is beyond DIY and what to expect from a professional leak-detection report so you don’t get upsold. Use this as a practical, step-by-step playbook think “helpful neighbor who’s also a licensed plumber.” Lest deep dive into “How to Find a Hidden Water Leak in Your Wall: Step by Step DIY Guide”
Early Signs of a Hidden Wall Leak
Hidden leaks rarely announce themselves loudly. Look for these early, common clues:
- Stains or discoloration on paint or wallpaper brown or yellow rings usually mean water has wicked through the drywall.
- Peeling paint, bubbling or wrinkled wallpaper — trapped moisture weakens adhesives and finishes.
- Musty or earthy smell even when the room looks dry trapped moisture + organic material = early mold and odor. (EPA: dry within 24–48 hours to prevent mold growth).
- Soft, spongy drywall when you press the wall or tap it a classic sign the gypsum has absorbed water and lost rigidity.
- Higher-than-normal water bills with no use change slow leaks add up.
- Higher indoor humidity or localized damp spots on the wall surface, especially near plumbing stacks, bathrooms, kitchens, HVAC lines, or exterior walls.
- Mold spots (black, green, or white speckles) or visible mycelium growth on the surface small mold patches may indicate a persistent hidden moisture source. The CDC/EPA recommend prompt attention and limiting personal cleanup if the patch is larger than about 10 sq ft.
- Electrical oddities — GFCI trips, flickering lights, or outlets that feel warm near a damp wall are serious red flags (water near wiring is dangerous).
If you see any of these, move to the safety steps below before poking holes or running tests.
READ MORE: What to Do When a Water Heater Leaks
Your Home’s Silent Guardian: 24/7 monitoring with SMS, email, and app alerts. [Get Peace of Mind]–Check Below-

Safety first: Steps to take immediately for hidden Leak
If you suspect a hidden leak, prioritize safety and documentation.
- Shut off water at the appropriate valve. If it’s a fixture (toilet, sink), turn off the fixture valve. For unknown or building-wide leaks, shut the main shutoff to stop flow and damage.
- Turn off electricity to the affected area If water is near outlets, switches, or fixtures water + electricity = electrocution risk. If uncertain, shut off the circuit at the breaker panel and call an electrician.
- Contain the water: place buckets, towels, and waterproof tarps to protect floors and belongings. Use a wet/dry vacuum for pooling (if safe).
- Ventilate and dry: open windows, run fans and dehumidifiers to reduce mold risk (dry within 24–48 hours if possible). EPA/CDC guidance emphasizes quick drying to prevent mold.
- Document everything with timestamped photos and notes for insurance ceiling/wall stains, serial numbers of damaged items, and measurements of the area.
- Don’t climb on wet plaster or drywall — it can crumble. Wear gloves, eye protection, and a respirator (N95) when mold is visible or suspected.
Quick checklist:
- Water shutoff (fixture/main)
- Power off to area (if water near circuits)
- Contain/collect water
- Photograph & note times
- Start drying (fans/dehumidifier)
- If mold visible >10 sq ft or electrical risk — call pros
READ MORE: Water Leak Repair Near Me
How to Find a Hidden Water Leak in Your Wall: Step by Step DIY Guide
Below are practical detection methods ordered from lowest- to higher-cost, plus what they reliably find and their limits. The goal is to teach how to find a hidden water leak in wall without needless tearing.
1. Visual + smell inspection (free)
What it detects: obvious staining, dripping, odor.
How to use: inspect walls, ceiling, closets, baseboards, and adjacent rooms; smell for mustiness close to suspect walls.
Good when: leaks are active or the moisture has travelled to visible surfaces.
Limits: won’t locate the exact pipe or small slow leaks behind insulation.
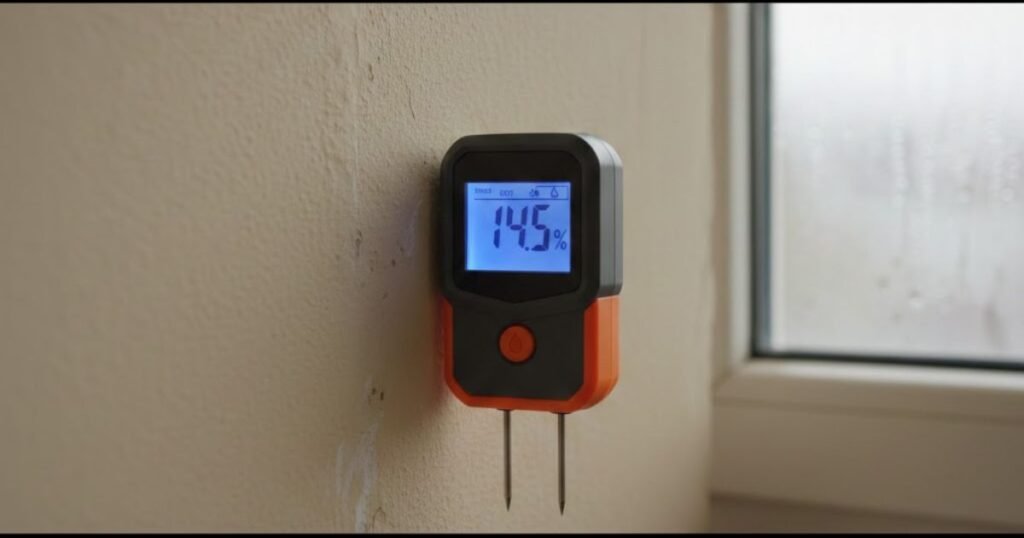
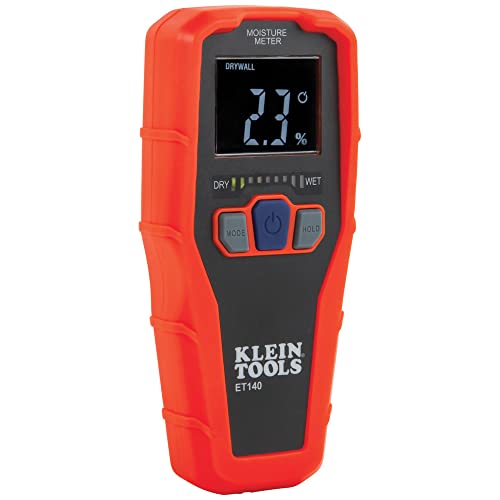
2. Moisture meters (pinless or pin-type) — inexpensive and fast
What it detects: elevated moisture behind or within wall surfaces. Pinless units read moisture up to a set depth (typical: up to ¾” / 19 mm). Example consumer unit: Klein Tools pinless moisture meter — $59.99, — checked Feb 12, 2026.
How to use: glide the meter across the wall in a grid pattern; compare to known-dry baseline (e.g., another wall). Mark wet spots.
Pros: non-destructive, quick scan.
Cons: depth-limited; can return false positives on wet plaster or exterior moisture.
Know What’s Behind the Wall: Get professional-level moisture detection in the palm of your hand. Check Below-
3. Infrared / thermal cameras — visualize temperature differences
What it detects: temperature differences caused by evaporative cooling (wet areas appear cooler). Pro models see through insulation effects better. Example consumer/small-pro camera: Topdon Thermal Imaging Camera — $219.36, Amazon — checked Feb 12, 2026.
How to use: scan the suspect wall, comparing to adjacent surfaces; perform scans at times of steady indoor temperature (don’t scan right after heating/cooling cycles).
Pros: shows likely wet regions without cutting. Great for large areas.
Cons: not a direct moisture reading — thermal patterns can be misleading (cold pipes, HVAC drafts, exterior shading). For best results pair with moisture meter.
Stop Squinting, Start Seeing: Experience crystal-clear 240 x 240 resolution in a pocket-sized powerhouse. Check Below-

4. Borescopes / inspection cameras — see inside cavities
What it detects: visual confirmation of leaks, corrosion, mold, or active drips inside stud bays. Example: DEPSTECH industrial borescope models commonly $50–$129 on Amazon (example price seen ~ $69.98 to $129.99).
How to use: drill a ¾” access hole behind baseboard or near an outlet, insert the flexible probe and look for drips or wet insulation. Patch hole after.
Pros: direct visual evidence, inexpensive for the certainty it provides.
Cons: small hole required; probe length and camera diameter limit reach.
Double the Lenses, Half the Hassle: No mirrors required. See every angle of your engine or pipes in 1080P. Check Below-

5. Acoustic amplifiers / leak listening devices
What it detects: sound of flowing/leaking water within cavities or pipe clatter. Small handheld units or smartphone-based apps exist; professional acoustic locators are expensive. Consumer acoustic devices are cheaper but less precise. A low-cost acoustic unit example listing: Wall pipe leak listen detector — $36.95, — checked Feb 12, 2026 .
How to use: quiet the house, place sensor on wall or floor, have someone run water to create a reference sound, then listen for amplified leak noise while tracing pipes.
Pros: can pinpoint active leaks without drilling.
Cons: ineffective for very slow leaks, complex background noise, or well-insulated walls.
Hear the Drip Before the Disaster: Pinpoint hidden pipe leaks through walls and floors with high-sensitivity acoustic technology. Check Below-

6. Pressure testing + isolation (advanced DIY or pro step)
What it detects: pressurized leaks in specific lines. You isolate a section, pressurize with water or air (with a gauge), and watch for pressure loss.
How to use: cap fixtures, install a pressure gauge, watch for drops over time. If pressure falls, the leak is within the isolated section.
Pros: precise for plumbing lines; helps narrow area.
Cons: risky with air-pressure testing (can damage fixtures), code-sensitive for apartment buildings — consider hiring a pro.
Check this Beast Digital Tire Pressure Gauge–

7. Tracer dye, dye tablets or food coloring (localized)
What it detects: confirms water path useful for toilets, fixtures, or near clear drains.
How to use: place dye in tank or suspect pipe and watch for appearance at suspected leak exit.
Pros: cheap and safe.
Cons: limited to visible flows; won’t find hidden capillary wetting inside walls.
How to combine methods
A smart sequence: visual → moisture meter scan → thermal scan → borescope or acoustic test → pressure test if needed. Use moisture and thermal together to reduce false positives. If you confirm wetness but can’t locate the source, stop and call a professional — especially near electrical circuits or mold.
| DIY Detection Tool | Method of Detection | Cost Range (USD) | Best Use Case |
| Water Meter | Volume tracking / Low-flow dial | $0.00 (Built-in) | Confirming if an active leak exists. |
| Pinless Moisture Meter | Electromagnetic capacitance | $45 – $60 | Mapping large areas of drywall non-invasively. |
| Thermal Camera | Temperature differential ($\Delta T$) | $200 – $400 | Identifying cold spots from evaporation. |
| Borescope Camera | Visual inspection via probe | $40 – $150 | Seeing inside the wall through a tiny hole. |
| Acoustic Amplifier | Sound frequency amplification | $20 – $1,800 | Pinpointing pressurized hissing sounds. |
| Dye Test Kit | Visual color tracking | $5 – $15 | Finding leaks in toilets or drain systems. |
READ MORE: Slab Leak Detection Cost
When to call a professional for Fixing leakage
Call a licensed plumber or certified leak-detection service when:
- You find active leaking you cannot isolate, or water continues after the main is off.
- Water is near electrical circuits or breaker panels.
- You detect structural damage (sagging ceilings, floor deflection, stud rot).
- You see mold growth >10 sq ft or recurring mold despite drying. CDC/EPA advise professional remediation for larger infestations.
- You live in a multi-unit building where leaks can affect others.
- Your DIY tests (pressure or tracer) aren’t conclusive.
Questions to ask the contractor before hiring: license number and proof of insurance; detection method they’ll use (acoustic, thermal, tracer gas); will they provide a written diagnostic report and location map; what is the diagnostic fee and is it credited toward repair; references and expected timeline.
What to expect in a professional diagnostic report:

A reputable professional will not simply “find the leak” and leave. They should provide a formal report that serves as a roadmap for the repair and insurance process. This report should include:
- The Findings: The exact location of the leak, the material of the failing pipe, and the cause of the failure (e.g., corrosion, high water pressure, or physical damage).
- Moisture Mapping Data: A visual representation of the affected area, including moisture percentages and thermal images.
- Repair Recommendations: A detailed estimate for the plumbing repair and a separate estimate for the structural restoration (e.g., drywall replacement, mold remediation).
Hidden Leak Repair Cost ranges
The following ballpark estimates reflect national averages for residential repairs in the United States as of early 2026. Note that regional labor rates can cause these figures to fluctuate by 20-40%.
| Repair Type | Description | Estimated Cost Range (USD) | Source |
| Simple Plumbing Fix | Repairing a leaking joint or pipe section. | $150 – $350 | Personal Experience |
| Complex Pipe Repair | Replacing a section of pipe behind a wall. | $350 – $2,000 | Personal Experience |
| Burst Pipe Restoration | Repairing pipe + associated water damage. | $1,000 – $4,000 | Personal Experience |
| Drywall Patch/Repair | Fixing water-damaged drywall per wall. | $300 – $850 | Personal Experience |
| Mold Remediation | Professional removal of mold from a room. | $1,200 – $3,800 | Personal Experience |
| Whole-House Mold | Extensive remediation for severe leaks. | $10,000 – $30,000 | Personal Experience |
| Ceiling Restoration | Replacing water-damaged ceiling sections. | $450 – $1,600 | Personal Experience |
READ MORE: Fix Leaky Bathroom Faucet
Regional Variation and Market Dynamics
Regional economic factors play a significant role in the total cost of a water leak. For instance, in areas like Boise, ID, the rapid growth of the housing market has led to high demand for contractors, resulting in an average restoration cost of $10,387—significantly higher than the national average. Conversely, in more established markets like Denver, CO, the average cost is approximately $2,732.
Climate also impacts these costs. In Atlanta, GA, the high humidity makes mold remediation a near-certain requirement for any leak, driving the average remediation cost to $2,775. In Austin, TX, where warm and muggy weather is common, the presence of mold can decrease a home’s value by 20% to 37% if not remediated by a professional.
Comparative Analysis of — Leak Detection Tools
Selecting the correct tool for a specific diagnostic challenge is critical for accuracy and cost-effectiveness. The following table compares five common leak detection tools and services.
| Product / Service | Type / Method | Detection range / accuracy | Price (USD) — retailer + date checked | Pros | Cons |
| Seek Thermal CompactPRO | Thermal camera (smartphone) | Detects surface temp differences; good for locating cooler wet zones on walls; not a direct moisture reading | $319.36 — Amazon — checked Feb 12, 2026. | Portable, visual, easy to use | Thermal patterns are indirect; needs complementary moisture meter |
| Klein Tools ET140 | Pinless moisture meter | Non-destructive readings up to ¾” (19 mm) into drywall/wood | $58.99 — Home Depot — checked Feb 12, 2026. | Cheap, fast scans, no holes needed | Limited depth; not quantitative like lab meters |
| DEPSTECH Dual-Lens Borescope | Visual inspection camera / borescope | Visual access inside stud bays; camera diameters ~5–7 mm, lengths 5–16 ft depending model | ~$59.98–$129.99 — Amazon listings — checked Feb 12, 2026. | Direct visual confirmation; inexpensive | Requires small access hole; probe length/diameter limits |
| FCS Dxmic® Pro (or similar) | Acoustic / listening device | Detects leak noise in pipes/walls; effectiveness depends on noise level & insulation | $36.95 — USA Blue Book — checked Feb 12, 2026. | Low cost for basic listening; good for active leaks | Consumer units less sensitive than pro acoustic locators |
| Professional Leak Detection Service | Acoustic + thermal + tracer gas / camera | Can locate leaks under slabs and behind walls to within inches; methods vary | Diagnostic fee / range: $80–$1,600+ depending on method; tracer/infrared options often $150–$1,000 — Checkatrade & HomeAdvisor averages — checked Feb 12, 2026. | Most accurate for tricky or slab leaks; non-destructive options | Higher cost; price depends on method and region |
READ MORE: How to Indicate and Fix Water Pipe Leaking Outside House
Preventive tips & maintenance of hidden leak
Simple checks cut risk of hidden leaks later:
- Inspect water-using areas seasonally (under sinks, around tubs, toilets, water heaters, behind washing machines).
- Watch your water bill monthly an unexplained rise often precedes visible damage.
- Insulate exposed pipes and exterior walls in cold climates to prevent freeze-thaw bursts.
- Install small monitoring devices (smart water sensors) near vulnerable spots they alert you to humidity or drip conditions early.
- Keep attic and crawlspace vents clear and maintain proper ventilation to stop condensation.
- Regular maintenance: flush water heater annually, check appliance hoses (replace rubber hoses every 5–7 years), and get periodic plumbing inspections if your home is older.
Prevention + early detection saves structure and prevents mold which public health agencies strongly warn against leaving untreated.
How can I find a hidden leak behind drywall without tearing it down?
Use a pinless moisture meter to scan suspect areas, follow up with an infrared thermal scan to identify cool spots, then confirm visually with a borescope through a small access hole. If uncertain or near electricals, call a pro.
Will a thermal camera show water inside a wall?
A thermal camera shows temperature differences that often correlate with wet areas (wet spots cool by evaporation). It’s indirect — pair thermal imaging with a moisture meter or borescope for confirmation.
What is the cheapest reliable tool to detect a hidden wall leak?
A pinless moisture meter (consumer models around $40–$60) gives a low-cost, non-destructive first pass. Example: Klein Tools ET140 at Home Depot.
When should I call a professional leak detection service?
Call a pro if you can’t locate an active leak, if water is close to wiring, if mold covers >10 sq ft, or if the leak affects multiple units — pro methods locate leaks with minimal wall damage.
How much does it cost to fix a leak in a wall?
Small repairs (patch + local pipe fix) may run $150–$900; more complex repairs and mold remediation can push $1,000–$6,000+. National averages vary by scope—get written estimates.
Conclusion
Finding and fixing a hidden leak in wall early saves thousands — if you suspect a leak, stop the water, document damage, try the low-cost tests above, and call a licensed leak-detection pro if uncertain.

