Tankless water heaters, especially those from Rheem, have become a household favorite because of their efficiency, space-saving creation, and endless supply of hot water. Unlike traditional water heaters with bulky tanks, these modern devices heat water on demand, ensuring you never run out during a shower or while doing laundry. However, many homeowners eventually face one common question: How do I increase the heat setting on my Rheem tankless water heater?
This question often arises for several reasons. Maybe your shower doesn’t feel as warm as it used to. Perhaps winter temperatures make your water feel cooler even though the unit is functioning correctly. Or, in some cases, you simply need higher heat settings for sanitizing dishes or handling laundry. Regardless of the reason, learning how to adjust your water heater properly is essential for both comfort and safety.
In this guide, we’ll break down everything you need to know, from understanding your Rheem system to making adjustments step by step. We’ll also cover safety precautions, troubleshooting tips, and maintenance practices to keep your heater working at its best. By the end, you’ll not only know how to increase your heat settings but also how to do so responsibly without damaging your unit or risking burns. Lets deep dive into “How to Increase Heat Setting on Tankless Rheem Water Heater”

Understanding Your Rheem Tankless Water Heater
Before you attempt to change any settings, it’s important to understand how your Rheem tankless water heater is designed. These units are built with user convenience in mind, but they vary slightly depending on the model and year of manufacture.
Most modern Rheem tankless water heaters come with a digital control panel or a remote thermostat that allows you to adjust the temperature with only a few button press. The display reflects the current temperature setting, and you can increase or reduce it within the recommended range. In the new model, the factory default is often set on 120 ° F (49 ° C), which is considered safe for most homes.
Older models, however, may not have digital displays. Instead, they use manual dip switches inside the unit to adjust the maximum water temperature. These require a bit more effort and caution, as they involve opening the unit’s panel and adjusting physical controls.
Another thing to note is that some Rheem tankless models limit the maximum temperature by default. For example, many units are capped at 120°F unless you activate a higher setting (up to 140°F) via the control system or dip switches. This limitation is intentional, as higher temperatures can increase the risk of scalding.
Knowing whether your unit has digital controls or manual dip switches is the first step to making adjustments. Check your owner’s manual, or look at the front panel of your unit if you see a digital screen with up and down arrows, you likely have the easier-to-use digital version.
READ MORE: How Does a Gas Water Heater Work?
Safety Precautions Before Adjusting the Temperature
Before rushing to increase your water heater’s temperature, let’s talk safety. Adjusting heat settings isn’t dangerous when done correctly, but if you push the limits too far, you could create risks for both your household and the water heater itself.
1. Scalding Risks
Hot water above 120°F can cause burns in just a few seconds. For example:
- At 120°F, it takes around 5 minutes of exposure to cause serious burns.
- At 130°F, burns can occur in about 30 seconds.
- At 140°F, burns can happen in less than 5 seconds.
This is why most manufacturers recommend keeping the setting at 120°F, especially if children or elderly people live in the home.
2. Safe Temperature Range
For most homes, 120°F to 125°F is ideal. It’s warm enough for showers, dishwashing, and laundry while still being safe. However, if you live in a cold climate or need hotter water for cleaning and sanitation, you might consider raising it up to 130°F–140°F. Just be cautious and consider installing anti-scald devices on faucets or showerheads.
3. Tools You May Need
If your unit has a digital control panel, you won’t need any tools just your hands. But if you have an older model with dip switches, you might need:
- A screwdriver (to open the access panel)
- Your owner’s manual (to identify the right switches)
- Safety gloves (to avoid accidental burns or shocks)
4. Warranty and Service Considerations
In some cases, tampering with factory settings without following instructions could affect your warranty. Always check your user manual before making changes, and when in doubt, call a professional technician for assistance.

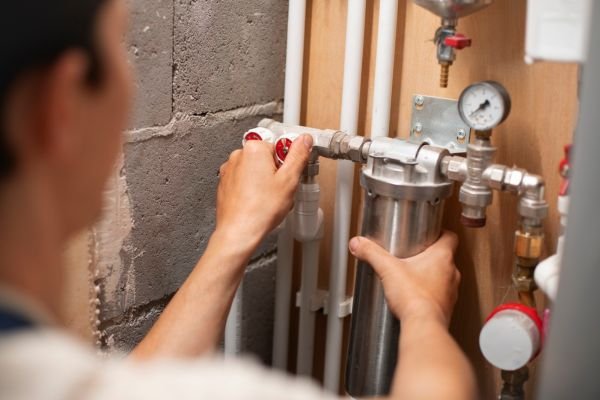
Locating the Control Panel
Once you’ve considered safety, the next step is to locate the control panel on your Rheem tankless water heater. This is where all the magic happens.
Indoor Units
On most indoor Rheem tankless models, the control panel is either built directly into the front of the unit or attached as a wall-mounted remote. The remote is often installed in convenient spots such as near the kitchen or bathroom so you can adjust the temperature without walking to the water heater.
Outdoor Units
For outdoor models, the control panel is usually integrated into the heater itself. You may need to open a small access panel to reach the controls. Since outdoor units are exposed to the elements, the buttons may be slightly more rugged, but the functionality is the same.
Keypad and Display Indicators
Most digital panels have:
- Up and down arrow buttons for adjusting temperature
- Power button to turn the unit on or off
- Digital screen showing the current temperature setting
- Error code display if something goes wrong
If you don’t see a digital display, that likely means your model uses manual dip switches instead of a keypad.
READ MORE: What to Do if Water Heater is Leaking from Bottom
Using the Digital Control Panel
If your Rheem tankless water heater has a digital control panel, adjusting the temperature is simple. Here’s a step-by-step guide:
- Turn on the Unit – Make sure your water heater is powered on and functioning. The display should be lit up.
- Locate the Temperature Buttons – Usually, you’ll see an up arrow (▲) and a down arrow (▼).
- Check the Current Setting – The screen will show the default setting, often 120°F.
- Increase the Temperature – Press the up arrow to raise the temperature in small increments (usually 1°F at a time).
- Confirm the Change – Many models automatically save the new setting after a few seconds. On some units, you may need to press a confirm or “set” button.
- Test the Hot Water – After adjusting, run a faucet and check the temperature. Use caution and test with your hand before stepping into the shower.
What the Display Symbols Mean
- A steady number = current temperature setting
- Flashing number = temporary change in progress
- Error codes (like “11” or “29”) = issues with ignition, ventilation, or sensors
The digital control method is by far the easiest way to increase your water heater’s heat setting. If you have this feature, you’re in luck it takes less than a minute.

Manual Temperature Adjustment (Older Models)
If you own an older Rheem tankless water heater, you may not have the luxury of a digital control panel. Instead, these units rely on manual dip switches inside the heater to control maximum temperature limits. This process requires a little more patience and care, but it’s still manageable for most homeowners.
Step 1: Turn Off the Power Supply
Before touching anything inside the water heater, always turn off the power to the unit. If your Rheem heater is electric, switch it off at the breaker. If it’s gas-powered, turn off both the gas and the power switch. This step make sure your safety while working on the internal controls.
Step 2: Locate the Access Panel
Use a screwdriver to change the screws securing the access cover. Inside, you’ll see a small set of dip switches tiny switches that look like a row of miniature toggles. These are what control the maximum water temperature.
Step 3: Identify the Temperature Switches
Consult your user manual to find specific switch configurations for your model. usually:
- The default position holds the maximum temperature at 120 ° F.
- Alternative position allows a higher max temperature, often 140°F.
The switches are usually labeled, but the manual provides the exact guidance you need to avoid mistakes.
Step 4: Adjust the Dip Switches
Flip the appropriate switch on “on” or “enabled” position that corresponds to high temperature settings. Be gentle, because these switches are delicate.
Step 5: Reassemble and Restore Power
Replace the access panel, secure it with screws, and then restore power to the unit. Once powered, run hot water from a faucet and test the new temperature.

READ MORE: Does a Plumber Replace a Water Heater?
Safety Reminder
Manual adjustments bypass the convenient step-by-step digital control, so double-check that you’ve followed the manual correctly. Never experiment by flipping random switches you could unintentionally alter other functions, leading to performance issues or safety risks.
Setting the Desired Temperature
Once you access the control room (digital or manual), the next big question is that at which temperature should you set your rhyme water heater? Choosing the right temperature is about comfort, safety and balanced the efficiency.
Recommended Settings for Everyday Use
Most experts agree that 120°F is the sweet spot for most households. At this level:
- The water is hot enough for showers, dishwashing, and laundry.
- The risk of burns and scalds is significantly reduced.
- Your unit runs efficiently, saving you money on energy bills.
Adjusting for Different Needs
However, some situations call for higher settings:
- Colder Climates: In winter, incoming water can be much colder, meaning your unit has to work harder. Raising the setting to 125°F–130°F ensures your showers stay warm.
- Sanitizing Dishes or Laundry: If you want to sanitize, you may need 130°F–140°F to kill bacteria effectively. Many dishwashers also perform better with hotter water.
- Large Households: Families with multiple people using hot water simultaneously may benefit from slightly higher settings to ensure consistent warmth across fixtures.
Avoiding Scalding Risks
If you do increase your setting beyond 120°F, it’s wise to install anti-scald devices on your faucets and showers. These small attachments regulate water flow and prevent dangerously hot water from reaching taps directly.
When You Need Higher Heat Settings
Raising your water heater’s temperature isn’t just about preference it can also be a necessity. Let’s look at some common scenarios where increasing your heat settings makes sense.
1. Cold Climate Regions
If you live in a hard winter area, you probably noticed your water does not feel warm even with a set heater on 120 ° F. This is because the coming ground water is cold, it makes it difficult for the heater to increase it to the desired temperature. By increasing your setting to 125°F or higher, you compensate for that difference and enjoy consistently hot showers.
2. Large Households
In busy households where multiple showers, dishwashers, and laundry machines might be running at once, hot water demand skyrockets. Even with a tankless system, the heater can only raise water to a certain degree at a given flow rate. Increasing maximum heat settings ensures that the water remains warm when divided between several outlets.
3. Sanitization Purposes
Sometimes hot water is a requirement, not a luxury. For example:
- Hospitals, nursing homes, or decay centers often require high water temperature for hygiene.
- Some dishwashing machines depend on high heat to disinfect the utensils properly.
- The laundry cycle designed for hygiene can work better with water above 130 ° F.
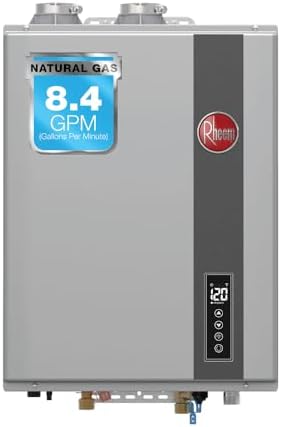
- Flow rate of 0.4 – 8.4 GPM
- Available temperature settings range from 100 to 140F (default setting of 120F)
- Includes electric ignition
READ MORE: How to Replace an Electric Hot Water Heater
Troubleshooting Common Issues
Sometimes, adjusting the heat settings does not work expected. Maybe your Rheem tankless water heater does not answer, or the water still feels lukewarm. Let’s go to general issues and how to fix them.
Problem 1: Temperature Won’t Increase
If you’ve adjusted the control panel but the water still won’t get hotter, possible causes include:
- Dip switches not set properly (on older models).
- Error in the digital controller requiring a reset.
- Low gas pressure preventing full heating capacity.
- Cold incoming water supply overwhelming the system in winter.
Problem 2: Error Codes Displayed
Modern Rheem units often show error codes on the digital display. For example:
- Error Code 11 – Ignition failure.
- Error Code 29 – Insufficient fan speed or vent blockage.
- Error Code 76 – Remote control communication issue.
If an error code appears, check your manual for the exact meaning. Many of these can be fixed with a simple reset, but some may require professional service.
Problem 3: Fluctuating Water Temperatures
If your water temperature rises and falls unpredictably:
- Make sure your unit isn’t undersized for your home’s demand.
- Clean the inlet water filter, as blockages can reduce heating efficiency.
- Ensure your flow rate isn’t too high—tankless heaters struggle if too many fixtures run at once.
Problem 4: Remote Control Not Working
For units with wall-mounted remote, check the wiring connection. If everything looks alright, try to change the remote or use the control over the unit.

- ELECTRICAL REQUIREMENTS: 1 x 30 AMP Double Pole Breaker Required. Product installation hard wired to 120 volts requiring…
- SAVES SPACE: Ideal for low flow point-of-use applications, such as in a bathroom, office breakroom, wet bar, or garage. …
- EASILY ADJUSTABLE: Thermostatic temperature controls in 1-degree increments ranging from 80 to 140 degrees Fahrenheit fo…
Maintenance Tips for Optimal Performance
Adjusting the temperature is one thing, but it is equally important to keep your Rheem tankless water heater in the top position. Regular maintenance ensures that your unit moves efficiently, provides frequent warm water, and lasts for many years.
1. Regular Flushing and Descaling
Over time, minerals such as calcium and lime are made inside the heat exchanger, which reduces efficiency. To stop it:
- Flush your heater every 6–12 months with a descaling solution.
- If you live in an area with hard water, consider installing a water softener to lower buildup.
2. Clean the Water Filter
Tankless units contain small inlet filters that can be filled with sediment. Cleaning these filters every few months ensures appropriate water flow and heating performance.
3. Check for Leaks
Inspect the pipes, connections, and unit itself regularly for signs of leaks. Even small leaks can affect performance and increase energy costs.
4. Inspect the Venting System
Gas-powered Rheem heaters rely on proper venting for combustion. Make sure vents are free from blockages and corrosion to avoid dangerous gas buildup.
5. Schedule Professional Inspections
Even if you handle basic maintenance, a licensed technician is intelligent to inspect your unit annually. They can present issues before converting into expensive repairs.
READ MORE: How Long for Hot Water Heater to Refill?
When to Call a Professional
While adjusting the heat setting on your Rheem tankless water heater is usually a simple DIY task, there are times when it’s better to leave it to the experts. Knowing when to call a professional can save you time, money, and prevent costly damage to your system.
1. Persistent Temperature Problems
If you have adjusted your heater several times, but the water is still not hot enough, the problem cannot be with settings. Instead, it can be caused by a defective thermostat, a closed heat exchanger, or gas supply problems. These are not quick reforms and require professional knowledge.
2. Frequent Error Codes
Error codes that reappear after resets often point to deeper problems. For example:
- Code 11 (ignition failure) could signal a gas valve issue.
- Code 29 (venting issue) might mean your flue system is blocked.
- Code 76 (remote communication failure) could suggest a wiring or controller problem.
If you’re not trained to diagnose these, a certified technician is the safest bet.
3. Leaks or Strange Noises
Hissing, sking, or gurgling noise often means mineral buildups or pressure issues. On the other hand, water leaks, internal corrosion or defective gasket may indicate. Both require professional inspection before deteriorating.
4. Installation Errors
If your Rheem unit was installed incorrectly, you may notice inconsistent water temperatures or constant shutdowns. Professionals can recheck gas lines, venting, and water connections to ensure everything is compliant and safe.
5. Warranty Considerations
If your heater is still subject to warranty, tampering with internal parts can zero the coverage. A professional service ensures call adjustment and repair is officially documented, which retains your warranty.
Extending the Lifespan of Your Rheem Water Heater
Rheem tankless water heaters are made to last last, often providing reliable service for 15–20 years when maintained properly. But how you use and care for your heater plays a big role in its long life.
1. Perform Regular Maintenance
As mentioned earlier, flushing, dish and cleaning filters are necessary. By overwork the heat exchanger, ignoring these steps, reduces the life of your heater.
2. Monitor Water Hardness
Hard water is a silent killer of tankless heaters. Minerals are deposited and stops the system. Installing a water softner or scale reduction filter can dramatically expand the life of your unit.
3. Avoid Overworking the Unit
The tankless heater has a maximum flow rate. If your domestic demand is higher than this limit, the unit will struggle, wear down fast, and possibly break prematurely. Installing several units or a large capacity system can be a clever long -term solution.
4. Adjust Temperature Wisely
By keeping your unit at the highest temperature continuously, it wears rapidly and energy waste it. Instead, raise the temperature only if necessary. For daily use, 120 ° F is ideal for both efficiency and durability.
5. Annual Professional Servicing
Even if you are working, the annual inspection by a rheem-certified technician ensures that your system is running safely and efficiently. They can see hidden problems that you can miss, prevent expensive breakdown.
READ MORE: How Many Watts Does a Water Heater Use?
Benefits of Optimizing Heat Settings
Why bother to fix the heat settings of your Rheem water heater? Because doing this provides many benefits that go beyond the hotter shower.
1. Improved Comfort
The most obvious benefit is consistent hot water at the exact temperature you prefer. Whether you’re washing dishes or enjoying a relaxing bath, you won’t have to worry about lukewarm water ruining the experience.
2. Better Energy Efficiency
Surprisingly, setting your heater too high doesn’t always give you more usable hot water—it can actually waste energy. By optimizing the settings, you ensure the heater only works as hard as needed, which lowers utility bills.
3. Extended Appliance Lifespan
Running your heater at unnecessarily high temperatures stresses its components. Balable settings reduce and reduce tears, which gives a long life to your unit.
4. Safety Assurance
By carefully managing the settings, you reduce the risk of casual scaling. This is especially important for families with young children or elderly members who are more sensitive to high water temperature.
5. Environmental Benefits
Only by using heat you actually need to reduce energy consumption. This means that if you are using gas and low electricity, low greenhouse gas emissions means, if you are on electricity, makes your home more environmentally friendly.
Conclusion
Adjusting the heat setting on a Rheem tankless water heater isn’t complicated, but it requires the right knowledge and precautions. Whether you have a modern model with a digital control panel or an older unit with dip switches, the process can be done in just a few minutes.
The key is to balance comfort, efficiency, and safety. For everyday use, 120°F is usually ideal, but you can raise it slightly during colder months or when you need hotter water for sanitization. Just be careful about risks, especially if children or elderly family members live in your house.
FAQs
What is the maximum temperature setting on a Rheem tankless water heater?
Most Rheem tankless water heaters allow a maximum temperature of 140°F, though the factory default is typically set at 120°F for safety.
Can I adjust the temperature without the remote control?
Yes. If your model has a built-in digital panel, you can adjust it directly on the unit. For older models, you may need to adjust dip switches inside the unit.
How often should I flush my tankless water heater?
Experts recommend flushing your heater every 6–12 months, depending on water hardness. Homes with very hard water may need more frequent flushing.
Why does my water temperature fluctuate even after adjustment?
Fluctuations can be caused by high demand, clogged filters, or mineral buildup inside the unit. Inconsistent gas or power supply can also cause this issue.
Is it safe to set the water heater above 120°F?
Yes, but with caution. Higher temperatures are useful for sanitization but increase the risk of scalding. If you choose settings above 120°F, install anti-scald devices on faucets and showers.

