Keeping an eye on your septic tank’s sludge is one of the best ways to protect your system, avoid backups, and save money on big repairs. This guide explains how to measure sludge levels in a septic tank with safe DIY methods, professional options, cost comparisons, and clear thresholds for when to pump or call a pro. It’s written for U.S. homeowners in plain language and follows EPA guidance and industry best practice.
Key takeaway: inspect every 1–3 years and keep an eye on sludge so you pump before the sludge gets too close to the outlet that’s how you avoid drain-field damage and home backups. Lets deep dive into “How to Measure Sludge Levels in a Septic Tank — DIY & Pro Guide”
READ MORE: CCTV Drain Inspection to Find Underground Sewer Blockage — Costs, Process & Fixes
Why Sludge Level Matters:
Sludge (the solids that settle to the bottom of a septic tank) gradually reduces the tank’s effective volume. When sludge gets too high it:
- Forces solids into the outlet and drainfield → clogs and drainfield failure.
- Reduces treatment time inside the tank → poorer effluent quality.
- Raises risk of slow drains, gurgling, foul odors, and sewage backing into the home.
The EPA and state guides recommend routine inspection and pumping to prevent these failures. Keeping sludge under control protects groundwater and saves you thousands.

- Clear plastic pipe sampler
- Model Number: C09247WA
- Item Package Dimension: 65.49999993319″ L x 4.49999999541″ W x 3.49999999643″ H
How septic tanks separate solids:
A septic tank is a multi-layered biological reactor that utilizes gravity and anaerobic bacteria to process waste. To measure the sludge accurately, one must first understand the stratification that occurs within the tank. Wastewater from the home, including “blackwater” from toilets and “greywater” from sinks and showers, enters the tank and separates into three distinct layers :
| Layer | Component Description | Behavioral Mechanism |
| Scum Layer | Fats, oils, grease (FOG), and lighter solids like soaps or buoyant plastics. | Flotation: These materials have a lower density than water and rise to the surface to form a thick, crusty mat. |
| Effluent (Clear Zone) | Clarified liquid wastewater containing dissolved minerals and fine suspended particles. | Clarification: This is the middle layer that eventually exits the tank for further treatment in the soil. |
| Sludge Layer | Heavy organic matter, grit, undigested food particles, and bacterial mass. | Sedimentation: These materials are denser than water and sink to the bottom, where they undergo slow anaerobic digestion. |
The separation process is optimized by the presence of baffles or T-shaped pipes at the inlet and outlet. The inlet baffle reduces the turbulence of incoming water, preventing it from stirring up the already settled sludge. The outlet baffle ensures that only the clarified liquid from the middle zone can leave the tank, while the scum and sludge layers remain trapped inside.

- Graduations on both sides, front side marking in feet/tenths, back scale in feet/inches
- 5 telescoping sections, Firecore FLR500B grade stick features a maximum extended height of 16 feet
- Durable, featuring anodized aluminum sections imprinted with weather and corrosion-resistant inks
READ MORE: Why is my water bill so high but no visible leaks (Cause, Fix & Costs)
Safety first for Septic Tank Sludge Measurement
Do this (homeowner-safe):
- Wear nitrile or heavy-duty gloves, eye protection, and boots.
- Use a NIOSH-rated respirator if you must open a large manhole in confined or windless conditions.
- Keep kids and pets away while inspecting.
- Wash hands and disinfect tools after use.
Never do this (dangerous / pro work only):
- Never enter a septic tank toxic gases (hydrogen sulfide, methane) and lack of oxygen can be deadly.
- Do not use an ordinary household vacuum or attempt to pump out sludge with improvised gear.
- Do not dig or disturb the drainfield without permits or a pro you can cause contamination or damage.
If you have any doubt about safety or accessibility, call a licensed septic professional. Local rules often require licensed pumpers for removal and disposal.
READ MORE: Emergency Sewer Backup: Immediate Steps, Real Costs, and Pro Solutions
Tools & equipment for Septic Tank Sludge Measurement
(Approximate U.S. retail / service prices — costs vary by region and supplier.)
DIY tools
- Sludge Judge (dip tube) or similar clear core sampler — $40–$200.
- Long measuring rod / probe (fiberglass/carbon or graduated rod) — $10–$40.
- Heavy-duty nitrile gloves, eye protection, boots — $10–$60.
- Cheesecloth + long wooden dowel (simple homemade method) — $3–$10.
- Flashlight and short mirror for riser inspection — $15–$50.

Pro-level equipment / services
- Camera inspection (pipeline camera and winch) — $250–$1,000+ depending on scope.
- Lab sludge analysis (if composition testing needed) — $50–$300 (turnaround days).
- Licensed pumping / inspection service (includes measurement & report) — $300–$900+ depending on tank size and access.
(Prices are ballpark; get local quotes for exact figures.)
READ MORE: How to Measure Plumbing Fittings
How to Measure Sludge Levels in a Septic Tank — DIY & Pro Guide
4 Proven Step by Step Methods to Septic Tank Sludge Measurement:
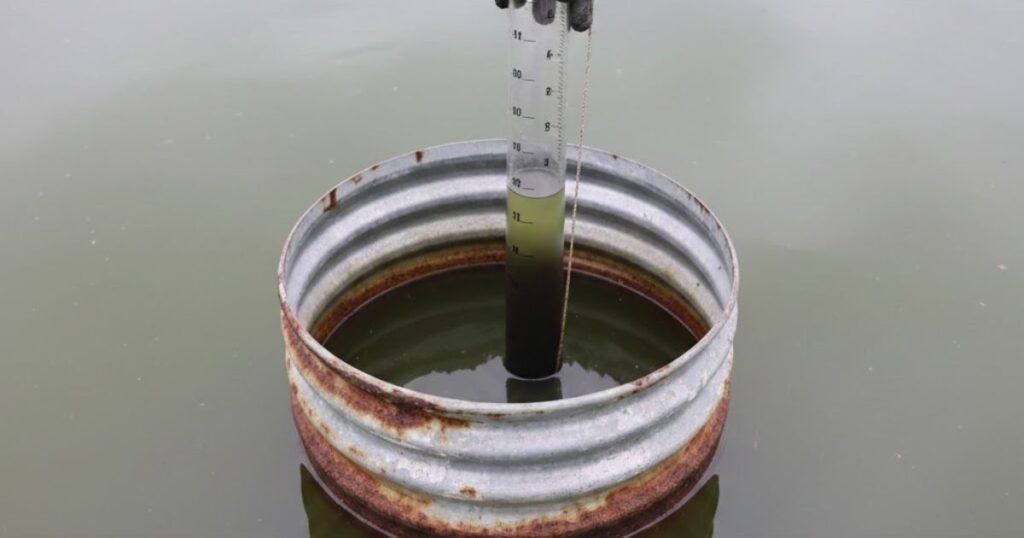
1. Using a sludge judge (dip tube)
What it is: A clear, rigid tube (the Sludge Judge® style) that samples from the bottom up allowing you to see the sludge blanket height.
Step-by-step (homeowner with riser access):
- Locate and open the septic riser or manhole cover safely (wear gloves & eye protection). If the tank is deep or heavy lids are present, have a helper.
- Slowly lower the sludge judge vertically through the scum layer until it seats on the tank bottom.
- Close the float/valve (if model has one) and pull the tube up. The sample trapped inside shows the solids that entered the tube.
- Note the top of the visible sludge layer on the tube and measure the depth from the top of the liquid or from the tank top per the tool instructions. Record the measurement.
- Repeat in a few locations (inlet, outlet side) to average—sludge can be uneven.
Accuracy: Medium–high when used correctly; gives a visual sample of solids. Hach and other manufacturers provide use instructions you should follow exactly.

- Keep your samplers running smoothly
- Sludge Judge Ultra Series
- Sludge Judge Ultra Series
READ MORE: Tree roots in sewer line — removal & repair cost (2026 guide)
2. Using a probe / measuring rod
What it is: A long fiberglass or graduated metal rod with a cloth or sock attached (a “witness cloth” technique) to catch solids.
Step-by-step (simple DIY):
- Attach a square of cheesecloth or a clean sock to the rod’s tip with tape or twine.
- Lower to the bottom until the rod rests; gently wiggle (±2″) to allow solids into the cloth.
- Lift out carefully and inspect the cloth for solids embedded in it. Measure the height of the solids mark from the bottom end of the cloth.
- Record and repeat in multiple positions.
Accuracy: Low–medium. Fast and cheap but less precise than a Sludge Judge and more prone to false readings if you disturb fresh scum or pull up trapped debris.

- 06-813C AL ROD 13FT 4SEC 8THS
3. Visual inspection via riser/manhole during pumping or inspection
What it is: Simply looking into the tank via a riser or manhole (with light) while taking measurements from a marked rod or sample.
For homeowners: If you have a shallow riser and good access, a visual check combined with a measuring rod can give a quick read. Never lean over the opening or enter the tank.
For pros: During pumping, professionals will often remove lids, measure the scum and sludge, check baffles and outlet filters, and note condition in a report. Professionals can safely open larger access points and run camera checks.
Accuracy: Variable — limited if you can only see a sliver of liquid. Better during pump-out when solids are exposed.
4. Professional inspection (camera inspection / sludge testing labs)
What it is: Licensed inspectors use pipeline cameras, sonars, or lab sampling to precisely measure sludge and inspect tank walls, baffles, and outlet piping.
What they do:
- Camera or optical scope to inspect inlet/outlet pipes, baffles, and internal walls.
- Sludge depth measured and recorded; outlet filter cleaned/checked.
- If regulatory testing needed, a lab will evaluate solids composition and pathogen indicators.
When to use: If you suspect structural problems, have repeated failures, are buying/selling a house, or need precise regulatory data. Camera inspections are the most accurate non-destructive method for diagnosing complex problems.

- 4.3-inch Clear Display: The VEVOR sewer camera features a 4.3-inch full-color screen, that delivers sharp, real-time vis…
- Robust Semi-Rigid Cable: Engineered for professionals, this drain camera comes with a super-tough fiberglass cable that …
- Versatile & Portable: The sturdy metal cable reel provides convenient cable storage and easy carrying, making this plumb…
READ MORE: Best Practices to Prevent Frozen Pipes: A U.S. Homeowner’s Step-by-Step Guide
Comparison table: methods, accuracy, difficulty, cost, time (Septic Tank Sludge Measurement)
| Method | Accuracy | DIY difficulty | Estimated cost (USD) | Time to perform | Best for | Pros | Cons |
| Sludge judge (dip tube) | Medium–High | Low–Medium | $40–$200. | 15–30 min | Homeowners comfortable opening riser | Visual sample; fairly accurate | Risk of contamination; needs care |
| Probe / measuring rod | Low–Medium | Low | $3–$40 | 10–20 min | Quick checks | Fast, cheap | Less precise; can disturb layers |
| Visual inspection (riser/manhole) | Variable | Medium | $0–$50 (tools) | 20–60 min | When riser present | Direct look at layers | Requires riser; safety risks |
| Professional camera inspection | High | Pro only | $250–$1,000+ (service). | 30–90 min | Accurate diagnosis, complex problems | Very accurate; inspects structure | Higher cost |
| Lab sludge analysis | High | Pro/lab | $50–$300 (lab). | Days (lab turnaround) | Regulatory / detailed testing | Precise composition data | Costly; delayed results |
Interpreting Results: When to Pump (Septic tank pumping frequency)
Measuring the sludge is only the first step; interpreting the data is what protects your home. There are two primary “Rules of Thumb” used by the EPA and state health departments to determine if a tank needs pumping.
The One-Third (1/3) Rule
Most residential septic systems should be pumped when the total volume of solids (sludge + scum) reaches one-third of the tank’s liquid capacity. For example, if your tank has a liquid depth of 48 inches, you must pump it if the solids exceed 16 inches.
The Baffle Clearance Threshold
A more technical measurement focuses on the clearance between the solids and the outlet baffle. If the solids get too close to the baffle, they will be swept into the drainfield.
- Pump if the bottom of the scum layer is within 6 inches of the bottom of the outlet baffle.
- Pump if the top of the sludge layer is within 12 inches of the outlet fitting.
Failure to adhere to these thresholds results in “short-circuiting,” where wastewater spends too little time in the tank to be treated properly, eventually ruining the soil absorption system.
READ MORE: How to Find a Hidden Water Leak in Your Wall
Troubleshooting & common mistakes
Common mistakes
- Measuring only at one spot — sludge is often uneven; sample inlet and outlet sides.
- Disturbing the sludge layer (wiggling too hard) which mixes layers and gives a false high reading.
- Not recording baseline measurements — without history you can’t spot trends.
- Reading after heavy rainfall or system use spikes — wait for normal flow if possible.
Special cases
- Frozen ground / frozen covers: In cold climates, access may be limited. Do not chip through covers call a licensed provider. Regional rules and seasonality matter.
- Rapid sludge buildup: Could indicate high solids load (garbage disposal, lots of paper, or failing aerobic components). Investigate habits and system type.
When to Call a Pro: Red Flags and Safety Concerns
While measuring sludge is a safe DIY task for most, certain situations require the immediate intervention of a licensed septic professional.
- Overpowering Odors: If the smell of raw sewage is strong even when the tank is closed, you may have a cracked tank or a vent blockage.
- Surfacing Sewage: If you see standing water or “mushy” ground over the drainfield, your system has already failed, and measuring sludge won’t fix it.
- Gurgling Pipes: If your toilets gurgle or drains are slow throughout the entire house (not just one sink), it indicates a major blockage or a full tank.
- Deep Burial: If your tank is buried more than 12 inches deep and you do not have risers, the physical labor of excavation is often best left to a crew with a backhoe.
Licensed professionals have the equipment and permits to pump, dispose of septage properly, and perform camera inspections.
READ MORE: The Modern Solution: Trenchless Sewer Line Replacement
Pros and Cons Summary
DIY Measurement
- Pros: Inexpensive; allows for more frequent monitoring; empowers homeowners.
- Cons: Messy; requires handling of hazardous waste; risk of inaccurate readings; exposure to toxic gases if not careful.
Professional Inspection
- Pros: Highly accurate; includes structural checks; provides documentation for real estate or insurance.
- Cons: Higher upfront cost ($250 – $800); requires scheduling.
Sample Maintenance Schedule for Homeowners
| Interval | Task | Trigger for Earlier Action |
| Yearly | Perform DIY sludge measurement and visual inspection of risers. | Increase in household size or adding a garbage disposal. |
| Every 3 Years | Hire a pro for a full system inspection and effluent filter cleaning. | Slow drains or foul odors in the yard. |
| Every 3–5 Years | Professional pump-out and tank cleaning. | Sludge level exceeds 1/3 of tank depth. |
5 FAQs
How often should a septic tank be pumped?
The average household tank needs pumping every 3 to 5 years. However, if you use a garbage disposal or have a large family, you may need to pump every 1 to 3 years.
How deep should septic sludge be?
Sludge should never occupy more than one-third (33%) of the tank’s liquid depth. If you have a standard 4-foot deep tank, you should pump when the sludge reaches 12 to 16 inches.
What is a sludge judge septic tank tool?
A Sludge Judge is a professional-grade clear plastic tube used to take a core sample of the septic tank’s contents. It allows you to see the exact thickness of the scum, liquid, and sludge layers.
Can I measure solids in a septic tank myself?
Yes, using a DIY “sludge stick” (PVC pipe with Velcro) is a safe and effective way for homeowners to monitor their own systems without specialized training.
How do I know if my septic tank is full?
A septic tank always appears “full” because the liquid level stays at the outlet pipe. It is only “full” in a maintenance sense when the sludge and scum levels reach the 30% capacity threshold.
Conclusion
Measuring sludge levels in a septic tank is a practical homeowner skill that prevents costly problems. Start by checking your tank riser, use a Sludge Judge or probe safely, record readings, and compare them against the EPA thresholds (pump if sludge is within 12″ of outlet or scum within 6″). If you’re unsure, or if measurements show high sludge, schedule a licensed septic inspection and pump-out it’s the safest way to protect your home and local groundwater.

