A slow or recurring kitchen sink clog is one of the most frustrating household interruptions: dishes pile up, drains gush slowly, and every attempt to fix things plungers, store-bought cleaners, even a rented snake only solves the problem for a little while. For many U.S. homeowners the longer-term answer to stubborn grease, soap buildup, and hardened residues is high pressure water jetting (also called hydro-jetting). This professional service uses a high-pressure hose and specialty nozzle to blast away grease, scale, and debris so the line flows like new.
This article covers everything a homeowner needs to know: what hydro-jetting is, realistic cost ranges and why prices vary, when it’s the right choice (and when it isn’t), a side-by-side comparison with other clearing methods, what happens during an appointment, how to hire a safe, licensed pro, maintenance tips, two short homeowner case studies. Where numbers or claims come from, they’re based on industry price guides and plumbing pros (see price snapshot below). Read on so you can decide if hydro-jetting is the efficient, long-lasting fix your kitchen needs. Lets deep dive into “High Pressure Hydro Jetting for Kitchen Drains: Costs, Benefits & When to Use It”

- Sewer Jetter Kit: 100 ft sewer jet hose x1; pressure washer gun x1; button nose nozzle x1; rotating nozzle x1; corner se…
- Sewer Jetter Nozzles: The button nose nozzle has a front jet at 0° angle that can clear blockages, and three rear jets a…
- Power Washer Gun: The accompanying short gun is a vital link. Connect to the sewer hose, so you can flexibly control the…
READ MORE: Safe Enzyme Drain Cleaners — The Eco-Friendly Way to Keep Drains Clear
What is High Pressure Water Jetting / Hydro-Jetting?
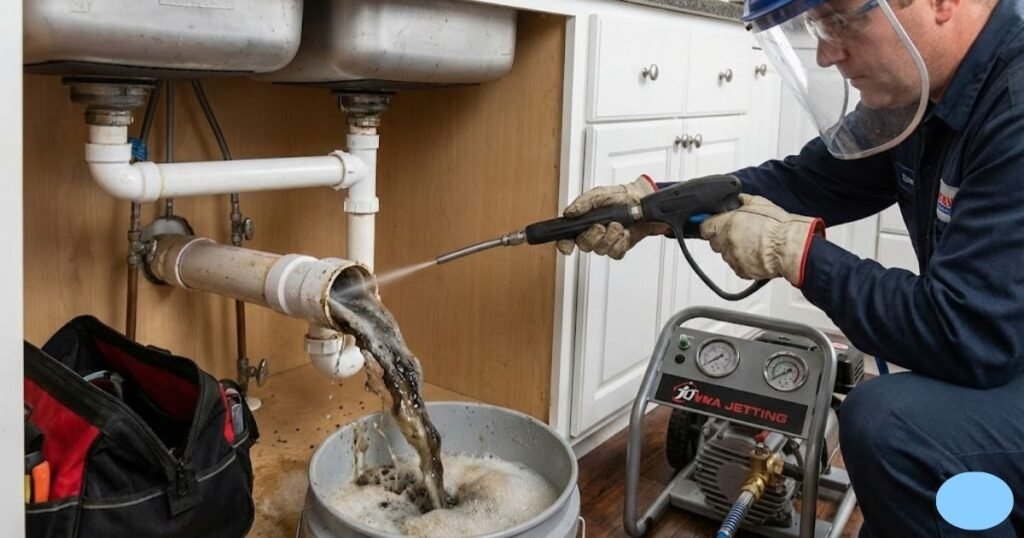
Hydro-jetting (high pressure water jetting) uses a hose with a specialized nozzle that delivers water at very high pressure typically thousands of PSI in professional systems to scour the inside of pipes. The nozzle both blasts forward to clear blockages and sprays backwards to scour pipe walls, removing grease, soap scum, mineral scale, and soft roots or debris. Unlike a mechanical snake that breaks or bores through a clog, hydro-jetting cleans the pipe circumference, not just the central channel, which is why it often produces longer-lasting results.
Nozzle types and machine sizes vary. For residential kitchen lines plumbers use lower-volume, lower-pressure setups than those used on commercial or main-line jobs, but they still deliver enough force to dislodge thick grease and compacted waste. Hydro-jetting works best when the plumber can access the drainline via a cleanout or a nearby drain and is frequently paired with a camera inspection (CCTV) so the pro can see what’s inside before and after cleaning.
Safety note: hydro-jetting is a professional service. A trained technician inspects pipe material and condition before applying the jets; jets can worsen damage in brittle or badly compromised pipes. For this reason many pros perform a camera inspection first to confirm the pipe can withstand the pressure.
“Hydro-jetting cleans the whole pipe wall; think of it more like pressure-washing your pipes than just poking a hole through a clog.” — Alex Martinez, licensed plumber.

- SEWER JETTER KIT LISTS: 1 × 100 ft sewer jet hose, 1 × button nose nozzle; 1 × rotating nozzle; 1 × corner sewer nozzle;…
- CLEANER HOSE with 5800PSI: Sewer jet hose is made of inner tube, reinforcement and cover. Inner tube is made of thermopl…
- SEWER JETTER NOZZLES: Button nose clears blockage and flush out debris by front 0° jet and 3 rear 33° jets; rotating noz…
READ MORE: CCTV Drain Inspection to Find Underground Sewer Blockage
When Should a Homeowner Choose Hydro-Jetting for a Kitchen Drain?
Choose hydro-jetting when:
- You have recurring clogs in the kitchen sink that come back after snaking. Hydro-jetting removes the build-up that causes repeated clogs, not just the immediate blockage.
- Grease or hardened buildup is suspected. Kitchens accumulate fats, oils, and grease (FOG) that solidify and cling to pipe walls. Hydro-jetting is especially effective at removing hardened grease and soap scum.
- A camera inspection shows broad circumferential buildup (not a single localized object). If the camera reveals long runs of grease or scale, jets are the best cleanup tool.
- You want preventive whole-line cleaning — hydro-jetting can be used as maintenance to restore full flow and reduce future service calls (used by homeowners who want a longer window between cleanings).
When not to hydro-jet:
- Very old, brittle clay or cast-iron pipes in poor condition. Jet pressure can enlarge existing cracks or dislodge sections of deteriorated pipe. If a camera shows heavily corroded cast iron, tree-root damage with pipe collapse, or brittle clay joints, a plumber will usually recommend snaking or targeted repair instead.
- Small, localized clogs caused by foreign objects (a child’s toy or utensil lodged near the trap) these are better handled with a targeted mechanical approach.
- If water access or a cleanout is unavailable and the only option is invasive access, costs and risks increase; discuss alternatives with the pro.
In short: hydro-jetting is ideal when the problem is grease and long-term buildup or when you want the entire run cleaned, but always confirm pipe condition first with a camera inspection.
Clear the clog fast with the POPULO 20V Cordless Electric Drain Auger—grab yours today and make drain cleanup easier. See Below-

READ MORE: Kitchen Sink Draining Very Slowly? Step by Step DIY Fixes
Comparison table — Hydro-Jetting vs Snaking vs Others
| Method | Typical U.S. cost (avg) | Best for | Effectiveness on grease | Time to fix | Risk to pipes | When to avoid |
| Hydro-jetting (high pressure water) | $300–$900 (see price snapshot). | Heavy grease, recurring clogs, whole-line cleaning | Excellent | Medium (appointment) | Low–medium if pipes are aged — pro should assess | Fragile/brittle old pipes |
| Snaking (mechanical auger/drain snake) | $100–$300 (typical). | Localized clog close to fixture | Moderate | Fast | Low | Long runs with heavy grease |
| Chemical drain cleaners | $10–$50 | Small organic clogs | Poor–variable | Fast | High (corrosive over time) | Any recurring or severe clog |
| Enzymatic/biological cleaners | $15–$50 | Maintenance / prevention | Moderate (long-term) | Slow (need repeat use) | Low | Severe or hardened grease |
| DIY plunger / hand snake | <$100 | Shallow, recent clogs | Poor | Fast | Low | Deep, hardened or recurring clogs |
- Professional: This professional plumbers snake comes complete with 25 ft Steel, more than enough for most household clog…
- Easy to Use: The sewer snake spring is both flexible and tough to enable you to easily take tight bends, and the large c…
- Multiple Uses for Tackling Clogs: This snake drain clog remover is professional using for various drains such as kitchen…
READ MORE: Best drain snake for home use
Hydro Jetting Cost — National Averages
The cost of hydro-jetting services in the United States is influenced by geographic location, the complexity of the plumbing layout, and the severity of the obstruction. While initial costs are higher than traditional snaking, the longevity of the results often provides a superior return on investment (ROI).
2026 Price Snapshot — Checked Feb, 2026
- Residential Hydro-jetting (Standard Kitchen/Drainline): $300 – $900. This range reflects the national average for typical residential calls where cleanout access is available.
- Basic Drain Snaking: $147 – $346. These figures represent the baseline for localized clogs cleared with a mechanical auger.
- Complex or Main-Line Hydro-jetting: $1,200+. Costs escalate when technicians encounter severe root intrusions, require extensive hose runs (exceeding 100 feet), or must remove fixtures to access the line.
- Video Camera Inspection Add-on: $250 – $500. While some contractors bundle this with the jetting service, it is often billed separately for diagnostic purposes.
Labor rates also vary significantly by market. For instance, master plumbers in high-cost urban areas like San Jose or Austin may charge up to $200 per hour, whereas rates in more rural or mid-sized markets like Indianapolis may start closer to $45 to $75 per hour. Homeowners are consistently advised to obtain a written estimate that specifies whether the price is a flat rate or based on hourly labor plus equipment fees.

- ENZYME ENHANCED FORMULA: Green Gobbler Enzymatic Drain & Grease Trap Cleaner uses an enzyme enhanced formula to clear bu…
- SAFE FOR PIPES: Green Gobbler helps maintain drain lines, septic tanks, grease traps and grease interceptors. Our enzyme…
- IMPROVE GREASE TRAP EFFICIENCY: Green Gobbler increases the efficacy of grease traps by allowing enzymes & bacteria to w…
READ MORE: How Much Does a Plumbing Snake Cost?
What to Expect During a Hydro-Jet Kitchen Drain Cleaning
Pre-visit prep: Your plumber may ask you to clear under-sink cabinets and ensure easy access to the cleanout or sink. If the cleanout is outside, leave a path to it. Some plumbers will request that you stop using water for a short period before arrival so the tech can assess current flow.
Typical steps on site:
- Initial assessment & questions: The tech asks about problem history (how long, frequency, what makes it better/worse).
- Camera inspection (recommended): A CCTV camera is run through the line to locate the clog, assess pipe material and condition, and confirm whether hydro-jetting is safe. Many pros charge an add-on for camera inspection (see price snapshot).
- Access preparation: The tech finds the nearest suitable access: kitchen sink, a soil pipe cleanout, or an outdoor sewer cleanout. If necessary, they may remove trap fittings or open an access point.
- Hydro-jet pass: The nozzle is fed into the line. The technician makes a controlled pass forward to displace blockages and backward-spray to scour walls. Expect 30–90 minutes for the actual jetting on a typical kitchen run, depending on severity.
- Post-jet inspection: Many pros re-run the camera to confirm cleaning results and show you before/after footage. This is a strong sign of professional, transparent work.
- Cleanup & report: The technician restores access points, removes debris, and often provides recommendations (e.g., whether pipe repair is advisable).
Add-ons & typical extras: Camera inspection ($125–$500+), root treatment or root cutting if roots are found (price varies), and minor repairs discovered during the visit. Emergency or after-hours service often includes significant premium fees.
Time on site: For a standard kitchen drain hydro-jet with camera work expect 1–3 hours on site (inspection, setup, cleaning, re-inspection), though simple snaking appointments are often shorter.
- 33% MORE VALUE, SAME GREAT PRICE ► Now get 20 powerful septic tablets for 10 months of complete system maintenance; Our …
- DESTROYS CLOGS & ORGANIC SLUDGE ► Patented bio-accelerator formula multiplies natural bacteria up to 40X, creating a sup…
- ELIMINATES FOUL SEPTIC ODORS FAST ► Don’t let embarrassing sewage smells invade your home; Our commercial-strength table…
READ MORE: How Much Does a Plumber Cost to Unclog a Drain?
Pros & Cons of Hydro-Jetting
Pros
- Thorough cleaning — removes circumferential grease and scale, not just a pathway.
- Long-lasting results compared with a single snake pass.
- Can clear soft roots and compacted debris in many cases.
- Frequently combined with camera inspection so you can see before/after.
Cons
- Higher upfront cost than basic snaking.
- Potential risk for fragile, corroded, or brittle pipe materials if used without prior inspection.
- May reveal or exacerbate hidden damage that leads to additional repair costs.
- Not a DIY job — requires professional equipment and training.
When to Delay Hydro-Jetting Kitchen Sink Clog Removal
The primary safety consideration is pipe condition. Hydro-jet pressure can stress weak joints or fracture corroded cast iron and clay pipes. A camera inspection helps a pro determine whether the pipe wall thickness and joints are sound enough to tolerate a jet. If the camera shows heavy corrosion, cracks, collapsed sections, or significant root intrusion with pipe wall compromise, hydro-jetting may be delayed in favor of targeted repair (sectional replacement, pipe lining, or spot excavation).
How pros evaluate pipe condition
- CCTV footage for cracks, holes, offset joints, and root intrusion.
- History of the home (very old plumbing with original clay or cast iron is riskier).
- The plumber’s experience with local soil/tree types (root intrusion likelihood).
When hydro-jetting could worsen damage
- If the pipe wall is thinned by corrosion, the jet pressure can create a full break or displace joint sections. In those cases, the plumber will recommend snaking or partial excavation instead.
Homeowner action steps if you suspect old pipes
- Ask for a pre-jet camera inspection. If the pro hesitates or refuses, get a second opinion.
- Request the camera footage and an explanation of what the images show.
- If damage is found, get written repair vs. cleaning options and cost estimates before proceeding.
READ MORE: How to Clean Lint From Washing Machine Drain Hose
Hiring the Right Pro for Kitchen Drain Hydro-Jetting
- Ask for licensing & insurance — confirm the plumber holds the required state or local license and carries general liability insurance and worker’s comp. Red flag: no proof of insurance.
- Experience with hydro-jetting — ask how long they’ve been operating hydro-jet machines and whether they service residential kitchen drains regularly.
- Camera inspection policy — prefer pros who perform pre- and post-jet camera inspections and show footage. This demonstrates transparency.
- Get a written estimate — the estimate should list hydro-jetting, camera inspection (if separate), travel fees, and potential extra charges (rooting, repairs).
- Ask about warranties/guarantees — a common professional promise is a limited time warranty against re-clogs on the same spot (confirm length and conditions).
- Check reviews & references — read recent customer reviews focused on hydro-jetting jobs or ask the contractor for references.
- Verify cleanup and disposal policy — ask how they handle debris (grease, solids) and whether they’ll leave a written report with camera images.
- Beware red flags: extremely low price, no camera inspection option, unwillingness to show footage, no insurance, or pressuring you into immediate, expensive repairs without evidence.
Maintenance after Hydro-Jetting Kitchen Sink
Grease management tips
- Wipe plates/pans: scrape and wipe excess grease into the trash before rinsing.
- Avoid pouring hot oil down the sink; let grease cool and dispose of it in the trash or a sealed container.
- Run hot water & mild detergent after meals for a minute to help emulsify light oils.
- Monthly enzyme treatments can help maintain a cleaner pipe wall over time (they break down organic film slowly). Enzymatic cleaners are a preventative tool, not a cure for hardened grease.
Recommended service frequency
- Typical households: hydro-jetting every 2–5 years as preventative maintenance if you’ve had repeated problems.
- High-risk kitchens (heavy cooking, frequent frying, rental properties): consider yearly or biennial hydro-jetting or a combination of annual enzyme treatments and camera checks.
Regularly scheduling a camera check plus enzyme maintenance can extend the time between full hydro-jetting services.
Conclusion
Hydro-jetting is a powerful, professional method for tackling hardened grease, recurring kitchen clogs, and whole-line buildup. When paired with a camera inspection and performed by a licensed pro, it delivers thorough, long-lasting results but it’s not always appropriate for old or brittle pipes. Use the checklist above to hire carefully, ask for camera footage, and get written estimates. If your sink keeps clogging despite snaking, schedule a camera inspection and consider hydro-jetting as a preventive or corrective option. When in doubt, prioritize the inspection knowing what’s inside the pipe is the safest first step.
5 FAQs
How much does hydro-jetting a kitchen sink cost?
Typical residential hydro-jetting jobs for kitchen drains run roughly $300–$900 nationally; simple snaking often costs much less. Always get a written estimate.
Is hydro-jetting safe for older pipes?
Hydro-jetting is highly effective but can stress brittle or degraded pipes — ask for a camera inspection first and opt for snaking or targeted repair if cameras show fragile material.
Will hydro-jetting remove grease from kitchen drains?
Yes — hydro-jetting is one of the best methods to remove hardened grease and long-term buildup from kitchen lines, producing longer-lasting results than snaking alone.
How long does hydro-jetting take for a typical kitchen drain?
Most residential kitchen drain hydro-jet jobs take 1–3 hours on-site (including camera inspection and setup), but time varies by access and clog severity.
Should I get a camera inspection before hydro-jetting?
Yes — a pre-jet camera inspection helps the plumber assess pipe condition and target the cleaning safely; many pros include camera checks as an add-on.

