Water belongs in your pipes, not on your floor. When a leak starts, every second counts to protect your home and your wallet.
If a leak starts, shut the water off, contain the leak, protect belongings, call a licensed plumber, and use one of these temporary fixes (clamp, epoxy putty, tape) only to slow the leak not as a permanent repair. Read on for step-by-step how-tos, real cost notes, and safety warnings. Lets deep dive into “How to Stop a Leak Until the Plumber Arrives: A Homeowner’s Guide”
Quick TL;DR: If a Leak Starts, Do These 5 Things Right Now
- Shut off the water at the main valve or the local fixture.
- Drain the pipes by turning on the lowest faucet in the house.
- Dry the area thoroughly so your temporary patches can actually stick.
- Apply a temporary fix like epoxy putty or a pipe clamp to stop the spray.
- Call a licensed plumber to schedule a permanent, professional repair.
READ MORE: What to Do if Water Heater is Leaking from Bottom
Stop Water Leak Temporarily: Safety and Quick Triage
The sound of spraying water is enough to make any homeowner panic. Before you grab a wrench, take a deep breath. Your first goal is safety. When alllllll leak starts, move fast but stay calm. Your top priorities are people, power, and stopping more water from spreading.
- Check people and pets. Make sure everyone is safe and out of harm’s way.
- Turn off electricity in the wet area if water is near outlets, lights, or appliances. Water plus electricity is dangerous. If unsure, cut power to the room at the breaker.
- Shut water off if the leak is large or getting worse (see “How to find the main shutoff” below). Shut the water off first.
- Contain the water. Put buckets under drips. Move rugs, furniture, and items off the floor.
- Call for help. If the leak is flooding, structural members are sagging, or people are in danger, call emergency services.
If the leak is small and contained (a slow under-sink drip), you can use a temporary patch and still wait for a scheduled plumber visit. If any sign of major flooding, collapse, or mold spreading fast, evacuate and call 911.
READ MORE: Top Leak Detectors for House: Best Water Leak Detectors 2026
Immediate Actions to Stop or Slow the Leak
You need to act fast to minimize water damage. Follow these steps in order to get the situation under control.
How to Find the Main Shutoff
Every homeowner needs to know where their water shutoff valve is located. If you don’t know, find it today.
- The House Valve: Usually located in the basement, crawlspace, or near the water heater. Look for a gate valve (a round wheel) or a ball valve (a lever handle). Turn the wheel clockwise or the lever perpendicular to the pipe.
- The Water Meter: Sometimes the shutoff is outside in a concrete box near the street. You might need a “meter key” tool to open it and turn the valve.
- Apartments and Condos: Check under the kitchen sink or in a small closet near the water heater. If you can’t find it, call your building manager or super immediately.
How to Stop Water Temporarily
Once the main valve is off, water will still be in the pipes. You need to get it out.
- Open the Faucets: Turn on the highest and lowest faucets in the house. This lets gravity pull the remaining water out through the sink instead of the leak.
- Use Buckets and Towels: Place a plastic bin or bucket under the drip. Surround the area with heavy towels to soak up any “splash-out.”
- Contain the Spray: If the pipe is still spraying, wrap a rag tightly around the hole. This redirects the water into your bucket rather than onto the walls.
- Apply a Quick Clamp: If you have a C-clamp and a piece of scrap rubber, you can squeeze it over the hole. This acts as a manual plug until you can apply a real patch.
READ MORE: 11 Ways to Fix Water Leaking From the Top of the Water Heater
Temporary Leak Repair Methods
A temporary fix buys you time. It is not a permanent solution. These methods work for different types of pipes and leaks. Choose the one that fits your situation.
1. Rubber Patch and Hose Clamp
This is the “old reliable” of DIY plumbing. It works best on copper or galvanized steel pipes with small holes. You use a piece of flexible rubber to seal the hole. Then, you use a metal clamp to hold it tight.
How-to Steps:
- Cut a piece of rubber (like an old bike inner tube) larger than the leak.
- Place the rubber patch directly over the hole.
- Slide a stainless steel hose clamp over the patch.
- Tighten the clamp with a screwdriver until the leak stops.
- Check for drips every hour.
- Ideal Use-Case: Pinhole leaks in straight sections of metal pipe.
- Time-to-Hold: 1–3 days.
- Tools/Materials: Scrap rubber, stainless steel hose clamps, screwdriver.
- Typical Cost: $10–$20 (prices checked March 2026).
Pros & Cons:
- Pros: Very cheap and uses common household items. It provides a very strong mechanical seal.
- Cons: It only works on straight pipe sections. It will not work on joints or elbows.
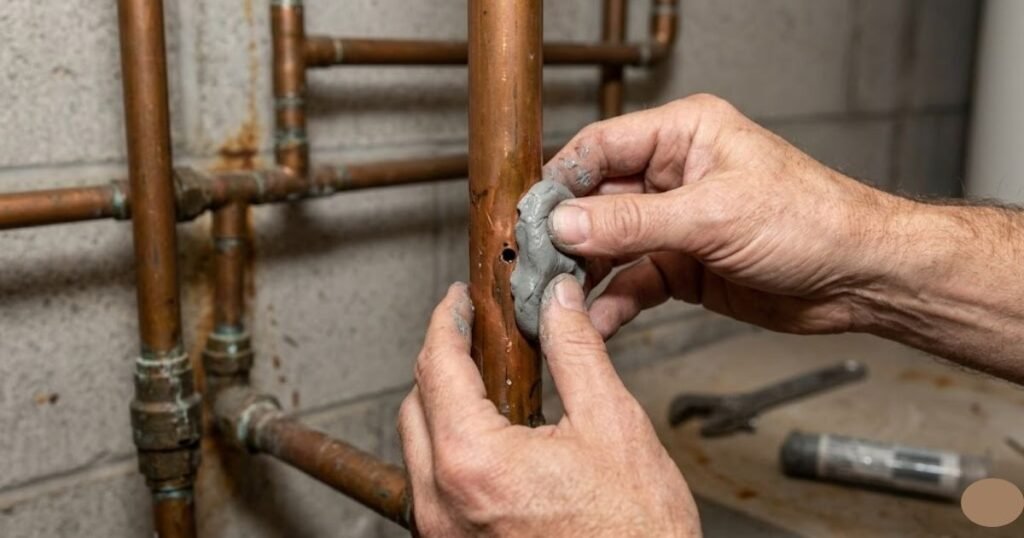
2. Epoxy Putty / Water-Activated Putty
Epoxy putty is a two-part material. You mix it by hand, and it hardens into a plastic-like seal. Some versions are “water-activated,” meaning they cure even if the pipe is damp.
How-to Steps:
- Clean the pipe with a rag or sandpaper to remove rust or scale.
- Knead the putty in your hands until it is a uniform color.
- Press the putty firmly over the hole and slightly around the pipe.
- Hold it iLn place for 3–5 minutes while it begins to harden.
- Let it cure completely (usually 30–60 minutes) before turning the water back on.
- Ideal Use-Case: Small cracks in PVC or metal joints where clamps won’t fit.
- Time-to-Hold: 12–24 hours.
- Tools/Materials: 2 oz stick of plumbing epoxy putty.
- Typical Cost: $6–$8 (prices checked March 2026).
Pros & Cons:
- Pros: It molds to any shape, making it great for elbows. It is very easy for beginners to use.
- Cons: It can be hard to remove when the plumber arrives. It may fail if the pipe is too oily or dirty.
READ MORE: Best Whole House Water Softener System for Home (2026) — Top Picks & Buyer’s Guide
3. Repair Clamp or Pipe Sleeve
A repair clamp is a heavy-duty version of the rubber-and-hose-clamp method. It is a metal sleeve with a rubber lining designed specifically for this job.
How-to Steps:
- Open the clamp by loosening the bolts.
- Position the rubber lining directly over the leak.
- Wrap the metal sleeve around the pipe.
- Tighten the bolts evenly with a wrench.
- Ideal Use-Case: Larger cracks or significant pinholes in metal pipes.
- Time-to-Hold: 3–5 days.
- Tools/Materials: Stainless steel pipe repair clamp (1–2 in. sizes).
- Typical Cost: $10–$20 (prices checked March 2026).
Pros & Cons:
- Pros: Professional-grade strength for a temporary fix. It is very difficult for this to accidentally slip off.
- Cons: You must buy the exact size for your pipe diameter. It is bulkier than other methods.
4. Thread Tape for Threaded Fittings
If your leak is coming from a connection point (like where a showerhead meets the arm), you likely need PTFE tape. This is often called “plumber’s tape.” It seals the gaps between the threads.
How-to Steps:
- Unscrew the leaking fitting.
- Clean the threads on both sides with a dry cloth.
- Wrap the tape around the male threads 3–5 times in a clockwise direction.
- Screw the fitting back together by hand, then tighten slightly with a wrench.
- Ideal Use-Case: Leaking showerheads, faucet connections, or threaded pipe joints.
- Time-to-Hold: Can be permanent if applied correctly, but check with a pro.
- Tools/Materials: Single roll of PTFE thread-sealing tape.
- Typical Cost: $1–$4 (prices checked March 2026).
Pros & Cons:
- Pros: Extremely inexpensive and easy to find. It creates a very clean, watertight seal on threads.
- Cons: It only works on threaded connections. It will not stop a hole in the middle of a pipe.
READ MORE: How to Stop a Leaking Pipe with Water in it
5. Compression Coupling (Temporary)
This is for the more confident DIYer. It involves cutting out the bad section of pipe and joining the ends with a mechanical fitting.
How-to Steps:
- Cut out the leaking section using a pipe cutter.
- Slide the compression nut and ring onto each end of the pipe.
- Insert the pipe ends into the coupling body.
- Tighten the nuts with two wrenches to compress the ring and create a seal.
- Ideal Use-Case: Significant pipe damage where a patch won’t work.
- Time-to-Hold: Several weeks (but still get it inspected).
- Tools/Materials: Compression coupling, pipe cutter, two wrenches.
- Typical Cost: $10–$25 (prices checked March 2026).
Pros & Cons:
- Pros: This is the strongest temporary fix available. It removes the damaged section entirely.
- Cons: Requires cutting your pipes. It is much more difficult for a beginner to get right.
6. Tape and Wrap (Emergency Only)
Self-fusing silicone tape is a specialized tool. It doesn’t have adhesive. Instead, it sticks to itself when stretched and wrapped.
How-to Steps:
- Start the wrap about two inches before the leak.
- Stretch the tape tightly as you wrap it around the pipe.
- Overlap each layer by half the width of the tape.
- Continue wrapping two inches past the leak.
- Ideal Use-Case: Low-pressure lines or odd-shaped fittings.
- Time-to-Hold: 2–6 hours.
- Tools/Materials: Silicone emergency repair tape.
- Typical Cost: $8–$15 (prices checked March 2026).
Pros & Cons:
- Pros: Works on wet pipes and odd angles. It is very fast to apply in a panic.
- Cons: It often fails under high water pressure. It is purely a “wait-for-the-plumber” bandage.
READ MORE: How to Find a Hidden Water Leak in Your Wall: Step by Step DIY Guide
When to Call the Plumber Now
Sometimes, a DIY patch isn’t enough. You need to call an emergency plumber if you see these red flags:
- Discolored Water: If your water looks brown, yellow, or green, you may have a main line break or severe corrosion.
- Sewage Smell: If the leak smells like a sewer, stay away. This is a health hazard.
- Rapid Flooding: If the water is rising faster than you can drain it, your main shutoff may have failed.
- Hissing Near Gas Appliances: As mentioned before, gas leaks are life-threatening.
- No Shutoff Found: If you cannot find a way to stop the water, every minute you wait is more damage to your home.
- Electrical Sparks: If the water has reached your outlets, do not touch anything. Call a pro.
A licensed plumber has the tools to find leaks hidden behind walls. They also have the insurance to cover the work. If you try to fix a major issue yourself and it fails later, your insurance might not cover the resulting flood.
How Much Will a Plumber Cost & What to Expect?
Plumbing costs vary depending on your location and the time of day. Emergency calls are almost always more expensive than scheduled appointments.
Call-Out Fees: Most companies charge a flat fee just to show up. A typical emergency plumber call-out fee ranges from $150–$350 (prices checked March 2026). This usually covers the first 30 to 60 minutes of diagnosis.
Hourly vs. Flat Rates:
- Hourly: Many emergency pros charge $150–$300 per hour (prices checked March 2026).
- Flat Rate: Some companies give you a total price after seeing the problem. This can be better for your budget because you know the cost upfront.
When the plumber arrives, they will first confirm the water is off. They will then inspect the damage. They might need to cut into your drywall to reach the pipe. Ask them for a written estimate before they start the actual repair. A good plumber will explain why the leak happened and how to prevent it in the future.
READ MORE: How to Repair a Burst Water Pipe
Comparison Table: Temporary Leak Repair Methods
| Temporary Method | Typical Materials & Cost (USD) | Difficulty | How Long It Holds | Best Use-Case | Quick Pros / Cons |
| Rubber Patch & Clamp | $10–$20 (checked March 2026) | Easy | 1–3 days | Metal pipe pinhole | Cheap / Straight pipes only |
| Epoxy Putty | $6–$8 (checked March 2026) | Easy | 12–24 hours | PVC or metal joints | Molds to shape / Messy to remove |
| Repair Clamp | $10–$20 (checked March 2026) | Easy | 3–5 days | Larger metal pipe cracks | Very secure / Must match pipe size |
| Thread Tape | $1–$4 (checked March 2026) | Easy | Varies | Threaded fittings | Very cheap / Only for threads |
| Compression Coupling | $10–$25 (checked March 2026) | Advanced | 2+ weeks | Severe pipe damage | Semi-permanent / Requires cutting |
| Tape & Wrap | $8–$15 (checked March 2026) | Easy | 2–6 hours | Low-pressure / odd shapes | Works on wet pipes / Fails under pressure |
Safety & legal notes
- Do not attempt repairs on gas lines. Gas work is dangerous and regulated. Call the gas company or licensed pro.
- If electrical fixtures are involved, shut power to the area at the breaker and call a licensed electrician if needed.
- If the leak floods the home or risks collapse, evacuate and call emergency services.
- Document damage with photos for insurance claims.
- Temporary fixes are temporary. Hire a licensed plumber for a permanent repair.
READ MORE: How to Fix a Copper Pipe Leak at the Joint
FAQ:
How do I stop a leak until the plumber arrives?
The most important step is to shut off the water supply immediately. Once the water is off, open your faucets to drain the remaining liquid from the system. After the pipe is dry, you can apply a temporary patch. Using a pipe repair clamp or epoxy putty are the most effective ways to stop a leak until the plumber arrives. Always keep a bucket under the area just in case the patch fails.
Will epoxy putty stop a leak permanently?
No, epoxy putty is only a temporary bandage. While it hardens into a very tough material, it does not bond to the pipe with the same strength as a weld or a professional fitting. Over time, the pressure and temperature changes in your plumbing will cause the putty to crack or pull away. It is designed to buy you a few hours or days of time, but you still need a professional to replace the damaged section of the pipe.
How much does an emergency plumber cost to fix a leak?
You should expect to pay an emergency call-out fee between $150–$350 (prices checked March 2026). In addition to this fee, many plumbers charge an hourly rate of $150–$300 (prices checked March 2026) for emergency labor. These rates can vary significantly based on your region and whether the call is made on a holiday or weekend. Always ask for a clear breakdown of fees before the work begins.
Can I safely turn off the water myself?
Yes, most homeowners can safely turn off their own water. You should look for a lever or wheel near your water heater or where the main line enters the house. If you live in an apartment, look under your sink or in a utility closet. If you cannot find your internal valve, you may need to use the shutoff at the water meter near the street. However, never try to turn off a gas line or touch pipes near electrical wires yourself.
Which temporary fix holds longest: epoxy, clamp, or tape?
A professional-grade repair clamp or a compression coupling usually holds the longest. A clamp provides physical, mechanical pressure that is much stronger than the adhesive bond of epoxy or tape. While epoxy putty is great for odd shapes, it can become brittle and fail. Emergency tape is the weakest option and should only be used as a very short-term solution. A well-installed repair clamp can often hold for several days while you wait for a scheduled plumbing appointment.
Final Thoughts
A water leak is stressful, but you have the tools to handle it. Shut off the water, apply a patch, and take plenty of photos for your insurance. Once the immediate danger is over, call a licensed plumber to ensure your home stays dry for years to come.

