Opening up your kitchen or bathroom cabinet and noticing a puddle of water or a damp, musty odor is an experience most homeowners dread. Discovering a pipe leaking under sink can instantly cause anxiety about potential water damage, warped cabinet wood, mold growth, and unexpected repair bills. Whether you are dealing with a slow trickle or a steady stream, under-sink leaks should never be ignored. Even a minor drip can rot out the base of your cabinet, damage subflooring, and turn into a much larger plumbing emergency if left unaddressed.
Fortunately, many under-sink plumbing issues are straightforward to diagnose and fix. Understanding why a leaking pipe under kitchen sink or a pipe leaking under bathroom sink happens can help you determine whether you can tackle the repair yourself or when it is time to call a licensed professional. In this comprehensive guide, we will explore the root causes of under-sink leaks, walk you through a step-by-step process on how to fix a leaking pipe under sink, break down repair costs, and share essential tips for prevention. Lets deep dive into “Pipe Leaking Under Sink: Causes, Fixes & Plumber Costs”
Why Is There a Pipe Leaking Under My Sink?
Under-sink plumbing consists of two main systems: the drain system, which carries wastewater away from the sink via gravity, and the supply system, which delivers pressurized hot and cold water to the faucet. A leak can originate from either system, or from the sink basin itself. Here are the most common causes of a kitchen sink plumbing leak or bathroom vanity leak:
Loose P-trap connections
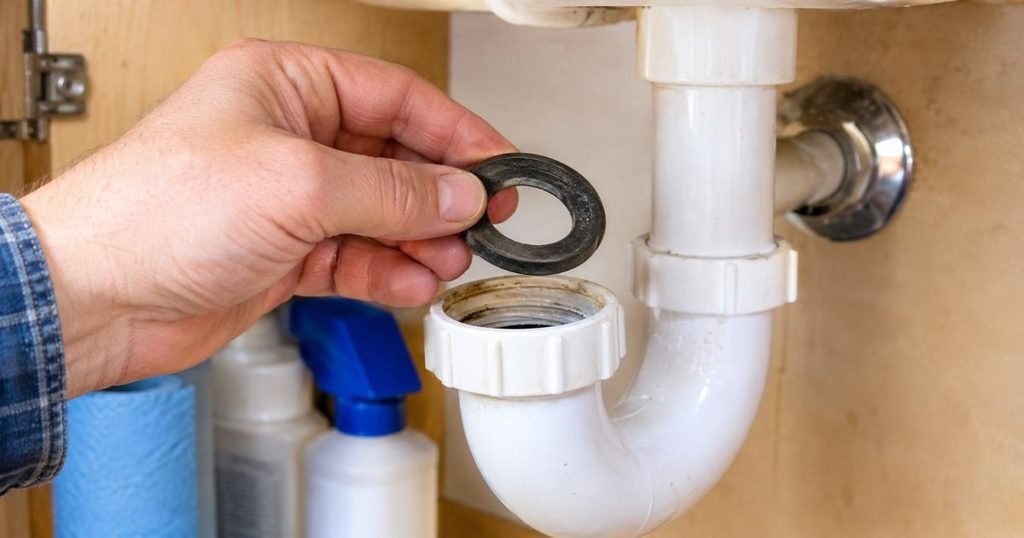
The P-trap is the curved U-shaped or J-shaped section of pipe directly beneath your sink. Its primary job is to hold a small amount of water to block sewer gases from entering your home. Over time, normal vibrations from using the garbage disposal, opening and closing cabinet doors, or thermal expansion can cause the slip-joint nuts holding the P-trap in place to loosen. When these fittings loosen, water will seep out whenever the sink drains.
Worn-out or damaged rubber washers
Inside every slip-joint connection on a drainpipe, there is a small rubber or plastic washer (often called a slip-joint washer) that creates a watertight seal. Over years of exposure to water, temperature changes, and cleaning chemicals, these rubber washers become brittle, cracked, flattened, or misaligned. When a washer loses its flexibility, water bypasses the seal, resulting in a drain pipe leaking under sink.
Cracked PVC or plastic drainpipes
Modern residential plumbing frequently utilizes lightweight, durable PVC or ABS plastic pipes. However, plastic can still become compromised. Overtightening fittings during installation, accidental impacts from cleaning supplies stored under the sink, or aging plastic exposed to harsh chemical drain cleaners can cause micro-fractures or visible splits in the pipe material, leading to a persistent sink P-trap leaking issue.
Corroded metal drainpipes
In older homes or custom installations, you may still find chrome-plated brass or galvanized steel drainpipes. Metal pipes are susceptible to internal and external corrosion, especially in humid bathroom environments or kitchens where moisture lingers. Over decades, rust eats away at the metal, thinning the pipe walls until pinhole leaks or major structural failures occur.
Damaged water supply lines
Water supply lines connect your home’s main plumbing to the faucet via flexible braided stainless steel, braided polymer, or rigid copper tubing. High water pressure, kinks in flexible hoses, old rubber inner tubing, or worn-out fittings can cause a supply line to bulge, weep, or burst. Unlike gravity drain leaks, a supply line leak is pressurized and will spray or drip water continuously even when the sink is not in use.
Loose or leaking shut-off valves
The shut-off valves attached to the wall beneath your sink allow you to turn off the water to the faucet without shutting off the main water supply to your entire house. Over time, the internal packing seals, stem washers, or threaded wall connections on these valves can degrade. If a valve is bumped or operated after years of sitting idle, it may start leaking around the handle or the pipe threads.
Faulty sink drain or basket strainer seals
Sometimes the leak isn’t coming from the pipes below at all, but rather from where the drain assembly meets the sink basin. The plumber’s putty, rubber gaskets, or mounting nuts holding the kitchen sink basket strainer or bathroom pop-up assembly can deteriorate or shift. When you run water, it leaks around the perimeter of the drain flange, running down the exterior of the tailpiece and pooling on the cabinet floor.
Damaged faucet connections
Underneath the sink deck, the faucet shanks connect to the supply lines and spray hoses. Loose mounting nuts, worn O-rings inside quick-connect fittings, or cracked spray hose lines can cause water to trickle down from the underside of the countertop. This water often travels along the pipes, making it look like a water leaking under sink scenario originating further down than it actually is.
READ MORE: Best Under Sink Hot Water Heater
How to Identify Where the Pipe Is Leaking Under the Sink
Effective plumbing leak detection begins with tracing the water back to its exact origin. Water has a frustrating habit of traveling along the lowest points of pipes and pooling away from the actual breach. Before grabbing wrenches, perform a systematic inspection:
- Dry the Area Completely: Use old towels or paper towels to wipe down every pipe, fitting, valve, and the cabinet floor until everything is bone dry.
- Run Water Systematically: Run a small stream of water down the basin while watching the upper connections. Next, plug the sink, fill it with water, and let it drain all at once to test the drainpipe under a heavy volume of water.
- Check Pressurized Lines: Feel along the hot and cold water supply lines, shut-off valves, and faucet connections.
- Use a Flashlight and Paper Towel: Run a dry paper towel along the underside of joints and pipes. The towel will instantly reveal damp spots that your eyes might miss in the dark cabinet interior.
| Leak Location | Common Signs | Possible Cause |
| P-trap | Water around curved pipe or bottom joint | Loose slip-joint connection or worn rubber washer |
| Supply line | Continuous dripping or wet hose braid | Damaged hose, kink, or failing threaded fitting |
| Shut-off valve | Water around valve handle or wall connection | Failed internal stem seal or loose compression nut |
| Drain assembly | Water appearing right after draining a full sink | Failed plumber’s putty, rubber gasket, or loose locknut |
| PVC drainpipe | Visible cracks, splits, or drips along straight runs | Damaged pipe material or improper alignment |
What Should You Do Immediately When a Pipe Leaks Under the Sink?
When you discover an active water leaking under sink, quick action prevents minor moisture from escalating into thousands of dollars in property damage. Follow these immediate emergency steps:
- Stop Using the Affected Sink: Immediately halt all use of the faucet and do not drain water into the basin.
- Remove Stored Items: Clear out all cleaning supplies, sponges, trash cans, and storage bins from beneath the sink to prevent chemical contamination and salvage your belongings.
- Place a Bucket or Container: Position a bucket, shallow pan, or old plastic container directly under the drip to catch active water.
- Turn Off the Water Supply Valves: If the leak originates from a pressurized water supply line, faucet connection, or shut-off valve, turn the corresponding under-sink shut-off valves clockwise until tightly closed.
- Shut Off the Main Water Line (If Necessary): If the under-sink valves are stuck, corroded, or spinning freely without stopping the flow, locate your home’s main water shut-off valve and turn it off immediately.
- Protect Electrical Elements: Keep standing water away from electrical outlets, garbage disposal cords, dishwashers, and under-sink instant hot water heaters.
- Dry Standing Water: Use towels and a wet/dry shop vacuum to thoroughly dry the cabinet floor and surrounding surfaces.
- Call a Professional: If the leak is uncontrollable, involves pressurized lines you cannot shut off, or stems from hidden wall plumbing, call a licensed plumber right away.
Important Safety Note: A pressurized supply-line leak will continue spraying water regardless of whether you turn off the faucet or drain. Always know where your main water shut-off valve is located before an emergency strikes.
READ MORE: How to Plumb a Pedestal Sink: Step by Step Guide
How to Fix a Pipe Leaking Under the Sink (Step-by-Step)
If you have diagnosed a minor drain or trap leak and want to know how to stop a pipe from leaking, many under-sink repairs are well within the capabilities of a handy homeowner. Here is a step-by-step guide to performing a successful under sink plumbing repair.
Step 1: Identify the Exact Leak Location
Before taking anything apart, confirm whether the leak is coming from a loose slip-joint nut, a worn washer, a cracked tailpiece, or a supply line. Knowing the exact source ensures you gather the right replacement parts before starting.
Step 2: Turn Off the Water Supply When Necessary
While gravity drain leaks do not require shutting off your home’s water, any work involving supply lines, shut-off valves, or faucet connections requires turning off the local water supply valves under the sink. Turn them clockwise until hand-tight.
Step 3: Prepare the Work Area
Clear the cabinet completely. Lay down old towels or a heavy-duty trash bag on the floor to catch any residual water trapped inside the P-trap when you loosen it. Keep a bucket, flashlight, and your tools close at hand.
Step 4: Inspect the P-Trap and Drain Connections
Loosen the plastic slip-joint nuts by hand or gently with channel-lock pliers if they are stuck. Slide the P-trap downward and dump the trapped water into your bucket. Inspect the interior of the trap and slip-joint fittings for accumulated hair, grease, soap scum, or physical damage.
Step 5: Tighten Loose Connections Carefully
In many cases, a leaking P-trap simply needs its slip-joint nuts retightened. Hand-tighten the nuts firmly, then give them an additional quarter-turn with channel-lock pliers.
- Warning: Never overtighten plastic PVC fittings. Excessive force can crush the plastic slip-joint washers, warp the threads, or crack the fittings, causing an even worse leak.
Step 6: Replace Damaged Washers or Seals
If tightening the nut does not stop the drip, unscrew the slip-joint nut completely and slide it back. Inspect the rubber washer inside. If it is flattened, hardened, or torn, slide it off and replace it with a new rubber slip-joint washer of the exact same diameter (typically 1-1/4 inch or 1-1/2 inch for standard residential sinks).
Step 7: Replace a Cracked Drainpipe When Appropriate
If you discover a split in a PVC drainpipe or a heavily corroded metal tailpiece, attempting a patch job with tape or epoxy is only a temporary band-aid. Purchase a replacement PVC P-trap kit or tailpiece extension from any home improvement center. Cut the new pipe to length with a hacksaw if necessary, align the washers properly, and assemble the new components securely.
Step 8: Check the Repair for Leaks
Once your repairs are complete, place a dry paper towel under the repaired assembly. Slowly turn the water back on (if supply lines were touched) and let a steady stream of water run down the sink drain for 60 seconds. Inspect all joints with your flashlight and paper towel. If everything remains completely dry, your repair is a success.
Professional Reality Check: Do not rely on plumber’s tape (PTFE tape), silicone sealants, or epoxy putty to permanently fix split pipes or worn slip-joint connections. PTFE tape is designed for threaded pipe joints and compression fittings (like pipe nipples and gas lines), not slip-joint drain connections, which seal via compressed rubber washers.
READ MORE: Kitchen Sink Draining Very Slowly? Step by Step DIY Fixes
What Tools and Materials Do You Need to Fix a Leaking Pipe?
Having the right equipment on hand makes any plumbing repair smoother and faster. The exact supplies you need will depend on whether you are working on a plastic drain assembly or a metal water supply line.
| Tool or Material | Purpose |
| Adjustable wrench | Tightening metal supply nuts and compression fittings |
| Channel-lock pliers | Loosening and tightening slip-joint nuts and stubborn fittings |
| Bucket | Catching residual water and debris when removing P-traps |
| Towels / Rags | Drying out the cabinet and keeping hands clean |
| Flashlight or headlamp | Illuminating dark, cramped under-sink spaces |
| Replacement washers | Swapping out worn rubber slip-joint or faucet gaskets |
| PVC P-trap kit | Replacing cracked or degraded plastic drain assemblies |
| Replacement supply line | Swapping out aging or bulging flexible water connectors |
| Work gloves | Protecting hands from sharp metal edges and grime |
How Much Does It Cost to Fix a Pipe Leaking Under the Sink?
When homeowners face plumbing repairs, understanding financial expectations is crucial. The cost to fix a pipe leaking under sink varies based on whether you perform a DIY repair or hire a licensed plumber, as well as the severity of the damage.
Minor Leak Repair Costs (DIY vs. Professional)
- DIY Repair Parts: If you only need to replace a rubber slip-joint washer or tighten a loose fitting, materials will cost between $2 and $10.
- Professional Minor Repair: If you hire a local plumber to tighten connections, replace washers, or adjust a slip-joint assembly, expect a service call fee plus labor, totaling between $125 and $250.
Component Replacement Costs
- P-trap Replacement: A DIY PVC P-trap kit costs $8 to $15. A professional plumber replacement typically runs $150 to $300 including parts and labor.
- Water Supply Line Replacement: Buying a new braided stainless steel supply line costs $10 to $25. Professional replacement ranges from $150 to $275.
- Shut-off Valve Replacement: Replacing a faulty under-sink angle stop valve professionally ranges from $175 to $350 depending on pipe material (copper sweating vs. compression fittings).
- Drain Assembly / Basket Strainer Replacement: Replacing a corroded sink drain basket assembly runs $200 to $450 professionally due to the tight space and specialized sealing required.
Professional Plumber Labor Rates
Most licensed residential plumbers charge an hourly rate ranging from $75 to $150 per hour, alongside a standard dispatch or diagnostic trip fee of $75 to $200. Emergency after-hours calls, weekends, or holidays can incur premium hourly rates between $150 and $300+ per hour.
Note: Estimates reflect average US residential plumbing pricing. Actual costs vary depending on geographic location, accessibility of the plumbing, local labor rates, and whether unexpected complications (such as rusted wall pipes or structural rot) are uncovered.
READ MORE: How to Plumb a Double Sink: Step by Step
DIY Repair vs. Hiring A Professional Plumber
Deciding whether to roll up your sleeves or call an expert depends on your comfort level, tools, and the complexity of the leak. Here is a practical guide to help you decide:
| Plumbing Problem | DIY or Professional? | Reason |
| Accessible loose drain connection | Possible DIY | Simple hand tightening or adjustment of slip-joint nut |
| Worn P-trap washer | Possible DIY | Inexpensive part swap requiring basic channel-lock pliers |
| Cracked PVC drainpipe | Depends | Easy if modular PVC; challenging if glued ABS/PVC in tight walls |
| Damaged water supply line | Professional recommended if unsure | Involves pressurized water; incorrect installation risks flooding |
| Leaking shut-off valve | Professional recommended | Requires shutting off main water; risk of snapping old wall pipes |
| Hidden wall pipe leak | Professional required | Requires drywall cutting, structural diagnosis, and pipe soldering |
| Severe or recurring leak | Professional required | Indicates systemic plumbing failure or improper venting/slope |
A Note for Renters: If you rent your home, apartment, or condo, you should notify your landlord, property manager, or maintenance team immediately upon discovering an under-sink leak. Attempting DIY plumbing repairs on rental property can make you legally liable for accidental water damage or code violations.
When Should You Call an Emergency Plumber?
While a slow drip into a bucket can wait until morning or the weekend, certain plumbing scenarios require immediate dispatch of an emergency plumber. Call a professional right away if:
- Water is flowing continuously and cannot be stopped by closing the under-sink shut-off valves.
- The main water shut-off valve fails or will not turn completely, leaving your entire home exposed to flooding.
- Water is rapidly spreading across kitchen or bathroom flooring and soaking into baseboards.
- The leak originates from inside a wall or cabinet partition rather than exposed under-sink fixtures.
- Pipes are severely corroded, split, or structurally broken when touched.
- Water is pooling near electrical outlets, garbage disposal wiring, dishwasher connections, or smart home appliances. (Never touch electrical components or wet cords while standing in water.)
- Cabinet flooring or subflooring is becoming spongy, soft, or warped, indicating prolonged hidden moisture damage.
- A leak recurs immediately after you have already attempted a repair.
What Happens If You Ignore a Pipe Leaking Under the Sink?
Ignoring an under-sink plumbing leak hoping it will somehow fix itself is one of the most costly mistakes a homeowner can make. Water is relentless and will quickly cause severe secondary damage:
- Cabinet and Vanity Damage: Plywood and particle board under sinks swell, delaminate, and disintegrate when exposed to chronic moisture. Replacing a custom vanity or kitchen base cabinet can cost thousands of dollars.
- Warped Flooring and Subfloors: Escaping water travels outward beneath cabinets, warping hardwood floors, buckling luxury vinyl planks, and rotting wooden subfloors.
- Mold and Mildew Growth: Dark, humid, enclosed cabinet spaces are breeding grounds for mold. Toxic mold spores can trigger severe allergies, asthma attacks, and unpleasant musty odors throughout your home.
- Structural Wood Rot: Long-term water exposure rots wooden framing studs and toe-kicks supporting your kitchen or bathroom structure.
- Inflated Water Bills: If your leak involves a pressurized supply line, even a small constant spray will cause your monthly water utility bill to spike noticeably.
- Costly Secondary Repairs: What starts as a $5 washer replacement can easily snowball into a major $3,000 property restoration project if structural rot and mold remediation become necessary.
READ MORE: How to Install Kitchen Sink Plumbing: Step by Step
How to Prevent Pipes From Leaking Under Your Sink
The best plumbing repair is the one you never have to make. Implementing a few simple preventive habits can protect your kitchen and bathroom plumbing from unexpected failures:
- Inspect Your Plumbing Bi-Annually: Make a habit of opening your under-sink cabinets every six months. Look for water stains, powdery mineral deposits, rust spots, or dampness.
- Avoid Overcrowding Storage: Do not jam heavy glass bottles, canned goods, or bulky cleaning supplies against your P-trap and supply lines. Accidental bumps can loosen slip-joint fittings or crack plastic pipes.
- Never Use Excessive Force: When tightening plastic slip-joint nuts, rely on hand-tightness supplemented by a gentle quarter-turn with pliers. Overtightening ruins washers and threads.
- Address Slow Drains Promptly: If your sink drains slowly, greasy buildup or hair clogs can create backpressure and stress pipe joints. Clear clogs early using mechanical snakes or safe enzyme cleaners rather than harsh chemical drain openers that degrade pipe walls.
- Inspect Supply Hoses: Replace flexible rubber water supply lines every 5 to 7 years, or upgrade to braided stainless steel supply lines which offer superior burst resistance.
- Keep Cabinets Dry: Wipe down wet items before placing them back under the sink. Ensure good ventilation in bathrooms to reduce ambient humidity.
- Schedule Professional Inspections: If your home is more than 30 years old and still features original galvanized steel or brass plumbing, have a qualified local plumber evaluate your system during routine home maintenance.
Frequently Asked Questions
Why is my pipe leaking under the sink?
Under-sink pipes typically leak because slip-joint connections have loosened from normal vibrations, rubber washers inside the joints have worn out and flattened over time, or plastic drainpipes have developed cracks. In other cases, pressurized water supply lines, faulty shut-off valves, or deteriorating sink drain basket assemblies can be the source of the water pooling in your cabinet.
How do I fix a leaking pipe under my kitchen sink?
To fix a leaking drainpipe, place a bucket underneath, loosen the slip-joint nuts on the P-trap, and remove the trap to inspect it. Clean out any debris, check the rubber washers for wear, replace any damaged washers, and reassemble the piping. Hand-tighten the slip-joint nuts firmly and secure them with a quarter-turn using channel-lock pliers without overtightening.
Why does my sink drain pipe leak only when water runs?
If your pipe only leaks when water is actively running or when you drain a full basin, the leak is located on the gravity-fed drain side (such as the tailpiece, slip-joint fittings, or P-trap). Because these pipes are not under pressure, water only escapes when flowing downward through gaps in loose fittings or worn gaskets.
Can I use plumber’s tape to stop a pipe leaking under the sink?
No, PTFE plumber’s tape is not designed for slip-joint drain connections or PVC P-traps. Plumber’s tape is used exclusively on tapered threaded pipe joints (like metal pipe nipples and gas fittings) to lubricate threads. Applying tape or epoxy to a leaking slip-joint connection will not stop water from bypassing a worn rubber washer.
How much does it cost to repair a leaking pipe under the sink?
DIY repairs typically cost between $2 and $15 for replacement washers or a new P-trap kit. If you hire a professional plumber, minor repairs or trap replacements generally cost between $125 and $300, while replacing damaged supply lines, shut-off valves, or sink drain assemblies ranges from $150 to $450 depending on labor and complexity.
Final Thoughts:
Discovering water pooling under your sink is never fun, but it doesn’t have to turn into a disaster. By understanding common culprits from loose P-trap connections and worn rubber washers to aging supply lines and cracked PVC drainpipes you can accurately diagnose where the problem originates.
While minor drain adjustments and washer replacements make great DIY weekend projects, never hesitate to call a licensed professional plumber when dealing with pressurized supply lines, broken shut-off valves, or hidden wall leaks. Taking prompt action protects your kitchen and bathroom cabinets, prevents expensive structural water damage, and gives you lasting peace of mind. Inspect your under-sink plumbing today, and don’t let a small drip turn into a major headache!

