A water heater works hard every day. Most homeowners never think about it until something goes wrong. One of the best ways to protect it is by replacing the anode rod on time.
If you are learning how to replace water heater anode rod, the good news is this. It is a basic maintenance task in many homes. It is not glamorous, but it can save you money. The anode rod helps stop corrosion inside the tank. That means it can help your water heater last longer and work better.
In this guide, you will learn what the rod does, how to tell when it needs replacing, and how to handle the job step by step. You will also learn when it is smarter to call a plumber. Lets deep dive into “How to Replace a Water Heater Anode Rod: Step by Step DIY Guide”
READ MORE: Hard Water Impact on Water Heater Lifespan — Signs, Fixes, and Costs
What Is a Water Heater Anode Rod?
A water heater anode rod is a long metal rod inside the tank. Its job is to attract corrosion before the tank itself starts to rust.
That is why it is often called a sacrificial anode rod. The rod sacrifices itself so the tank does not have to.
Here is the simple version:
- The rod takes the damage first
- The tank stays protected longer
- The rod wears out over time
- Once the rod is mostly gone, the tank becomes more exposed
This is a key part of water heater maintenance. If the rod is ignored for too long, the tank can corrode faster. That can lead to leaks and an early replacement.
There are a few different rod materials, and each one works a little differently. But the main idea is the same. The rod protects the tank from rust.
READ MORE: Best Whole House Water Softener System for Home (2026) — Top Picks & Buyer’s Guide
Signs It May Be Time to Replace the Anode Rod
A homeowner does not always need to pull the rod out just to know something may be wrong. There are some common warning signs.
Look for these signs:
- Rusty or discolored hot water
- A rotten egg smell from the hot water
- A noisy tank
- Visible corrosion around fittings
- A rod that looks badly worn during inspection
- A water heater that is getting older
If you notice one or more of these signs, it may be time to check the rod. A rod does not last forever. In many homes, it should be inspected every few years. The exact timing depends on water quality, tank size, and how often the heater is used.
If your hot water has a strange smell or the tank seems to be aging fast, the water heater anode rod replacement may be overdue.
Tools and Materials You Need
Before you start, gather your supplies. Having everything ready makes the job easier.
Basic tools and materials:
- New anode rod
- Socket wrench
- Breaker bar
- Teflon tape
- Pipe wrench
- Garden hose
- Bucket
- Gloves
- Safety glasses
Some water heaters use a hex-head rod. Others may have a flexible rod, especially if the heater has low overhead clearance. So the exact tools may vary by model.
It is always smart to check your manufacturer instructions before you begin. That can help you buy the right rod size and style.
READ MORE: How to Clean Sediment from a Water Heater
Safety Tips Before You Start
Safety matters. Water heaters can hold very hot water. They also involve electricity or gas, depending on the model.
Before you touch anything:
- Turn off the power or gas
- Shut off the water supply
- Let the heater cool if needed
- Wear gloves and safety glasses
- Watch for sharp metal edges
- Follow the manufacturer instructions
If your heater is electric, turn off the breaker first. If it is gas, switch it off as directed by the unit’s instructions.
Do not rush this part. A few extra minutes of caution is worth it.
READ MORE: How to Flush a Tankless Water Heater (Step-by-Step Guide)
How to Replace a Water Heater Anode Rod: Step by Step DIY Guide
This is the part most homeowners want to understand clearly. Here is a simple step-by-step guide.
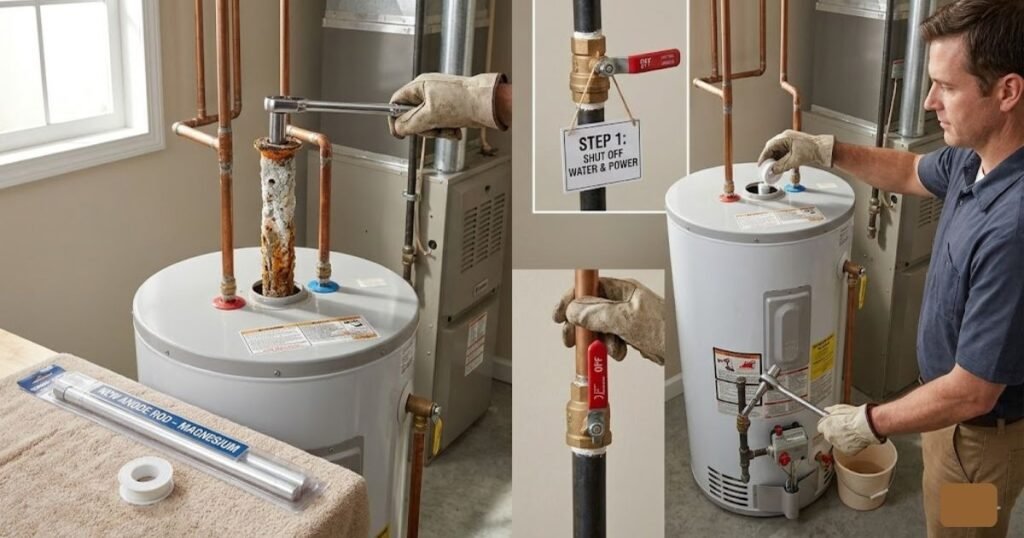
1. Turn off power or gas
Start by shutting down the heater safely.
- For electric units, turn off the breaker
- For gas units, turn the control to the off position
This helps prevent damage and keeps the job safer.
2. Shut off the cold water supply
Find the cold water valve feeding the tank and close it.
This stops more water from entering while you work.
3. Drain a few gallons from the tank if needed
Some water may spill when the rod comes out. Draining a few gallons can lower the water level and make the job cleaner.
Use a hose connected to the drain valve if needed. Drain into a safe area where hot water will not cause damage.
4. Find the anode rod location
Most anode rods are located on the top of the water heater. Sometimes the rod is under a plastic cap. Other times it is built into the hot water outlet.
On some models, the rod is easy to see. On others, it may be harder to reach.
5. Loosen the old rod
Use the correct socket wrench or breaker bar to loosen the rod.
This part can be stubborn. Anode rods often sit tight for years. If the rod does not move right away, do not force it too fast. Apply steady pressure.
A little extra leverage may help. Some homeowners need a second person to hold the heater steady.
6. Remove the worn rod
Once loose, slowly pull the old rod out.
This is where you may see how worn it really is. In many cases, the rod will be heavily corroded or thin in spots. That is normal. It means the rod has been doing its job.
If the rod is badly bent, it may take some patience to remove it.
7. Install the new rod
Wrap Teflon tape around the threads if the manufacturer recommends it. Then insert the new rod into the opening.
Carefully thread it by hand first. That helps avoid cross-threading. Once it is lined up correctly, tighten it with your wrench. Do not overtighten. Snug is good. Too much force can damage the fitting.
8. Tighten securely
Make sure the rod is secure, but not forced too hard.
A good seal matters. A loose fit could lead to leaks. But an overly tight fit can make future replacement harder.
9. Restore water and power
Turn the cold water supply back on. Let the tank refill fully.
If you have an electric heater, do not turn power back on until the tank is full. Running the heating elements without water can damage them. For gas heaters, relight or restore the unit as instructed.
10. Check for leaks
Look closely around the rod opening and nearby fittings. Check for:
- Dripping water
- Slow leaks
- Loose connections
- Any unusual noise
If you see a leak, tighten carefully or call a plumber if it does not stop. That is the basic process for anyone learning how to replace water heater anode rod at home.
READ MORE: Why Does My Hot Water Have a Metallic Taste? Causes, Tests & Fixes for Homeowners
Types of Anode Rods
Not all rods are the same. The material matters.
1. Magnesium anode rod
A magnesium anode rod is a common choice. It is very effective at protecting the tank. Many homeowners like it because it offers strong corrosion protection.
It may be a good fit if your water quality is normal and you want solid tank protection.
2. Aluminum anode rod
An aluminum anode rod is another option. It tends to last well in some water conditions. It may also be used when water chemistry makes magnesium less ideal.
Some homeowners choose it for durability and cost reasons.
3. Aluminum zinc anode rod
An aluminum zinc anode rod is often chosen when a hot water smell is a concern. The zinc can help reduce the rotten egg odor that some homes experience.
This type can be a smart choice for homes with sulfur smells in hot water.
Which one is best?
There is no one perfect rod for every home. The best choice depends on your water type, your heater model, and what problem you are trying to solve.
In general:
- Magnesium is a strong all-around choice
- Aluminum can be practical in certain water conditions
- Aluminum zinc may help with odor issues
If you are unsure, check the heater manual or ask a plumber.
READ MORE: Hot Water Runs Out Too Fast — Fixes, Costs & When to Replace
How Often Should You Replace Anode Rod?
There is no single schedule for every home. Replacement timing depends on:
- Water quality
- Tank usage
- Local water hardness
- Heater age
As a general rule, many homeowners check the rod every 2 to 3 years. In areas with hard water, it may wear out faster. In some homes, it may last longer.
If you want to extend water heater life, do not wait until the tank starts leaking. It is better to inspect the rod before damage starts.
A simple guideline is this: if the rod looks badly worn or thin, replace it.
Common Mistakes to Avoid
A few simple mistakes can turn a basic job into a bigger headache.
Avoid these problems:
- Forgetting to turn off power
- Not shutting off the water
- Buying the wrong rod size
- Over tightening the new rod
- Skipping leak checks
- Ignoring tank condition
One of the biggest mistakes is rushing. A careful replacement is usually better than a fast one.
Another common issue is buying the wrong rod type. Always match the size and style to your water heater model.
READ MORE: Why My Tankless Water Heater Shuts Off During Shower — Fixes & Costs
When to Call a Plumber
Not every job is easy. Sometimes a professional is the better choice.
Call a plumber if:
- The rod is stuck or hard to remove
- There is very tight overhead clearance
- The fittings are corroded
- You see leaks
- The water heater is old or damaged
- You do not feel comfortable doing the work
Some rods are sealed in very tight. Others may be blocked by low ceilings or pipes. A plumber has the right tools to handle tough situations.
If your heater is already rusting or leaking, the rod may not be the only issue.
Anode Rod Replacement Cost Considerations
How much does it cost to extend water heater life? Surprisingly little!
- DIY Cost: A new rod usually costs between $30 and $60. Tools (if you don’t have them) might run you another $40.
- Professional Cost: A plumber will typically charge between $150 and $300 for the service, which often includes a quick tank flush and inspection.
- Replacement Cost: A new water heater, installed, usually starts around $1,200 to $2,000.
When you look at it that way, spending $50 every few years to keep your current heater running for 15 years instead of 8 is one of the best investments you can make in your home.
Anode Rod Maintenance Tips
Once the new rod is in place, keep up with basic care. That helps the heater stay in better shape.
Helpful maintenance tips:
- Flush the tank regularly
- Check the anode rod every few years
- Keep the area around the heater clean
- Watch for signs of corrosion
- Schedule maintenance before major problems happen
If your water is hard, sediment can build up faster. That means regular flushing becomes even more important.
Also, keep an eye on small changes. A little rust, a small smell, or a tiny leak can be an early warning sign. Good water heater maintenance does not need to be complicated. It just needs to be consistent.
Conclusion
Learning how to replace water heater anode rod is a smart step for homeowners who want to protect their tank and avoid early breakdowns. The rod is a small part, but it does an important job. It helps fight corrosion and can help extend water heater life.
If you check it every few years, replace it when needed, and stay on top of basic maintenance, your water heater has a better chance of lasting longer and working better.
FAQs
How do I know if my water heater anode rod needs replacing?
Look for rusty water, a rotten egg smell, a noisy tank, or visible corrosion. If the rod looks heavily worn during inspection, it is probably time to replace it.
Can I replace a water heater anode rod myself?
Yes, many homeowners can do it with basic tools and the right safety steps. If the rod is stuck, the space is tight, or the heater is old, a plumber may be the better choice.
How often should an anode rod be replaced in a water heater?
A common guideline is to inspect it every 2 to 3 years. Some homes may need replacement sooner, especially with hard water.
What happens if you do not replace the anode rod?
The tank can start corroding faster. That may lead to rust, leaks, and a shorter water heater lifespan.
Which anode rod is best for a water heater?
It depends on your water and your heater. Magnesium offers strong protection, aluminum is practical in many cases, and aluminum zinc may help with odor issues.

