I’ve been in the construction business for over 20 years, mostly handling residential builds and renovations across the Midwest and Southwest, and one thing that’s saved my bacon more times than I can count is a solid temporary power pole setup.
If you’re a homeowner diving into a new build or a major remodel, or maybe setting up a mobile home on some rural acreage, understanding temporary power poles is crucial. Simply put, a temporary power pole is a standalone electrical service pole that provides electricity to your site before the permanent utility hookup is ready. It’s basically your lifeline for running tools, lights, and even basic appliances during the early stages of a project.
What Is a Temporary Power Pole?
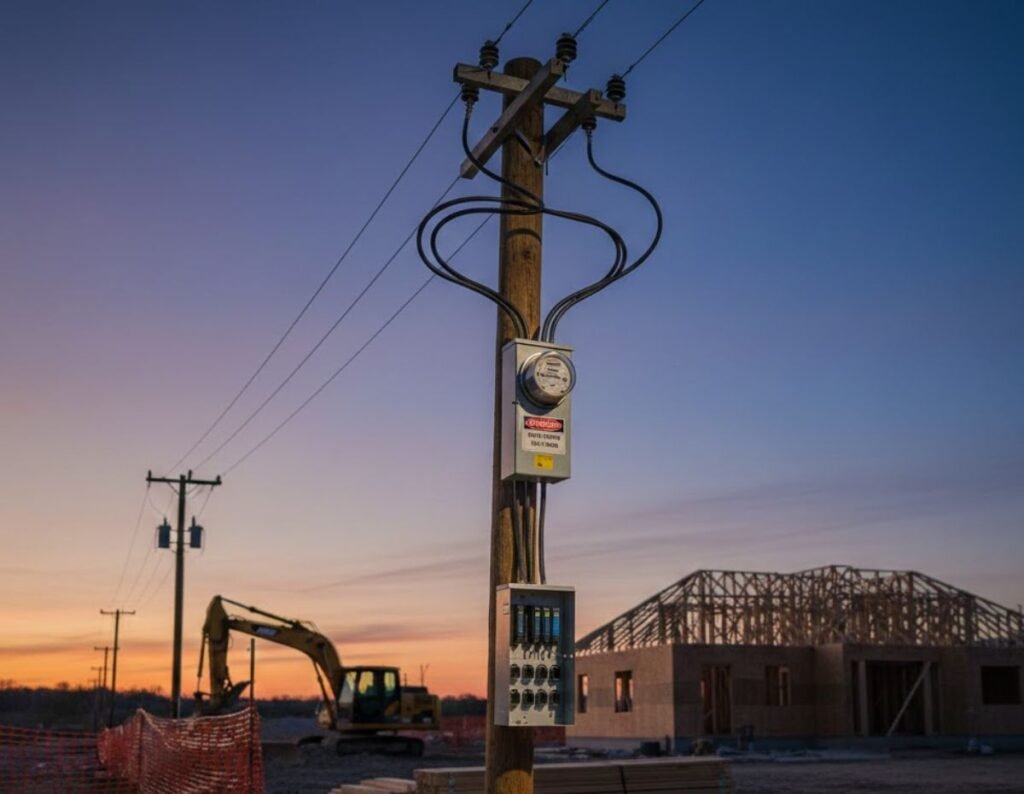
A temporary power pole (also called a temporary service pole, construction pole, or sometimes a “saw pole”) is a free-standing utility post installed at a work site. It supports a weatherproof meter base and service panel, unlike a permanent meter which is mounted on your house or a ground pedestal. The pole is anchored in the ground (typically a 4×4 or 6×6 treated wood post or a steel conduit post) and holds all the electrical gear needed for a short-term hookup. Electricians often use the term meter pole or temporary service.
A survey of a Georgia utility’s rules even lists these as “Temporary Service Poles (Saw Service)”. In practice, a temporary pole has its own disconnect, meter socket and small breaker panel, then is removed once the permanent service goes live. It exists only for the construction period and carries power directly from the utility to the job site.
When Do You Need a Temporary Power Pole?
NEC Article 590 allows temporary power only for construction, renovation, repair or emergencies. In plain terms, you’d use a temporary pole whenever a permanent meter isn’t ready but work must be powered. Common scenarios include:
- New home construction: Before your house’s permanent service is hooked up, a temp pole provides electricity for framing and finishing.
- Mobile or manufactured homes: These often arrive on site without any utility connection. A mobile-home pole supplies power during setup.
- Major remodels or additions: If the existing meter must be shut off or moved, a temporary pole feeds the work area.
- Rural land development: On lots without nearby power, a pole is set so you can build out infrastructure.
- Disaster rebuilds: After storms or fires, temp poles restore power during reconstruction.
- Emergency or special events: (Less common in residential work, but used for temporary lighting or power trailers.)
In each case, contractors “rely on them for new builds, renovations, and job sites”, since you often need power long before permanent service is in place. Utilities will typically only allow a meter once the pole installation is approved.
READ MORE: Rewiring a House: Costs, Process, Permits, and What Homeowners Should Expect
How a Temporary Power Pole Works
A temporary power pole works like a mini utility hookup. The basic steps are:
- Set and secure the pole: A treated post (usually 16–24 ft long) is buried or concreted at least 2–4 ft deep. It must stand level and be braced or guyed for stability, keeping clearances from structures.
- Install meter socket and weatherhead: Near the top, a weatherproof meter base (often 100–200A rated) is mounted. A weatherhead is attached at the peak for the incoming service cable. An eyebolt or cross-arm is added just below the weatherhead so the utility’s drop line can anchor securely.
- Attach the breaker panel: Directly below the meter, an outdoor panel with a main breaker is installed. The breaker size matches the service (60A is common for residential builds) and allows all power to be shut off on the pole.
- Wire outlets and grounding: The panel is wired with outdoor-rated cable (e.g. THHN/THWN) to GFCI-protected outlet circuits. Typically you’ll provide a couple of 20A duplex receptacles on the pole itself for tools. Grounding rods are driven (usually two 8‑ft rods) and bonded to the panel for equipment grounding. All connections must be weatherproof and meet code.
- Inspection and utility connection: The installation must pass a local electrical inspection (for code compliance). Once approved, you call the power company. A utility crew will then attach the overhead service drop to the pole’s weatherhead (using the eyebolt) and energize the meter. After this, the pole is live and contractors can plug in power as needed.
Throughout this process the National Electric Code (NEC) is followed. For example, NEC 590 requires GFCI protection on construction site outlets and weatherproof in-use covers if outdoors. By the end, the temporary pole functions exactly like a small transformer box, supplying 120/240V service to the work site.
Temporary Power Pole Requirements in the USA
Temporary poles must meet both NEC rules and the local utility’s standards. Generally, these are some common requirements:
- NEC compliance: All permanent-service requirements (Article 230, grounding, clearances, etc.) still apply to the temp pole. NEC Article 590 adds a few allowances (e.g. approved wire types and removability), but does not waive basic safety standards. In short, build the pole “to the utility’s specifications and follow NEC” just as you would a normal service.
- Utility company rules: Every provider has specifics. For example, many require an 8‑ft #6 copper ground rod driven beside the pole, a weatherproof NEMA 3R meter base and panel enclosure, and GFCI protection on all 120V outlets. The entrance cable from the weatherhead must be secured to the pole (stapled) and a bracket/eyebolt must be installed for the drop line. Other rules include minimum pole size (often 6×6 wood or 6″ round) and height (many specify at least 20 ft total, 4 ft in ground). The exact specs (clearances over roads, bracket bolts, etc.) vary by utility and region.
- Permits and inspection: Virtually all U.S. jurisdictions require a building/electrical permit for a temporary service pole. After installing the pole, a local inspector must approve the meter base, panel wiring, grounding, etc. Many areas also require the utility to witness or sign off on the final hookup. Skipping permits is a common mistake and can result in fines or a shutdown.
- Utility approval and fees: Utilities usually charge a hook-up fee or deposit (for example, $30–$50 is common). They may also enforce a limit on how long temporary service can remain (often 6–12 months). You’ll typically coordinate with the utility’s construction or engineering department to schedule the connection and get an approval sticker on the panel.
- Safety standards: Temporary poles must still meet safety codes. This means weatherproof in-use covers on receptacles, proper conductor fill, clear labeling, and mechanical protection of cables. Grounding, clearances, and bonding must follow NEC/NESC. For instance, NEC 590.6(B) essentially requires GFCIs on all 15–30A 120V outlets used by construction personnel. Utilities will expect these safety features at inspection time.
Overall, think of a temporary pole as a special temporary service entrance – it follows the same rules as a permanent service, just intended for limited use.
READ MORE: Cost to Upgrade Electrical Panel to 200 Amps
Temporary Power Pole Components Explained
Each temporary pole assembly includes several key parts:
- Pole (Wood or Metal): Most temporary poles use a pressure-treated wood post (commonly 4×4 or 6×6) or a steel conduit. The pole must be tall enough to meet overhead clearance requirements, typically around 16–24 feet, with 2–4 feet buried for stability. Some utilities require specific sizes or approved materials such as treated Douglas fir or cedar.
- Weatherhead & Attachment Point: At the top of the pole, the utility’s service conductors enter through a weatherhead. An eyebolt or J-hook near the top provides a secure attachment point for the overhead service drop, allowing utility crews to connect power safely.
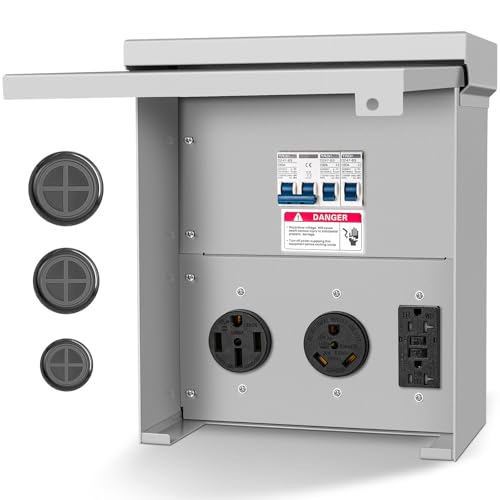
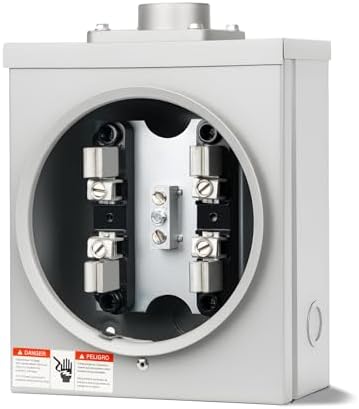
- Meter Socket: A utility-approved meter base, usually rated for 100–200 amps, is mounted to the pole. This socket holds the electric meter and serves as the official service connection point for the power company.
- Main Breaker Panel: Below the meter is an outdoor-rated breaker panel with a main disconnect. This breaker protects the entire temporary service and is typically sized around 60 amps for residential construction. The enclosure is weatherproof and often lockable.
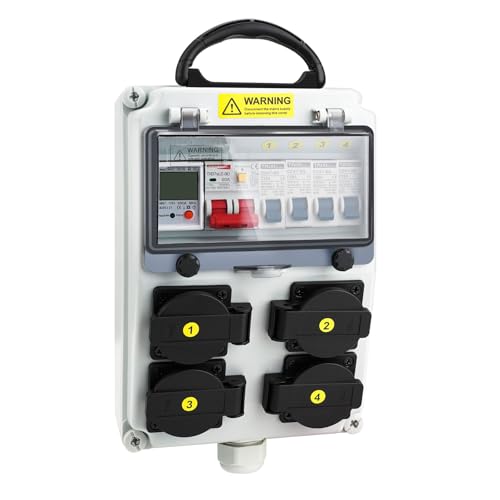
- Outlets and Branch Circuits: The panel feeds a small number of branch circuits, commonly including 20-amp GFCI outlets for tools and job-site equipment. Any additional circuits must also meet construction-site safety requirements, with GFCI protection on all 120-volt receptacles.
- Grounding System: The service is grounded using two 8-foot ground rods driven into the soil and bonded to the panel’s ground bus. Proper grounding clamps designed for ground rods are required.
- Wiring & Weather Protection: All wiring is rated for outdoor use, with splices enclosed in weatherproof boxes. Components such as the meter, panel, and outlets are housed in outdoor-rated enclosures, with in-use covers to keep outlets safe during wet conditions.
In simple terms, a temporary power pole functions like a compact, outdoor service entrance combining a pole, meter, disconnect, outlets, and grounding into one secure setup for temporary electrical power.
Temporary Power Pole Cost (USA)
Installing a temporary pole can range widely in cost. For a typical residential setup (say a 60A overhead pole), expect anywhere from $900 to $4,000 total. The pole and basic hardware might only be a few hundred dollars, but labor (electrician’s time) is a large part of the bill. For example, one cost breakdown shows:
| Component | Estimated Cost (USD) |
| Power pole (wood/metal) | $150 – $500 |
| Meter base & panel (60A) | $100 – $400 |
| Breakers & wiring | $50 – $300 |
| Grounding rods & clamps | $50 – $150 |
| Permits & inspection fees | $50 – $200 |
| Electrician labor (installation) | $500 – $2,500 |
| Total (typical range) | $900 – $4,000+ |
(These figures are illustrative; actual prices vary by region, amperage, and site conditions.)
Labor can swing higher if the job is complex or the pole is far from access. Bringing power underground (trenching conduit from the pole) can add another $500–$2,000 in excavation costs. Utility connection fees or deposits (often $30–$100+) also add to the bill. DIY installation can save on labor, but remember permits and safety equipment still cost money. It’s wise to get quotes from local electricians and the utility. In general, overhead poles are cheaper; running underground cable drives the price up significantly.
READ MORE: Electrical Panels
How to Install a Temporary Power Pole
1. Plan and Permit: Start by obtaining a permit from your local building department. Skipping the permit is a common mistake; most areas require one for a temporary electric service. You (or your contractor) will submit plans for the pole, meter, panel and grounding, which will be reviewed just like any electrical installation.
2. Set the Pole: With permits in hand, either you or a licensed electrician will set the pole in the ground. In many jurisdictions a homeowner may even physically drive the post, but the wiring must meet code (and some utilities require a licensed electrician). Place it at the correct height and location per code: typically a 16–24 ft pole with 2–4 ft buried. Make sure it clears driveways/roads (usually 16–18 ft above ground). A local rule-of-thumb: keep it within ~70 ft of the house if possible. Brace the pole with a support arm or guys so it won’t lean.
3. Mount Equipment: Install the weatherhead, meter base, and panel on the pole. Run outdoor-rated conduit up the pole. Mount a utility-approved meter socket at about 5–6 ft high so meter readers can access it. Below that, mount the breaker panel with the main disconnect. Wire in the grounding rods and ensure #6 copper from rods to panel. Install the required GFCI receptacles on the panel or pole.
4. Electrician Work: Have a licensed electrician wire the pole interior: install breakers, tie the neutrals/grounds correctly, and connect any temporary branch circuits. They will ensure everything meets NEC (wire sizes, torque, grounding, etc.). This phase typically costs a few hundred dollars (True Built Home notes ~$450–$750 labor).
5. Inspection: Call the inspector once installation is complete. The local electrical inspector will check that the pole, meter base, panel and grounding meet code. Often the utility requires inspection approval before they energize the pole. If any issues (like missing grounding or wrong wire), the inspector will note corrections.
6. Utility Connection: After you pass inspection, contact your electric provider. They will schedule a lineman to connect the power drop. The utility worker will clip the overhead drop conductors to your pole’s weatherhead/eyebolt and energize the meter. Expect this step to take a few days to a week, depending on the utility’s schedule.
Throughout this process, hire a licensed electrician for the technical work. As one builder advises, you or an electrician set the pole to code, pull the permit, and then the inspector and utility take over. The exact steps vary by area, but typically: get a permit, install pole & panel, inspect, and then get the power turned on.
Temporary Power Pole vs Permanent Power Pole
The main differences between a temporary pole and a permanent service are in duration and setup:
- Purpose and Duration: A temporary pole is meant only for construction or short-term use. It’s disconnected and removed once permanent power is ready. In contrast, a permanent service pole (or underground connection) is intended for the life of the structure.
- Installation Method: Temporary poles are standalone and often overhead. Permanent service usually comes via a service drop attached to the house or an underground conduit to a meter pedestal.
- Code Treatment: Despite appearances, a temporary service must meet the same safety requirements as a permanent one. NEC requires that all requirements for permanent service (metering, grounding, disconnects, etc.) also apply to temporary services. In fact, Lakeland Electric explicitly states a temporary service “shall comply with all requirements applicable to permanent services” (application, code compliance, inspections, etc.).
- Connection Procedures: Utilities treat them differently. You cannot simply leave a temporary hook-up forever. For example, True Built Home warns that once the permanent meter is installed, “you can remove your temporary power pole from your site”. NEC 590.3(D) even requires temporary wiring to be removed after it is no longer needed. In practice, when a home is finished, the electrician will switch the service to the permanent meter, and only then the temporary pole is dismantled.
- Service Configuration: A temporary pole typically has a smaller setup (often 60A for homes). Permanent service might be 100A, 200A, or more. Also, a temporary pole must stand alone you must never tie the temporary and permanent panels together in parallel. Utilities forbid this. As one electric co-op notes, the temporary drop “shall not be tied to the customer’s permanent panel” except very briefly for testing. In short, they must remain isolated circuits.
- Timing: Utilities often require a temporary pole first because a permanent meter box or transformer isn’t ready. After final inspection and wiring, the temp pole is taken out of service. Only then can the permanent service be connected fully.
In summary, a temporary power pole is essentially a self-contained, interim service entrance. Once the permanent service is in place, the temporary pole must be removed. This ensures that the home transitions to a long-term, code-compliant service without overlapping power sources.
READ MORE: Mr Sparky Electric
Common Mistakes Homeowners Make
Even experienced DIYers can trip up on a temporary pole. Some frequent errors include:
- Wrong pole size or placement: Using too short a pole or not burying it deep enough is a problem. Many jurisdictions require at least a 20′ pole (16′ above ground, 4′ buried). Poles that are too short may fail clearance or drop rules. Also avoid placing it under trees or too close to the street utilities have strict clearance requirements.
- Improper grounding: We often see people use only one 4′ rod or the wrong clamp. Code requires two 8′ rods with a proper #6 clamp. Never use a cheap “water pipe” clamp on the ground rod it must be a listed teardrop or split-bolt clamp. Insufficient grounding will fail inspection.
- Lack of bracing/guying: A temp pole must stand rigid. Failing to anchor or brace the pole (for example, with a 2×4 support) can lead to a violation or a tipping hazard.
- Unapproved equipment: Using off‑the-shelf extension cords or boxes as part of the permanent set-up is illegal. For instance, tapping into a house panel or reusing drywall wiring for the panel is not allowed. The meter base and breakers must be properly rated and labeled. Using non-listed meters or boxes will cause a rejection.
- Ignoring weatherproofing: All outdoor enclosures must be NEMA‑rated. We’ve seen outlets without “in-use” covers or panels without proper seals. NEC dictates weatherproof covers on all 120V receptacles. Not doing this will fail inspection and can create shock hazards.
- Skipping permits/inspections: This is one of the biggest mistakes. Many homeowners think a temporary pole is “temporary enough” to skip permits but that can lead to fines or service disconnection. Always pull the permit and pass the required inspections.
- Bypassing the utility: Attempting to energize the panel yourself (e.g. using a generator or hooking to an existing service illegitimately) is dangerous and illegal. Only the utility is allowed to connect their drop line. Don’t let anyone bypass the main breaker or meter.
- Overloading or misconfiguring panels: Putting too many loads on a small panel, or trying to use the panel for storage, can cause problems. The panel should only feed the intended outlets. One common issue is failing to label circuits or exceeding the breaker limits.
- Neglecting safety: Leaving cords lying around the site, or not protecting them from damage, is risky. NEC requires cords be protected from physical damage. Also, insufficient lighting or lack of lock-out can endanger workers.
Real-world example: an inspector once cited a temp pole for missing the second ground rod and using a water pipe clamp on the first rod. Another time a contractor forgot the weatherproof cover on a plug (easy mistake), and the job was red‑tagged. Careful planning avoids these pitfalls.
Temporary Power Pole for Mobile Homes
Mobile homes and RVs have their own twist on temporary service. Many utilities actually refer to a “Mobile Home Pole” or “Metering Pole” when powering a manufactured home. The basic setup is similar but often with stricter placement rules. For instance, Greeneville (TN) Light & Power specifies:
- A treated pole at least 20 feet long (4 ft buried in ground, 16 ft above) and minimum 6″×6″ in cross-section. This meets the NESC clearance requirements.
- An eyebolt or J-hook within 6″ of the top (around 16 ft high) for the service drop.
- The top of the meter base is typically set about 6 feet above ground low enough for easy access. Utility rules often limit the meter height (e.g. “meter must be ≤6′” in some areas), so the panel sits just below it.
- Clearance to roof: the pole height must give at least 4′ clearance above any part of the mobile home’s roof. Many inspectors insist on a 16′ minimum height overall.
- Grounding: Two 8′ rods with #6 copper wire are mandatory, with approved clamps.
- Equipment: A single‑phase 120/240V panel sized to match the home (often 100–200A service) is used. The disconnect on the pole must match the interior panel size.
- Distance limits: The pole must not be more than about 30′ from the home’s perimeter. If wiring extends beyond that, a subpanel or other measures may be required.
- Inspection: Crucially, a mobile home pole must be inspected every time a home is connected. Utilities often require prior approval and an engineer’s sign-off for mobile home service poles.
In practice, setting up a temporary pole for a mobile home follows the same permit and installation steps as any site, but check the mobile-home-specific specs. Many RV parks and modular home dealers are very familiar with these requirements. As always, consult your local utility they may even have a published drawing or checklist for mobile home poles.
How Long Can You Use a Temporary Power Pole?
Utilities typically allow 6-12 months on a temporary power pole, enough for most builds. Extensions are possible with good reason like weather delays but expect fees and reinspections.
They push for permanent ASAP to avoid wear and ensure billing accuracy. I’ve had jobs extend to 18 months on rural sites, but only after jumping through hoops.
READ MORE: Electric Company Near Me
Safety Considerations
Working around a temporary power pole requires vigilance. Key safety points include:
- GFCI Protection: Always use ground‑fault circuit interrupters on all 120V outlets. NEC 590 requires GFCI on construction-site outlets. This greatly reduces shock risk.
- Weatherproofing: Cover outdoor outlets and panel in-use covers to keep water out. Even small rains can energize outlets protected covers prevent electrocution.
- Cord Management: Keep extension cords off the ground and away from puddles. Feed cords overhead or through hose protectors. NEC notes that cords and cables must be “protected from physical damage”.
- Secure the Pole: Make sure the pole is well-braced or guyed. A loose pole can fall and break lines or injure people.
- Labeling: Mark the main breaker clearly (e.g. “TEMPORARY SERVICE DISCONNECT”). If there are multiple circuits, label each outlet. This helps during emergencies.
- Regular Inspection: Periodically check the pole, connections and grounding. Look for corrosion, loose clamps, or damage. As AllSite suggests, conduct “regular inspections” of wiring and rods.
- Area Protection: Keep the site secured. If people or pets frequent the area, put up temporary fencing or caution tape. AllSite Rentals even notes using temporary fencing to keep the public clear.
- No Bypasses: Don’t bypass breakers or close jumpers across the main disconnect. A short circuit will trip the breaker respect these safeguards.
- Training: Finally, anyone working at the site should know how to shut off power in an emergency. Keep a tag-out lock or label on the disconnect.
Electricity and construction tools can be a dangerous mix. Always treat the temporary service with the same caution as permanent power. Following NEC and utility safety rules will minimize hazards on your site.
Renting vs Buying a Temporary Power Pole
| Aspect | Renting | Buying |
| Upfront Cost | Low (usually just a deposit/rental fee) | High (purchase of pole, meter, panel) |
| Project Duration | Great for short-term jobs (weeks/months) | Cheaper if needed long-term (over a year) |
| Maintenance | Rental company provides and maintains equipment | You must store and maintain the pole |
| Flexibility | Return immediately when done | Need to sell or store when done |
| Permits/Setup | You still need your own permit; the equipment may be ready-to-go | You handle all setup (but can reuse gear later) |
Renting a temporary pole can be convenient for one-off or short projects. The rental company often supplies a prewired pole and may even help with pickup/drop-off. This avoids a large one-time purchase, and you don’t have to store the equipment afterward.
However, rental rates add up, and availability may be limited. Buying your own pole costs more upfront, but it pays off if you have multiple projects or a long build timeline. You have the pole as an asset and aren’t at the mercy of rental availability. The downside is storage and ensuring you meet all code/utility specs with a DIY pole. In practice, small contractors often rent a pole for quick jobs, while larger builders or municipalities invest in their own poles for repeated use.
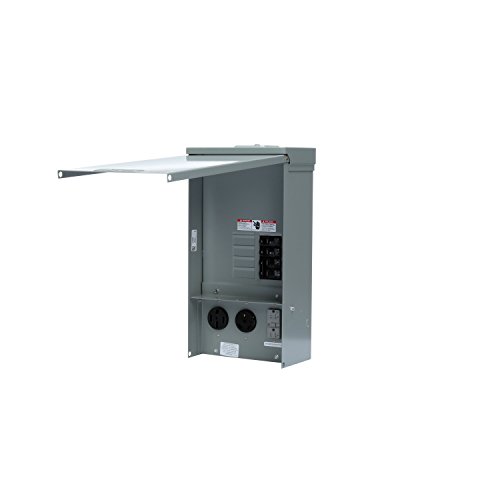
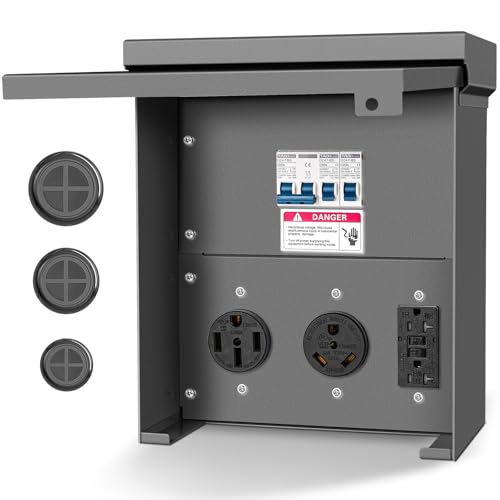
- UL Listed and Outdoor Rated
- Elevated cover with padlock prevents unauthorized use
- Receptacles protected by Siemens circuit breakers
READ MORE: Electrician Near Me
Frequently Asked Questions (FAQ)
Do I need a permit for a temporary power pole?
Yes. Most cities/counties require an electrical permit for a temporary pole. You’ll need to submit plans for the pole, meter base, panel and grounding. Without a permit and inspection, the utility will not legally energize the pole and you could face fines.
Can a homeowner install one?
In many places you can assist (like driving the post), but the actual electrical work must meet code. Many states require a licensed electrician or electric utility to do the final hookup. According to a homebuilder guide, either a homeowner or licensed electrician sets the pole, but local codes usually demand a pro handle the wiring. It’s safest to hire an electrician.
Who connects the power the electrician or the utility?
Once the pole and panel are set up and pass inspection, the utility must attach their drop line and energize the meter. The electrician sets up everything on the pole, but you call the power company for the final hookup. Electricians are not allowed to energize the pole themselves (unless as authorized by the utility).
What size (amperage) service do I need?
That depends on your tools and equipment. For most home construction, a 60-amp service is common and usually sufficient. Some areas use 100A or even 200A poles if you have big loads (air compressors, pump, etc.). Always check with your electrician and utility they may have minimum requirements (for example, they might require a 100A base even if you only use 60A).
Can I live in the house on temporary power?
No. Temporary power is intended only for construction use. You cannot legally occupy a home on temporary power indefinitely. NEC 590.3(D) requires that temporary wiring be removed once it’s no longer needed. In practice, utilities will cut service if a home isn’t switched to permanent power by the end of the allowed period. You should arrange for permanent service (and meter installation) before moving in.
Who pays for the electricity on the temporary pole?
Typically the homeowner pays any metered usage on the temporary pole until permanent service is active. You may prepay or pay bills for that service just like a normal meter. Check with the utility about deposit and metering arrangements.
What does an inspector check on a temporary pole?
The inspector will verify: the pole depth and height, proper meter base and panel installation, grounding rod installation (# and depth), correct wire sizes, GFCI protection on outlets, and weatherproof covers. Essentially, they check it against the NEC and local code as if it were a permanent service. An electrical inspector from the city/town usually does this; sometimes the utility’s engineer also inspects before hooking up.
How much does a temporary power pole cost?
The cost varies. As noted above, a typical 60A pole installation often ends up in the low thousands (commonly $900–$4,000 including labor and fees). If you buy equipment yourself, the pole and panel parts alone might be a few hundred dollars, plus permits and electrician labor. Expect to pay more in expensive areas or if you need a larger service or underground conduit.
Should I rent or buy a temporary power pole?
For short construction jobs (a few weeks to a few months), renting can be easier you avoid the high purchase price and just pay a rental fee. If you have a long-term project or multiple builds, buying may save money over time. Weigh the upfront cost of buying (and having to store it later) against the convenience of renting from a supplier.
What about NEC requirements for temporary power?
NEC Article 590 covers temporary installations. It doesn’t give a separate list of features (you follow the normal codes) but it does clarify that all outlets need GFCI protection and sets the conditions for wiring methods (you can only use listed conductors, not NM cable outside, etc.). In short: follow the NEC rules for service equipment (grounding, weatherproofing, clearances) and use Article 590 as guidance on what’s allowed for temporary use.
Final Thoughts
Setting up a temporary power pole is a critical step in many construction projects. Done right, it keeps the job running safely; done wrong, it can delay everything or create hazards. The keys are planning ahead, following codes, and working with experienced people. Always coordinate with your utility early, pull the proper permits, and consider hiring a licensed electrician to install and wire the pole. Safety and compliance should be your top priorities. With careful adherence to the NEC and utility standards, a temporary power pole will serve your construction needs reliably letting you focus on building while keeping the lights on.