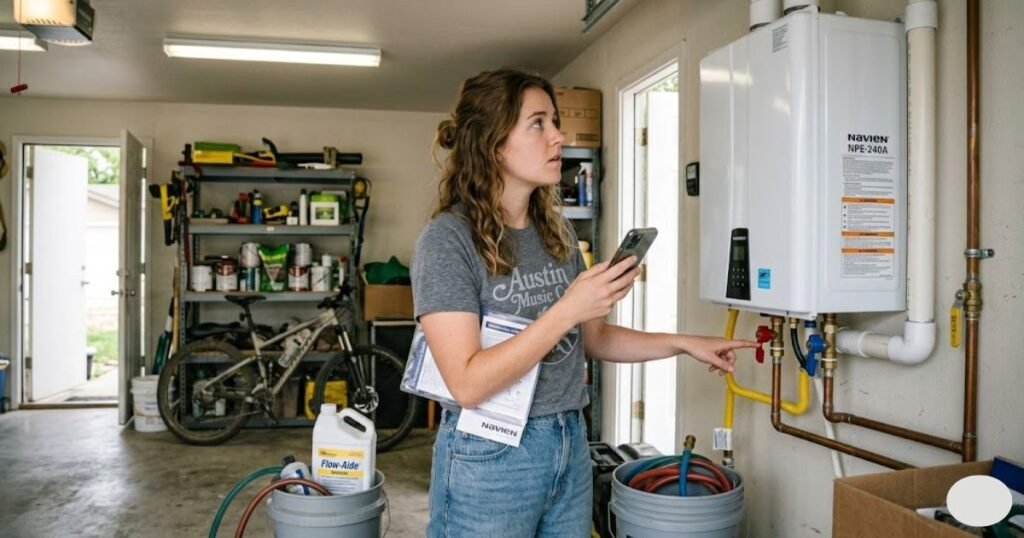
Ever wondered why your once-efficient tankless water heater now delivers lukewarm water or strange noises? Mineral buildup from hard water is usually the culprit, cutting efficiency and harming internal parts. This quick guide How to Flush a Tankless Water Heater shows when to descale, the simple flushing steps, and the payoff: better performance, longer life, and lower energy bills. Regular flushes and basic maintenance keep your unit running reliably and save on repairs. Lets deep dive into “How to Flush a Tankless Water Heater (Step-by-Step Guide)”
What is a Tankless Water Heater?
Tankless water heaters, also known as on-demand water heaters, are innovative devices that heat water only when you need it. Unlike traditional water heaters that store hot water in a tank, these systems deliver hot water directly through the pipes when you turn on the tap. That means no more waiting for a water tank to fill up—and no more running out of hot water halfway through your shower. It’s energy-efficient, compact, and ideal for modern homes.
However, because these heaters have intricate inner workings—like heating elements and narrow pipes—they can get clogged over time by mineral buildup, especially if your home has hard water. That’s why regular maintenance isn’t just a suggestion; it’s a necessity.
Restore peak performance to your tankless water heater — get the Chromex Flush Kit today. Check below-

READ MORE: How Long Does a Hot Water Heater Last?
Why Regular Maintenance is Crucial
Mineral deposits, primarily calcium and magnesium, can accumulate inside your tankless unit. This buildup not only affects efficiency – it can significantly decrease the lifespan of your water heater. Think of it as a buildup in your arteries; The more buildups you have to fight to supply hot water to your system. this leads to:
- Reduced water pressure
- Fluctuating temperatures
- Higher energy bills
- System failures
Flushing the system helps clear out this sediment, restoring performance and preventing costly damage. Most manufacturers recommend doing it once a year, but the frequency can vary depending on water hardness and usage.
Signs Your Tankless Water Heater Needs Flushing
Common Symptoms of Scale Buildup
You don’t have to wait until your water heater fails to know it’s time for maintenance. Several telltale signs indicate your unit is overdue for a flush:
- Strange Noises: If you hear rumbling or clicking inside your heater, mineral buildup is likely causing the noise.
- Decreased Water Pressure: Mineral deposits can block the narrow pipes in the unit, reducing water flow.
- Error Codes: Many modern tankless water heaters display error codes when they detect internal problems.
- Higher Energy Bills: If your heater has to work harder, it consumes more energy. An increase in your bill could be a red flag.
- Inconsistent Water Temperature: If your water goes from hot to cold and back again, sediment might be interfering with heat exchange.
These symptoms may seem small at first, but ignoring them can lead to complete system failure, requiring expensive repairs or even full replacement.
Keep your heat exchanger clean and running smoothly with this powerful descaling solvent. Check Product Below-

How Often Should You Flush It?
Flushing frequency depends largely on your water quality and usage habits. Here’s a general guide:
- Every 12 Months: Ideal for most households, especially in areas with average water hardness.
- Every 6 Months: Recommended for homes with hard water or high hot water usage.
- Every 2-3 Years: In rare cases, such as in regions with soft, treated water, you may stretch it a bit longer—but always check your manual.
Even if you have a water softener, don’t assume you’re in the clear. Flushing is about more than just minerals—it’s about overall system health.
Tools and Materials You’ll Need
List of Required Items
Before you begin with the flushing procedure, collect all the tools and materials you need. The work becomes easy and safe because everything is prepared. What you normally need here:
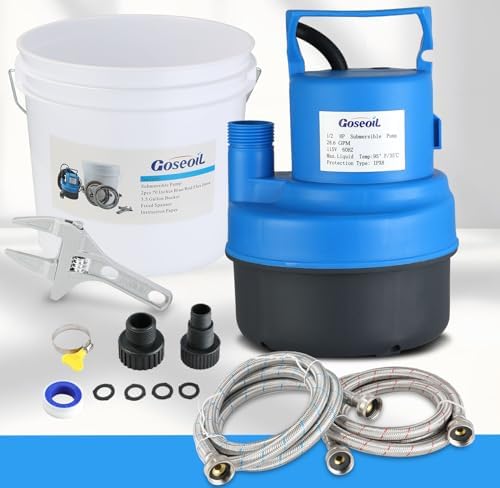
1. Submersible pump – Used to circulate the descaling solution through the heater. Need fast, dependable water removal? Choose the Aquastrong 1 HP submersible pump — 4500 GPH, durable thermoplastic housing, and a 10-ft cord for flexible setup. Check below-

2. Two 5-gallon buckets – One for the cleaning solution, the other for draining.
3. Tankless water heater descaling solution or white vinegar – To break down mineral deposits. Check Product & Price
4. Stainless steel braided hoses – For connecting the pump and bucket to the service valves. Check Product & Price
5. Adjustable wrench – To loosen and tighten valve connections. Check Product & Price
6. Teflon tape – For sealing hose connections. Check Product & Price
7. Rubber gloves. Check Product & Price
8. safety glasses – Protect yourself from chemical exposure. Check Product & Price
READ MORE: How to Drain a Hot Water Heater
Optional Tools for Easier Maintenance
If you want to make the job even easier or safer, consider these optional but helpful additions:
1. Digital thermometer – Helps check temperature accuracy post-flush. Check Thermometer & Price
2. hardness test kit – To evaluate how often you should flush in the future. Check Test Kit & Price
3. Flush kit – Some brands offer a complete flush kit, which includes the pump, hoses, and cleaner.
Getting these tools in advance ensures you won’t have to pause mid-job to make a store run. Plus, it helps you do the job thoroughly, extending the life of your unit.
Restore heater efficiency fast — flush with premium hoses and concentrated vinegar. Check this Flush Kit Below-

Safety First – Preparing to Flush
Powering Down the Unit
Before you touch anything, safety comes first. You’ll need to cut off the power to your water heater. If it’s an electric model, this means switching off the breaker at your main panel. For gas models, you’ll need to shut off the gas valve.
This isn’t just about preventing shocks or leaks—it also ensures you don’t accidentally activate the system mid-clean, which can cause hot water to flow through your pump and damage it.
Turning Off Water and Gas Supply
Next, you need to isolate the water heater. Close the cold water supply valve to prevent water from entering the unit during the flush. Then shut off the hot water outlet valve to stop water from flowing to your faucets.
If you’re working with a gas-powered unit, you’ll also want to turn off the gas supply at the valve. This prevents any chance of accidental ignition or pressure build-up while you’re working.
Ensuring Proper Ventilation
While you might not think of it immediately, ventilation is key—especially for gas-powered units. Working in a confined or poorly ventilated space can be dangerous. Always open windows or doors, and if your water heater is in a small utility closet, leave the door open throughout the process.
Also, never smoke or use open flames around the unit while you’re working. A little caution now can prevent serious issues later.
Step-by-Step Guide to Flushing a Tankless Water Heater
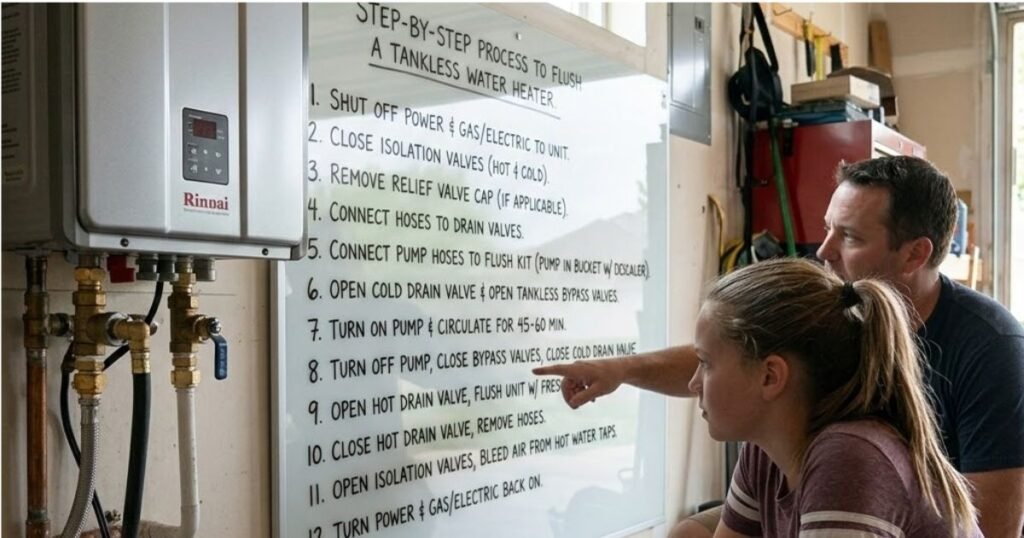
Step 1: Disconnect the Power and Water Supply
This is your first line of defense against accidents. Turn off the power supply—either unplug the unit or switch off the breaker. For gas heaters, make sure the gas valve is completely shut. Then, close both the cold-water inlet and the hot-water outlet valves. This isolates the system and ensures nothing flows through the unit during the flush.
Missing this step could cause hot water to suddenly rush out, which is not only dangerous but could also ruin your pump or damage your plumbing system. Always double-check that the unit is powered down and isolated before moving forward.
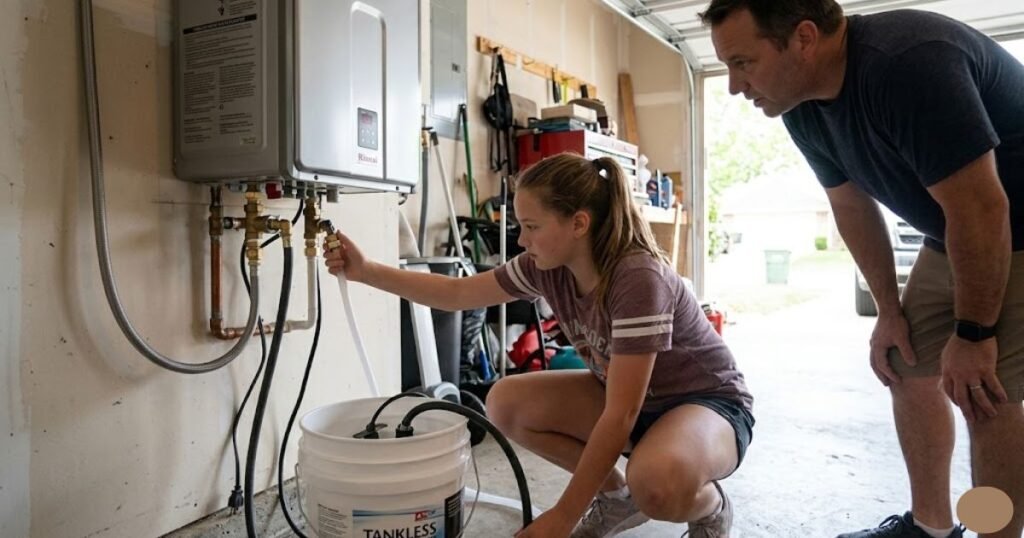
Step 2: Attach Hoses to the Service Valves
Most tankless water heaters have service valves installed on both the hot and cold sides. These are specifically for flushing and descaling. Connect one hose from the cold water valve to the submersible pump. Attach another hose from the hot water valve and run it into an empty bucket.
This setup allows the descaling solution to circulate through the unit, breaking down any scale inside. Make sure the hose fittings are tight and secure. Loose connections could lead to leaks, which not only waste solution but can cause electrical hazards if water gets where it shouldn’t.
Step 3: Use a Descaling Solution
Pour 1–2 gallons of a descaling solution into a 5-gallon bucket. You can use a commercial descaler or just plain white vinegar—both work well to dissolve calcium and lime deposits. Submerge the pump in the solution and switch it on. This begins the flushing cycle.
Let the solution circulate for at least 45 minutes to 1 hour. If it’s your first time flushing or if the heater hasn’t been cleaned in a while, extend the time to ensure deep cleaning. During this process, the solution loops through the heater and carries away mineral buildup.
Step 4: Flush the Heater
After circulating the solution, the next step is flushing it out. Remove the hose from the pump and empty the bucket. Refill the bucket with clean, cold water and run the pump again for 10–15 minutes. This helps rinse out any remaining descaler and scale particles from the heater.
Don’t omit this rinse step. Having the remaining dysing fluid still in the unit will rust or have an unusual smell in your hot water. Rinse well to protect both your heater and your water supply.
Step 5: Reconnect and Restart the Heater
Once the flush is complete, turn off the pump and disconnect all hoses. Reattach the service valve caps tightly and reopen both the cold and hot water valves. Restore power to the unit and, if applicable, turn the gas supply back on.
It might take a minute for the heater to recalibrate and resume normal function. Run the hot water tap for a few minutes to ensure everything is working smoothly and any leftover residue is flushed from your system.
READ MORE: Gas Line Installation Cost

Common Mistakes to Avoid When Flushing a Tankless Water Heater
Flushing your tankless water heater isn’t rocket science, but a few common missteps can cause more harm than good. Let’s walk through what not to do during this essential maintenance task.
1. Skipping the Power Shutdown
This is one of the most dangerous mistakes. Flushing a live unit is not only unsafe but could fry internal electronics. Always, always shut off the power or gas supply before starting. It only takes a second and could save you hundreds—or thousands—of dollars in repairs.
2. Using the Wrong Type of Cleaner
Not all descaling solutions are created equal. Using harsh or abrasive chemicals can damage the heat exchanger and internal components. Stick to manufacturer-recommended descalers or plain white vinegar. Avoid bleach, drain cleaners, or any corrosive cleaners—they’re not designed for water heaters.
3. Not Closing the Water Valves Properly
If the hot and cold water valves aren’t fully closed, water could enter or exit the unit during the flush. This not only dilutes your descaling solution but could also result in leaks and mess. Double-check that your valves are completely shut before connecting the hoses.
4. Forgetting to Rinse the System
After you flush with descaler, you must run clean water through the unit to rinse it out. Skipping this step can leave chemicals inside your heater, which may corrode internal parts or produce unpleasant odors in your water.
5. Neglecting to Inspect O-Rings and Gaskets
Every time you open and close the service valves, you should inspect the rubber O-rings and gaskets inside. These wear out over time and can lead to leaks. Replace any that look cracked, dry, or brittle before reassembling the system.
6. Improper Hose Connections
Loose or improperly fitted hoses can result in water spraying everywhere, which is a huge safety risk, especially around electric models. Use Teflon tape on the threads and make sure everything is tightly sealed before turning on the pump.
7. Rushing the Process
A proper flush takes time. If you only circulate the solution for 10–15 minutes, you’re not really cleaning the unit. Give the solution at least 45 minutes to work its magic. Think of it like soaking a dirty pan—you wouldn’t scrub it instantly, right?
8. Ignoring Manufacturer’s Instructions
Each brand has varying requirements. Some are able to utilize special cleaning products or unique valve arrangements. Always refer to your owner’s manual initially. Manufacturer-specific guidelines avoid you from voiding your guarantee or bringing harm to your unit.
Avoiding these usual losses, you will ensure your maintenance is stress-free, safe and efficient. It is always better to spend a little extra time and get it right the first time to deal with the next flooded utility chamber or next broken heater.
Maintenance Tips for Tankless Water Heater
Keep your tankless water heater reliable and efficient with simple regular care: a quick visual check, routine descaling, and attention to filters and venting will prevent most problems and extend the unit’s life.
- Flush/descale every 6–12 months (sooner if water is hard).
- Clean the inlet water filter/screen and replace if torn.
- Inspect gas/electrical connections, venting, and condensate drains for blockages or damage.
- Run hot water at a few fixtures to confirm steady flow and temperature; note any error codes.
- Keep a maintenance log and book a pro inspection yearly.
Can I use vinegar instead of a commercial descaling solution?
Yes, white vinegar is a safe and effective alternative to commercial descaling solutions. It’s non-toxic, affordable, and does a great job at breaking down mineral deposits like calcium and lime. Just make sure to run clean water through the unit afterward to rinse out any remaining vinegar and odor.
How long does it take to flush a tankless water heater?
The entire flushing process typically takes about 60 to 90 minutes. Circulating the descaling solution should last at least 45 minutes, followed by a 10–15 minute freshwater rinse. Prep time, setup, and cleanup may add an additional 15–30 minutes.
Is flushing necessary if I have a water softener installed?
Even if you have a water softener, flushing is still recommended—just less frequently. While softeners help reduce calcium and magnesium buildup, they don’t eliminate all minerals or sediment. Flushing ensures your system remains clean and efficient.
What happens if I don’t flush my tankless water heater regularly?
Neglecting to flush your unit can lead to mineral buildup, reduced heating efficiency, error codes, higher energy bills, and eventually complete system failure. Regular flushing helps maintain performance and avoid costly repairs or replacements.
Do I need a professional to flush my tankless water heater?
Not necessarily. Most homeowners can flush their tankless water heater themselves with the proper tools and instructions. However, if you’re uncomfortable working with plumbing or gas lines, or if your unit has complex configurations, it’s best to hire a certified technician.
Final Verdict
Draining a tankless water heater may be a technical nightmare, but it is something anybody can accomplish with the right tools and a little instruction. It is one of those maintenance habits that pay off in a big way – boosting performance, conserving energy, and extending the life of your water heater by years. And all this takes place in an hour a year and some rudimentary supply.
By following the steps in this guide and avoiding common mistakes, you not only protect your investment, but also ensure a hassle-free supply of hot water when the time is right. And come on – there’s nothing quite like a great cold shower, is there?
So wait not until your unit will start to show a sign of crisis. Drain a regular part of your home maintenance routine, and your tankless water heater will pay you with many trouble-free years of service.

