Open the cabinet beneath almost any kitchen or bathroom basin in America, and the first piece of plumbing you will notice is the curved pipe assembly suspended directly below the drain. That curved section is the P trap under sink, a simple, inexpensive, and indispensable component of residential drainage. When it works properly, you never think about it. When it fails, you immediately notice foul sewer odors drifting into your kitchen, slow-draining water, puddles ruining your cabinet floor, or a stubborn clog backing up into the basin.
Understanding how this curved drain pipe functions empowers you to handle basic maintenance, spot leaks before they cause water damage, and communicate clearly with a licensed plumber when bigger repairs are needed. Lets deep dive into “P Trap Under Sink: Installation, Repair & Sizing”
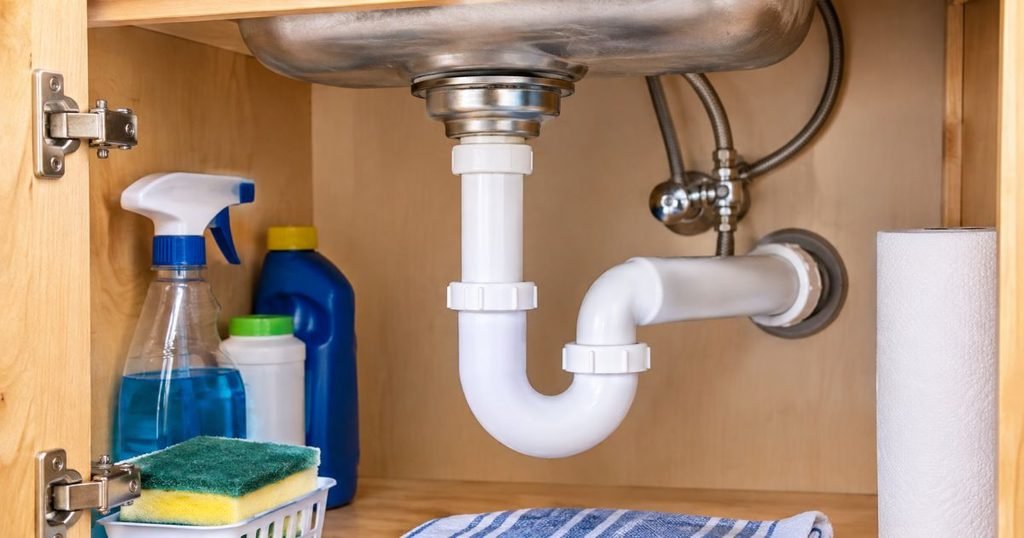
What Is a P Trap Under a Sink?
A P trap under a sink is a U-shaped or curved section of drain pipe installed directly beneath a sink basin that holds a small reservoir of standing water. This water barrier blocks foul-smelling and potentially hazardous sewer gases from traveling up through the drainpipe and entering your living space, while still allowing wastewater to flow smoothly into your home’s drainage system.
The fitting gets its name from its profile: when you combine the downward-curving U-bend with the horizontal pipe extending toward the wall, the assembly resembles the letter “P” lying on its side. You will find a P-trap beneath virtually every bathroom lavatory, kitchen sink, utility sink, and bar sink in modern US homes.
Beyond blocking sewer gas, a sink drain trap serves a secondary practical purpose. Because water must dip down and rise back up before exiting to the wall, heavier objects such as wedding rings, small earrings, coins, or stray screws often settle at the bottom of the bend rather than washing deep into your home’s main sewer line. A quick disassembly with a bucket underneath can often recover valuables that would otherwise be lost forever.
READ MORE: S Trap vs P Trap: Differences, Codes & Which Is Better
How Does a Sink P Trap Work?
Despite its vital role in household sanitation, a P-trap has no moving parts, valves, or electronics. It relies entirely on gravity and basic fluid dynamics to maintain a sanitary barrier between your home and the municipal sewer or septic system.
Here is the step-by-step drainage process every time you turn on the faucet:
- Water leaves the sink drain: Wastewater exits the bottom of the sink basin through the strainer basket or pop-up drain assembly.
- Wastewater travels through the tailpiece: Gravity pulls the water straight down a vertical section of pipe called the sink tailpiece (or through a garbage disposal discharge tube on many kitchen sinks).
- Water enters the curved P-trap: The falling water enters the bottom curve of the trap, pushing out the older standing water that was already sitting inside the bend.
- A portion of water remains inside the trap: Once you shut off the faucet, water stops flowing over the upper curve (the weir) of the trap. Gravity keeps the lowest section of the U-bend completely filled with fresh water, typically maintaining a water seal depth between 2 inches and 4 inches as required by standard US plumbing codes.
- Wastewater exits through the trap arm: The displaced water flows horizontally through the trap arm, passes the wall connection, and drops down the main vertical drain stack toward the sewer line, while a connected vent pipe equalizes air pressure so the water seal is not sucked dry.
Think of the water seal inside a P-trap like a closed storm door during winter. The door itself doesn’t stop air from moving around the outside of your house, nor does it require power to function; it simply creates a physical barrier that keeps cold drafts out while letting people pass through when opened. In the exact same way, water passes freely through the trap when the faucet runs, and the remaining pool immediately seals the pipe shut against rising methane, hydrogen sulfide, and sewer odors once the flow stops.
Parts of a P Trap Under Sink
When you look under your sink or open a replacement kit from a hardware store, you will see several distinct components working together. Knowing the exact names of these pieces makes troubleshooting and buying replacement parts dramatically easier.
- Sink Drain Tailpiece: The straight vertical pipe extending downward from the bottom of the sink strainer or pop-up drain assembly. In kitchens with a garbage disposal, the disposal’s curved discharge elbow connects into a baffled tee or directly into the trap.
- J-Bend (or Trap Bend): The U-shaped bottom curve of the assembly that holds the standing water seal. Most residential tubular traps feature a removable J-bend so you can clear clogs without cutting pipes.
- Trap Arm (or Wall Tube): The horizontal section of pipe that connects the outlet side of the J-bend to the drain stub-out coming through the wall. A properly installed trap arm slopes slightly downward toward the wall typically 1/4 inch per foot so water drains steadily without siphoning the trap.
- Slip-Joint Nuts: Threaded collars made of plastic or brass that slide over the pipe ends and screw onto threaded male adapters, compressing the washers to create a watertight mechanical seal.
- Compression Washers (Beveled Washers): Thin plastic, nylon, or rubber rings placed underneath slip-joint nuts. They typically feature a flat side and a tapered (beveled) edge; the beveled edge faces the female fitting so tightening the nut wedges the washer tightly into the joint.
- Wall Drain Connection (Trap Adapter): The fitting at the wall stub-out where the tubular trap arm transitions into the home’s permanent DWV (drain, waste, and vent) piping. Often, a plastic or brass trap adapter is glued or threaded onto the wall pipe and fitted with a slip-joint nut and washer.
READ MORE: Pipe Leaking Under Sink: Causes, Fixes & Plumber Costs
Different Types of P Traps for Kitchen and Bathroom Sinks
Residential P-traps are manufactured in several materials and configurations. Choosing the right type depends on your existing plumbing pipes, local building codes, whether the pipes are hidden inside a cabinet or exposed to view, and your budget.
1. PVC P-Traps
Polyvinyl chloride (PVC) is the white rigid plastic most commonly found under modern American sinks. Tubular PVC traps connect using hand-tightened slip-joint nuts and washers, making them very easy to take apart for cleaning. In some areas, schedule 40 solvent-weld PVC traps (glued together permanently, sometimes with a cleanout plug on the bottom) are used for heavy-duty commercial or residential applications. PVC resists household chemicals, never rusts, and costs very little, though it is meant to be hidden inside a vanity or base cabinet rather than left exposed.
2. ABS Plastic P-Traps
Acrylonitrile butadiene styrene (ABS) is the rigid black plastic pipe commonly installed in homes across the western United States and parts of the Midwest. Like PVC, ABS is lightweight, corrosion-proof, and available in both tubular slip-joint kits and solvent-weld configurations. One important rule for DIYers: never use standard PVC cement to glue ABS pipe, or vice versa. While tubular slip-joint parts can transition mechanically with the proper washers, glued joints require transition cement or mechanical shielded couplings.
3. Chrome-Plated Brass P-Traps
If you have a pedestal sink, a wall-mounted console sink, or an open-shelf vanity where the under-sink plumbing is visible, white or black plastic looks utilitarian. Chrome-plated brass (as well as brushed nickel, oil-rubbed bronze, or matte black brass) provides a clean, finished appearance. Brass tubular traps are sturdy and heat-resistant, though heavier-gauge brass (17-gauge) lasts significantly longer than thin 20- or 22-gauge metal traps, which can eventually corrode from the inside out if exposed to harsh drain cleaners or acidic wastewater.
4. Metal Tubular P-Traps
Beyond decorative chrome-plated brass, standard unfinished brass tubular traps are occasionally used in older homes or specific commercial installations. They assemble with brass slip-joint nuts and rubber or poly washers. While mechanically durable when installed properly, thin-walled metal tubular pipes are less forgiving of slight misalignment than flexible polypropylene or PVC tubular kits and require careful wrench tightening without crushing the thin metal threads.
5. Adjustable and Flexible P-Trap Assemblies
Standard tubular P-trap kits feature an adjustable slip-joint connection between the tailpiece and J-bend, allowing you to raise, lower, or swivel the trap to align with your wall drain. You will also see corrugated “flexible” accordion-style plastic traps sold in big-box stores. Most experienced plumbers strongly advise against accordion-style traps because their interior ridges catch hair, grease, and food scraps, leading to frequent clogs and foul odors, and they are prohibited under many local plumbing codes. Stick with smooth-walled adjustable tubular traps.
| P-Trap Type | Typical Material | Durability | Best Application | Pros & Cons |
| Tubular PVC | White polypropylene or PVC | High (15–30+ years) | Enclosed kitchen and bathroom cabinets | Inexpensive, easy DIY slip-joint assembly, rust-proof; not decorative for exposed sinks. |
| Tubular ABS | Black ABS plastic | High (15–30+ years) | Homes with existing black ABS drain lines | Durable, impact-resistant, easy to disassemble; requires ABS-specific cement if glued. |
| Chrome-Plated Brass (17-Gauge) | Brass with decorative finish | Moderate to High (10–20+ years) | Pedestal sinks, open vanities, exposed drains | Attractive finish, rigid, heat-tolerant; higher cost, can eventually corrode if thin-gauge. |
| Solvent-Weld Schedule 40 | Heavy-wall PVC or ABS | Very High (30+ years) | Permanent installations, utility sinks, certain code zones | Extremely sturdy, leak-resistant once glued; harder to remove for cleaning unless a cleanout plug is included. |
READ MORE: Kitchen Sink Repair: Common Problems, DIY Fixes & Costs
What Size P Trap Do You Need Under a Sink?
Buying the wrong diameter parts is one of the most frustrating mistakes a homeowner can make during a weekend repair. Fortunately, residential sink traps in the United States follow two standard nominal diameters, though variations still exist in older homes and custom fixtures.
- 1¼-Inch P-Traps (Bathroom Sinks): Most standard residential bathroom lavatory sinks use a 1¼-inch drain tailpiece and a 1¼-inch P-trap assembly. Because bathroom sinks handle relatively low volumes of water, mostly handwashing and toothbrushing a 1 1⁄4-inch pipe provides plenty of drainage capacity while fitting neatly inside compact vanities.
- 1½-Inch P-Traps (Kitchen and Utility Sinks): Kitchen sinks, laundry tubs, and utility sinks almost universally require a 1½-inch P-trap. Kitchen sinks drain larger volumes of water quickly and must handle food particles and dishwasher discharges, making the wider 1½-inch diameter essential. Some modern bathroom sinks also use 1½-inch traps, especially when paired with vessel sinks or larger drain assemblies.
Nominal Size vs. Actual Measurement
In plumbing, pipe sizes are referred to by their nominal inside diameter rather than their exact outer tape-measure reading. For example, a nominal 1½-inch tubular plastic P-trap has an outside diameter (OD) of 1.5 inches, whereas a nominal 1½-inch Schedule 40 PVC pipe has an outside diameter of roughly 1.9 inches because its walls are much thicker.
Before heading to the hardware store, measure the outside diameter of your existing sink tailpiece and check the wall connection. In many bathrooms, a 1¼-inch tailpiece connects into a 1½-inch wall drain stub-out. You do not need to rebuild the wall pipe to bridge that gap: standard 1½-inch P-trap kits frequently include a 1½-inch to 1¼-inch reducing washer (a thicker beveled washer that slides onto the 1¼-inch tailpiece and seals tightly inside a 1½-inch slip-joint nut).
Always verify both the sink tailpiece size and the wall adapter size before purchasing replacement parts, as older homes may occasionally have 1 1⁄2-inch galvanized steel or 1¼-inch copper drain stub-outs requiring specialized shielded transition couplings.
How to Install a P Trap Under a Sink (Step-by-Step DIY Guide)
Replacing a damaged or leaking P-trap with a matching tubular kit is a straightforward project that most homeowners can complete in 30 to 45 minutes. Note that replacing an existing trap in the same configuration is very different from relocating a sink or altering the drain and vent piping inside your wall, which requires strict adherence to slope, trap-arm length, and venting codes.
Tools and Materials Needed
- Replacement P-trap kit (1¼-inch or 1½-inch tubular PVC, ABS, or brass)
- Channel-lock or tongue-and-groove adjustable pliers
- Small bucket or shallow plastic tub
- Old towels or shop rags
- Tape measure
- Flashlight or headlamp
- Extra slip-joint washers (flat and beveled, including a 1½” x 1¼” reducing washer if needed)
Step-by-Step Installation Instructions
- Clear the area underneath the sink: Remove cleaning supplies, trash bins, and liners from the cabinet so you have clear access and room to maneuver your hands and tools.
- Place a bucket below the existing P-trap: Position your bucket directly beneath the U-shaped J-bend and lay an old towel underneath it to catch splashes. Remember that the trap is full of standing water.
- Inspect the existing pipe configuration: Take a quick photo with your phone before loosening anything. Note how the tailpiece, J-bend, trap arm, and wall adapter align so you have a clear visual reference during reassembly.
- Carefully loosen the slip-joint nuts: Turn the two slip-joint nuts holding the J-bend counterclockwise (looking down from above). Plastic nuts can usually be loosened by hand; if they are stuck or made of metal, grip them gently with adjustable pliers without squeezing hard enough to crack the nut.
- Remove the old P-trap and empty the remaining water: Slide the nuts back, pull the J-bend downward off the tailpiece and trap arm, and pour the trapped water into your bucket. Loosen the wall nut and remove the old trap arm as well.
- Clean the connection areas: Use a damp rag to wipe away slime, soap scum, mineral buildup, and old washer residue from the sink tailpiece and the wall drain adapter. Smooth, clean mating surfaces are critical for a leak-free seal.
- Compare the old and new P-trap dimensions: Hold the new J-bend and trap arm next to the old ones. If the new trap arm or tailpiece extension is too long to fit cleanly into the wall adapter without forcing the pipes at an angle, mark the excess length and trim it squarely with a fine-tooth hacksaw or tubing cutter, then deburr the cut edge.
- Position the new trap bend correctly: Look closely at the J-bend. One side has a deeper hub (the inlet) that receives the vertical tailpiece, while the other side has a threaded collar or shorter outlet designed to meet the horizontal trap arm. Make sure the deeper inlet faces up toward the sink tailpiece.
- Connect the tailpiece and trap arm: Slide a slip-joint nut and washer onto the sink tailpiece, and slide another slip-joint nut and washer onto the trap arm where it enters the wall adapter. Insert the trap arm into the wall drain connection at least 1 to 1½ inches.
- Install the washers in the correct orientation: Confirm that the flat side of each beveled washer faces the slip-joint nut, and the tapered (beveled) edge points toward the female fitting it is entering.
- Hand-tighten the slip-joint nuts: Align the J-bend between the tailpiece and trap arm so nothing is under tension or cocked at an angle. Tighten all slip-joint nuts firmly by hand. For plastic fittings, hand-tightening or at most a gentle quarter-turn with pliers is sufficient; excessive torque can split plastic nuts or deform washers.
- Run water through the sink: Remove the bucket, place a dry paper towel underneath the trap, and turn on the faucet for a full minute. Fill the basin halfway and pull the stopper to test the joints under full drainage pressure.
- Inspect every connection for leaks: Shine your flashlight around every nut and check the dry paper towel for droplets. If a joint weeps slightly, give that nut a subtle tweak just a fraction of a turn and test again.
READ MORE: How to Plumb a Double Sink: Step by Step
Common P-Trap Installation Mistakes to Avoid
- Installing the J-bend backward: Reversing the J-bend changes the water seal depth and creates an awkward vertical alignment that puts stress on the joints.
- Reversing tapered washers: Putting the flat side of a beveled washer toward the fitting prevents it from wedging into the gap, causing an immediate leak under pressure.
- Overtightening plastic fittings: Cranking down hard on polypropylene or PVC slip nuts with heavy pliers often cracks the collar or pushes the washer out of alignment.
- Creating an improper trap-arm slope: The horizontal trap arm must slope gently toward the wall (about 1/4 inch per foot). If it slopes backward toward the sink, water stagnates; if it drops sharply downward before reaching the vent inside the wall, it acts like an illegal S-trap.
- Inadvertently building an S-trap: Using extra elbows to drop the drain vertically into the cabinet floor without a proper vent connection creates siphoning hazards.
- Ignoring plumbing vent requirements: Replacing an existing trap is straightforward, but adding a sink or moving a drain line without maintaining a proper vent within the code-allowed trap-arm distance violates plumbing standards and leads to gurgling, slow drains, and dry traps.
How to Clean a P Trap Under a Sink
When a sink drains slowly or emits a sour odor despite running water, hair, soap scum, grease, and toothpaste buildup inside the P-trap are often the culprits. Removing and cleaning the trap mechanically is safer, cheaper, and far more effective than pouring harsh chemicals down the drain.
Safety Warning About Chemical Drain Cleaners
Before taking any pipes apart, ask yourself or anyone else in the household whether liquid chemical drain cleaner was recently poured down that sink. Caustic lye or sulfuric acid cleaners can remain pooled inside a clogged P-trap for days. If you loosen the slip nuts and splash chemical-laden water onto your skin or eyes, severe chemical burns can result.
Never mix different chemical drain cleaners, as combining bleach-based and acid-based products can release toxic chloramine or chlorine gas. If a chemical drain cleaner is sitting in a clogged sink, wear heavy chemical-resistant gloves and eye protection, or call a licensed plumber and inform them beforehand so they can handle it safely.
Step-by-Step Cleaning Process
- Recognize when cleaning is needed: Slow drainage restricted to a single sink, localized odor coming from the drain opening, or a dropped ring are classic signs that the trap needs cleaning.
- Prepare the workspace: Clear the cabinet, lay down an old towel, and place a bucket directly beneath the J-bend. Put on rubber household gloves.
- Remove the J-bend: Unscrew the two slip-joint nuts securing the J-bend, pull the curved section down, and dump the standing water and loose sludge into your bucket.
- Scour the interior of the trap: Take the J-bend to an outdoor hose, utility sink, or bathtub (with a hair catcher in place). Use an old bottle brush, flexible pipe brush, or soapy rag pushed through with a wooden spoon handle to scrub out clinging grease, hair, and biofilm. Wipe inside the bottom of the sink tailpiece and the opening of the trap arm as far as you can reach safely.
- Inspect washers and fittings: Check the beveled washers for cracks, flattening, or brittleness, and inspect the slip-joint nuts for hairline splits. Replace worn washers for a couple of dollars while the trap is apart.
- Reinstall the trap: Slide the clean J-bend back into place with the washers oriented properly, and hand-tighten the slip-joint nuts.
- Test for leaks: Run hot water for 60 seconds and check every joint with a dry paper towel and flashlight.
READ MORE: How to Install Kitchen Sink Plumbing: Step by Step
Common P Trap Problems Under a Sink
Even well-installed drain plumbing eventually shows wear. Below are the five most frequent issues homeowners encounter with a P trap under sink, along with what causes them and how to respond.
P Trap Leaking Under the Sink
A leaking P trap under sink typically shows up as damp cabinet wood, warped particleboard, or a small puddle directly beneath the U-bend.
- Likely causes: Slip-joint nuts loosening over time from thermal expansion (hot water followed by cold water), degraded or flattened rubber washers, a bumped pipe knocked out of alignment by storage items under the sink, hairline cracks in overtightened plastic nuts, or pinhole corrosion in older metal traps.
- Troubleshooting: Dry the pipes thoroughly with a paper towel, then run the faucet while watching closely with a flashlight to pinpoint the exact joint where water emerges. Try snug-tightening the slip nut by hand first. If leaking continues, remove the J-bend, inspect the mating surfaces for grime or cracks, install fresh beveled washers, and reassemble.
- When to call a plumber: If water is leaking from the wall connection behind the escutcheon plate, if a glued Schedule 40 joint is cracked, or if leaks persist after replacing washers and pipes.
P Trap Smells Like Sewer Gas
When a P trap smells like sewer, raw sewage odors are bypassing the water seal and entering your room.
- Likely causes: The most benign cause is an evaporated water seal in a guest bathroom or basement utility sink that hasn’t been used in several weeks. Other causes include a leak in the J-bend draining the trap dry, hair draped over the weir acting like a wick to slowly drain the water seal, an improper S-trap siphoning itself dry, or a blocked roof vent pulling the water seal out when nearby fixtures flush.
- Troubleshooting: Run water into the sink for 15 to 20 seconds to refill the trap. Inspect under the cabinet for leaks and clean out any hair or debris trapped inside the J-bend.
- When to call a plumber: If the odor returns within a day or two even though the sink is used regularly and has no visible leaks, you likely have a venting defect, hidden drain crack, or dry floor drain nearby that requires professional diagnosis.
P Trap Keeps Getting Clogged
A recurring clogged P trap is usually a habit or slope issue rather than a defective pipe.
- Likely causes: Pouring cooking grease, oil, coffee grounds, or fibrous food scraps down a kitchen sink; long hair and thick conditioner or bar-soap buildup in bathroom sinks; an accordion-style flexible trap catching debris; or a trap arm with insufficient downward slope causing sluggish flow.
- Troubleshooting: Remove and clean the J-bend thoroughly, flush the line with hot water, and install a mesh drain strainer or hair catcher. If you have a flexible accordion pipe, replace it with a smooth-walled tubular P-trap.
- When to call a plumber: If the trap itself is completely clean when you remove it, the blockage lies further down the drain line inside the wall or floor and requires mechanical snaking.
Slow Draining Sink
When water pools in the basin and takes minutes to empty, flow is restricted either inside the trap or downstream.
- Likely causes: Partial buildup inside the pop-up stopper assembly (the single most common culprit in bathroom sinks), accumulated sludge in the J-bend, or grease buildup inside the horizontal branch line in the wall.
- Troubleshooting: Remove and clean the pop-up stopper first, then remove and clean the P-trap. Check whether other fixtures in the house are draining slowly at the same time.
- When to call a plumber: If cleaning both the stopper and the P-trap does not restore normal flow, or if multiple drains back up simultaneously, a licensed plumber should cable or hydro-jet the main branch line.
P Trap Making Gurgling Sounds
Gurgling, bubbling, or sucking noises coming from a sink drain indicate trapped air fighting against flowing water.
- Likely causes: A developing partial clog downstream in the drainpipe forcing displaced air back up through the trap’s water seal, or a blocked/improperly installed plumbing vent pipe (such as leaves, ice, or a bird’s nest obstructing the roof vent stack, or a failed air admittance valve under the sink).
- Troubleshooting: Clean the P-trap to rule out local blockage, and check whether your under-sink plumbing includes a mechanical air admittance valve (AAV) that may be stuck or expired.
- When to call a plumber: Persistent gurgling—especially when flushing a toilet or running a washing machine nearby—points to a venting or main-line restriction that needs professional inspection.
READ MORE: Kitchen Sink Draining Very Slowly? Step by Step DIY Fixes
P Trap vs. S Trap Under a Sink: What’s the Difference?
Homeowners inspecting older houses frequently spot an S-trap—a pipe shaped like an upright or sideways “S” that curves down, rises over a crest, and drops straight down through the floor of the cabinet without connecting to a wall vent.
| Feature | P-Trap | S-Trap |
| Pipe Shape | U-bend followed by a horizontal trap arm leading into the wall | U-bend followed immediately by a downward vertical drop into the floor |
| Venting Connection | Connects horizontally to a vented drain stack inside the wall | Typically unvented; drops directly into the drain line without air relief |
| Water Seal Stability | Stable; venting equalizes air pressure so water stays in the bend | Prone to self-siphoning; rushing water creates suction that empties the trap |
| Sewer Gas Protection | Reliable continuous barrier when properly sloped and vented | Unreliable; dry trap allows sewer gas to enter the home |
| Modern US Plumbing Codes | Standard approved design under IPC, UPC, and local US codes | Prohibited for new installations under modern IPC and UPC standards |
How Much Does It Cost to Replace a P Trap Under a Sink?
Replacing a P-trap is one of the most affordable plumbing repairs in residential homeownership, though total expenses vary significantly depending on whether you handle the swap yourself or hire a licensed plumber, as well as the condition of the pipes inside your wall.
- Basic Plastic P-Trap Kit (DIY): A standard 1¼-inch or 1½-inch tubular PVC or ABS P-trap kit with nuts and washers typically costs $5 to $20 at major US hardware stores. Adding a basic pair of adjustable pliers, a bucket, and spare washers brings a first-time DIYer’s total outlay to roughly $20 to $45.
- Metal or Decorative P-Trap Kit (DIY): A 17-gauge chrome-plated brass, brushed nickel, or matte black P-trap kit generally ranges from $25 to $80+, depending on brand, gauge thickness, and decorative finish.
- Professional Plumber Labor: Because licensed plumbers factor in travel time, insurance, overhead, and minimum service-call fees (often a 1-hour minimum), having a plumber replace a straightforward tubular P-trap typically runs between $125 and $300, including basic parts.
- Additional Repair Factors: Costs increase if the plumber discovers a corroded galvanized or cast-iron wall stub-out, needs to cut open drywall to repair a cracked sanitary tee, converts an illegal S-trap into a code-compliant vented P-trap (such as installing an approved air admittance valve where permitted by local code), or has to clear a stubborn main-line clog during the visit.
| Replacement Scenario | Estimated Cost Range (USD) | What Is Typically Included |
| DIY Plastic Tubular Replacement | $5 – $25 (materials only) | 1¼” or 1½” PVC/ABS P-trap kit, slip-joint nuts, and washers |
| DIY Decorative Brass Replacement | $25 – $85 (materials only) | Chrome, brushed nickel, or matte black brass P-trap and wall escutcheon |
| Standard Plumber P-Trap Swap | $125 – $300 | Service call, removal of old trap, installation of new trap, and leak testing |
| Complex Repair / Drain Modification | $250 – $600+ | Corroded wall pipe repair, S-trap conversion, or drain clearing |
Note: Material prices and labor rates vary widely across US regions, metropolitan areas, and individual plumbing companies.
READ MORE: CCTV Drain Inspection to Find Underground Sewer Blockage
When Should You Call a Professional Plumber?
Swapping out a standard tubular P-trap or clearing a hair clog is well within reach for most handy homeowners. However, forcing a DIY repair when underlying drain pipes are damaged can turn a modest repair bill into major water damage. Call a licensed plumber if you run into any of the following situations:
- The wall drain connection is damaged: If the threads on a metal wall stub-out are stripped, rusted through, or broken flush with the drywall, improper force can snap the pipe inside the wall cavity.
- Pipes are cracked or severely corroded: Older homes with deteriorating galvanized steel, lead, or thin brass drainpipes often require specialized cutting and shielded transition couplings.
- Sewer odors continue after refilling the trap: Persistent smells suggest a hidden vent leak, dry floor drain, or cracked stack behind the wall.
- The sink repeatedly backs up: Frequent clogs after cleaning the trap point to grease buildup, root intrusion, or a sagging pipe further down the drainage system.
- The existing plumbing has an S-trap configuration: Converting an S-trap properly requires understanding vent distances, pipe slope, and local code rules regarding air admittance valves.
- Venting or drainage modifications are required: Moving a sink, adding a garbage disposal where drain height is tight, or reconfiguring multiple drains calls for professional layout and code compliance.
- Leaks continue after replacing washers and tightening connections: Ongoing dripping indicates misaligned rigid piping, a hairline fracture in a fitting, or a leak originating higher up at the sink strainer basket or faucet supply lines.
Frequently Asked Questions
What does a P-trap do under a sink?
A P-trap holds a small pool of standing water inside its U-shaped bend to create an airtight barrier that stops foul and hazardous sewer gases from rising through your sink drain into your home. It also catches heavy dropped objects like rings before they wash into the main sewer line.
How do you install a P-trap under a kitchen sink?
Place a bucket under the drain, unscrew the old slip-joint nuts, and clean the tailpiece and wall adapter. Slide the new nuts and beveled washers onto the pipes (with the tapered edge of each washer facing the female fitting), position the J-bend with its deeper inlet facing the sink tailpiece, hand-tighten all nuts firmly without over-torquing, and run water to verify there are no leaks.
What size P-trap do I need for a bathroom or kitchen sink?
Most US bathroom sinks use a 1¼-inch P-trap, while most kitchen and utility sinks require a 1½-inch P-trap. Always measure the outside diameter of your existing sink tailpiece and wall connection before buying parts, as some bathrooms transition from a 1¼-inch tailpiece to a 1½-inch wall drain using a reducing washer.
Why is my P-trap leaking underneath the sink?
The most common causes are a loose slip-joint nut, a worn or reversed beveled washer, a pipe bumped out of alignment by stored items under the cabinet, or a cracked plastic nut from overtightening. Drying the pipes and running water while watching with a flashlight will show exactly which joint needs tightening or a fresh washer.
How do you unclog or clean a P-trap without calling a plumber?
Set a bucket and towel beneath the U-shaped J-bend, unscrew the two slip-joint nuts by hand or with adjustable pliers, and dump the water and debris into the bucket. Scrub the inside of the curved pipe with a bottle brush and soapy water, inspect the washers, reassemble the trap, and test with running water.
Final Thoughts
The P trap under sink is one of the hardest-working pieces of plumbing in your home, quietly protecting your indoor air quality and keeping wastewater moving every single day. Once you understand how its water seal works, how the slip-joint washers seat together, and how to remove the J-bend for a quick cleaning, routine inspections and basic P-trap replacements become manageable homeowner tasks.
Take two minutes today to open your kitchen and bathroom cabinets, clear away any bottles pressing against the pipes, and check the joints for dampness. If you spot persistent leaks, cracked wall connections, or recurring sewer odors that basic maintenance doesn’t solve, reach out to a licensed local plumber to inspect your drain and vent system safely.
Sources & References
- International Code Council (ICC): International Plumbing Code (IPC) — Chapter 10 (Traps, Interceptors and Separators) & Chapter 9 (Vents).
- International Association of Plumbing and Mechanical Officials (IAPMO): Uniform Plumbing Code (UPC) — Chapter 10 (Traps and Interceptors).
- Oatey Co.: Technical Installation Guides & Tubular Drainage Specifications (PVC, ABS, and Brass P-Traps).
- Plumbing-Heating-Cooling Contractors Association (PHCC): Residential Drainage & Venting Best Practices for Homeowners.
Disclaimer: Residential plumbing regulations, approved materials, air admittance valve allowances, and permit requirements vary by state, county, and municipality across the United States. Always verify your local plumbing code requirements before modifying drain or vent piping, and consult a licensed plumber if you are unsure how to complete a repair safely.

