Open the cabinet doors beneath your kitchen or bathroom sink, and you will see a curved section of pipe tucked behind the cleaning supplies. Most homeowners rarely think twice about that loop of plastic or metal until a foul, rotten-egg odor drifts out from the drain or a home inspector flags it during a real estate transaction. When it comes to S trap vs P trap configurations, the exact shape of that small bend determines whether your home’s indoor air stays clean or gets exposed to unpleasant and potentially hazardous sewer gases.
Every sink, bathtub, and floor drain in your house relies on a plumbing trap to hold a small barrier of standing water. That water acts as an airtight plug between your living space and the underground sewer or septic system. While both trap styles hold water, only one reliably keeps that barrier intact when water rushes down the drain.
In this practical homeowner’s guide, you will learn how plumbing traps work, why older S traps fall short of modern safety standards, how to identify which trap is sitting under your sink right now, and what it takes to upgrade to a code-compliant P-trap setup. Lets deep dive into “S Trap vs P Trap: Differences, Codes & Which Is Better”
What Is a Plumbing Trap and Why Is It Important?
A plumbing trap is a curved section of drainpipe installed directly beneath a plumbing fixture. Its sole job is to hold a small reservoir of clean water known as a trap seal every time you turn off the faucet.
Think of a plumbing trap like the airlock on a spacecraft or the water sitting in the bottom of a toilet bowl. Even when you are not running water, that standing pool completely blocks the diameter of the pipe. Because sewer gases cannot bubble up through a solid wall of standing water, the trap keeps foul odors, methane, hydrogen sulfide, and airborne bacteria trapped inside the drainage piping where they belong.
You will find traps attached to virtually every fixture in an American home:
- Kitchen and bathroom sinks (typically exposed inside the vanity or base cabinet)
- Bathtubs and showers (concealed beneath the floor or inside a ceiling cavity)
- Laundry standpipes and utility sinks (located in basements, garages, or laundry rooms)
- Floor drains (found in mechanical rooms, basements, and crawlspaces)
However, simply installing a curved pipe does not guarantee protection. For a trap seal to stay in place, the drainage system must also have proper venting. Plumbing vent pipes extend up through your roof to supply atmospheric air to the drain lines. Without air entering behind draining water, suction forms inside the pipes and pulls the protective water right out of the trap.
READ MORE: Pipe Leaking Under Sink: Causes, Fixes & Plumber Costs
What Is an S Trap in Plumbing?
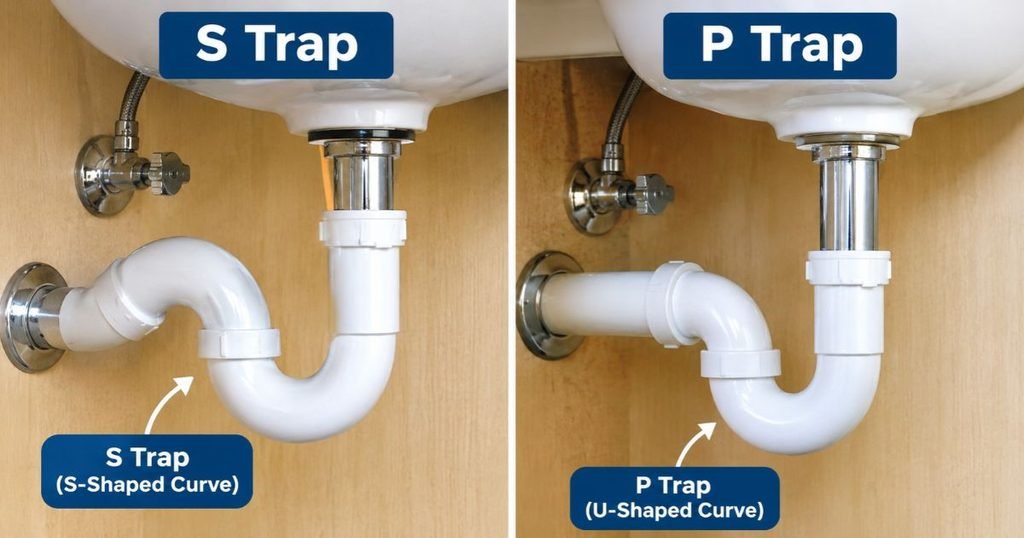
An S trap is a older style of drain fitting shaped like the letter “S” turned on its side. Looking closely at its profile, water drops vertically from the sink tailpiece into a bottom U-bend, rises over a top curve, and then immediately plunges straight downward into a vertical drainpipe running through the cabinet floor.
If you live in a house built before the 1970s or 1980s or a home that underwent unpermitted DIY renovations there is a reasonable chance you might spot S trap plumbing under a bathroom vanity, an older kitchen sink, or a basement laundry tub. Decades ago, plumbers routinely ran drainpipes straight down through the floor because it saved materials and avoided cutting into structural wall studs.
Why the S-Trap Design Fails
The fatal flaw of an S trap is that final downward drop. When a large volume of water such as a full basin of dishwater or a sink full of shaving water drains rapidly, the water fills the entire cross-section of the pipe as it plunges straight down.
This falling column of water creates a powerful vacuum effect called self-siphonage. Because an S trap lacks a horizontal section connected to a vent pipe, there is no way for air to enter the line and break the suction. As a result, the momentum of the draining water pulls the remaining water out of the bottom U-bend, leaving the trap empty or nearly dry.
Major Disadvantages of S Traps
- Loss of the water seal: Frequent self-siphonage strips away the water barrier that blocks sewer gases.
- Sewer odors inside your home: Once the water seal drops below the top of the lower bend, foul smells drift straight up through the sink drain.
- Plumbing code violations: S traps are explicitly prohibited under modern US model plumbing codes for new installations and major remodels.
LarryInspects Home Inspection Service - Venting deficiencies: The vertical-drop geometry prevents proper fixture venting, which can also affect nearby drains on the same branch line.
What Is a P Trap in Plumbing?
A P trap gets its name from its sideways “P” silhouette. Like an S trap, it starts with a vertical tailpiece dropping from the sink drain into a bottom U-bend. The crucial difference happens after the water rises out of that U-bend: instead of plunging straight down through the floor, the pipe extends horizontally through a piece called a trap arm into a sanitary tee inside the wall.
Because the drain line runs horizontally before turning downward inside the wall, it connects directly to a vertical vent stack. That vent introduces outside air at the exact point where the water begins its downward journey to the main sewer line, neutralizing suction and keeping the water seal safely inside the bottom bend.
Common Materials Used in P Trap Plumbing
Modern P traps are manufactured from several durable materials depending on whether the piping is hidden or exposed:
- PVC (Polyvinyl Chloride): White rigid plastic; lightweight, corrosion-proof, affordable, and standard in most modern US homes.
- ABS (Acrylonitrile Butadiene Styrene): Black rigid plastic; popular in western states and colder climates, offering high impact resistance.
- Chrome-plated brass: Polished or brushed metal; heavier and more expensive, commonly chosen for exposed pedestal sinks or open-shelf vanities where appearance matters.
- Polypropylene: Thin-walled white or black plastic found in budget slip-joint kits.
Why a P-Shaped Pipe Alone Does Not Guarantee Code Compliance
A common misconception among DIYers is that buying a $10 P-trap kit at the hardware store automatically makes a sink code-compliant. In reality, a P trap only works as intended when the entire drainage assembly meets specific engineering rules. If the horizontal trap arm is too long, slopes too steeply, lacks a proper vent connection, or drops straight down immediately after leaving the trap, it behaves just like an illegal S trap.
READ MORE: Dishwasher Not Draining? Causes, Fixes & When to Call Pro
S Trap vs P Trap: Key Differences Explained
Understanding the S trap vs P trap difference becomes much easier when you compare their geometry, airflow, and performance side by side.
| Feature | S Trap | P Trap |
| Shape and Design | Double curve resembling a sideways “S” with two consecutive vertical bends | Single U-bend followed by a straight horizontal exit pipe (“P” shape) |
| Drainage Direction | Drops vertically straight down through the cabinet floor | Exits horizontally into a wall drain before turning downward |
| Water Seal Protection | Poor; water momentum frequently pulls the seal out of the trap | High; horizontal arm and vent connection preserve the standing water |
| Siphoning Risk | High risk of self-siphonage during heavy drainage | Minimal risk when properly sloped and vented |
| Venting Requirements | Cannot be properly vented due to the immediate vertical drop | Connects to a vented sanitary tee or approved air admittance valve |
| Installation Location | Found almost exclusively in older pre-1980s homes | Standard across all modern residential and commercial buildings |
| Maintenance & Cleaning | Often glued or soldered; harder to disassemble without cutting pipe | Usually assembled with removable slip-joint nuts for easy cleanout |
| Sewer Gas Protection | Unreliable; dries out easily after draining large volumes | Reliable, continuous barrier against sewer odors and gases |
| Plumbing Code Compliance | Prohibited under modern US model plumbing codes | Required and approved across US jurisdictions when vented properly |
| Suitability for Modern Homes | Not recommended for new installs or renovations | The gold standard for safe, modern US residential plumbing |
In plain English, the difference comes down to air pressure control. An S trap acts like a straw when you pull your finger off the top gravity yanks all the liquid out in one rush. A P trap slows that downward plunge with a horizontal runway and gives the pipe a breath of air at the wall connection, leaving a clean pool of water behind every single time.
Why Are S Traps Illegal in the USA?
When homeowners hear that S traps are “illegal,” they sometimes worry that a code inspector is going to show up at their front door and issue a fine. Understanding what plumbing codes actually say and how they are enforced helps put this rule into proper perspective.
How Negative Pressure Breaks the Trap Seal
Inside your home’s drain-waste-vent (DWV) system, air pressure must stay balanced with the atmosphere. When an S trap discharges water straight down into a vertical pipe, the rushing water pushes air ahead of it and creates a low-pressure vacuum behind it. Without a vent opening above the weir (the highest point of the lower U-bend), atmospheric pressure pushes down on the water in the trap from the sink side, forcing the protective water seal over the hump and down the drain.
What the 2024 Model Plumbing Codes Say
To protect public health and indoor air quality, major US model plumbing codes explicitly ban S traps:
- 2024 International Plumbing Code (IPC): Under Section 1002.3 (Prohibited traps), “S” traps are specifically listed alongside bell traps, drum traps, and crown-vented traps as prohibited installations.
ICC Digital Codes – International Code Council - 2024 International Residential Code (IRC): Section P3201.5 similarly prohibits S traps in one- and two-family dwellings, requiring fixtures to use approved self-scouring traps such as P traps protected by a properly sized vent.
- Uniform Plumbing Code (UPC): Published by IAPMO and adopted in many western states, the UPC also forbids S traps and mandates proper trap-arm venting.
Local Adoption and Existing Homes
It is important to remember that the IPC, IRC, and UPC are model codes, not blanket federal laws. Individual US states, counties, and municipalities adopt these codes on different schedules and often add local amendments.
How to Identify an S Trap or P Trap Under Your Sink
You do not need special tools or a plumbing license to figure out which trap style is installed under your sink. Grab a flashlight and follow these five steps:
- Open the cabinet doors beneath the sink: Clear out any bottles, buckets, or bins blocking your view of the pipes.
- Locate the curved drain fitting: Find the vertical pipe coming down from the bottom of the sink basin (the tailpiece) and trace it to the lowest U-shaped bend.
- Follow the direction of the pipe leaving the trap: Look closely at what happens immediately after the water rises out of that bottom U-bend.
- Check whether the outlet runs horizontally or vertically:
- You likely have a P trap if the pipe travels straight out horizontally into the back wall of the cabinet.
- You likely have an S trap if the pipe curves up and immediately turns straight down into the floor of the cabinet without any horizontal run.
- Look for unusual modifications or missing vents: Keep an eye out for accordion-style flexible plastic tubes, “double traps” (two U-bends stacked together), or a vertical pipe rising behind the sink topped with a small plastic cylindrical cap (an air admittance valve).
READ MORE: Washing Machine Drain Clogged: Causes & Fixes
Common Problems Associated With S Traps
Because S traps struggle to hold water, they tend to produce distinct warning signs. Here are the most common S trap plumbing problems homeowners notice:
- Gurgling or glugging sounds: Hearing a loud “glug-glug-glug” as the sink finishes draining is a classic sign that air is being sucked violently through the water seal because the line lacks proper venting.
- Persistent sewer-like smells: A foul odor coming from one specific sink especially after a nearby toilet flushes or a washing machine drains often means negative pressure siphons the trap dry.
- Loss of the trap water seal: If you shine a flashlight straight down into your sink drain and cannot see a reflection of standing water at the bottom of the curve, the trap seal has evaporated or siphoned away.
- Slow drainage: Improperly pitched bends and older corroded metal S traps frequently catch hair, soap scum, and food debris.
- Improper DIY repairs: Homeowners sometimes try to stop odors by installing flexible corrugated pipes or adding a second trap, which only worsens drainage resistance and violates plumbing codes.
Not Every Drain Issue Means You Have an S Trap
Before assuming your trap shape is to blame, remember that everyday plumbing issues can mimic venting symptoms. A partial clog of grease or hair can cause slow drainage and gurgling, while dried-out water in a rarely used guest bathroom sink can let sewer gas enter even if you have a brand-new P trap. Similarly, a blocked roof vent caused by leaves or a bird’s nest can siphon a properly installed P trap.
Can You Replace an S Trap With a P Trap?
Yes, you can replace an S trap with a P trap, and doing so is one of the best upgrades you can make for safer, odor-free drainage. However, converting an S trap to a P trap is rarely as simple as swapping one curved fitting for another.
Because an S trap drains downward through the floor and a P trap must exit horizontally into a vented drain connection, S trap replacement requires addressing how air enters the pipe.
Why Venting and Drain Location Matter
If your drainpipe currently comes straight up through the cabinet floor, simply attaching a P trap and turning the pipe back down into the floor leaves you with the exact same vertical drop meaning it will still siphon itself dry. To convert the setup properly, a plumber must install a vertical riser pipe inside the cabinet or wall, connect the P trap’s horizontal arm into a sanitary tee, and ensure the top of that tee is vented.
Where Air Admittance Valves (AAVs) Fit In
When a sink is located on a kitchen island or in an older home where tying into an existing roof vent requires tearing open plaster walls, plumbers often use an Air Admittance Valve (AAV) commonly known by the brand name Studor vent.
An AAV is a one-way mechanical valve installed on top of a vertical pipe above the sanitary tee. When water drains and creates negative pressure, the valve opens slightly to let room air equalize the pipe; when drainage stops, gravity closes the seal so sewer gases cannot escape. While AAVs are recognized under the 2024 IPC and IRC, they are not universally permitted in every US city or state, and they must be installed upright in an accessible, ventilated space never sealed inside a wall. Always verify local code rules before relying on an AAV.
Overview of the S-Trap to P-Trap Conversion Process
- Inspect the existing plumbing: Check the material, diameter, and condition of the drainpipe coming through the floor or wall.
- Identify the drain and vent arrangement: Determine whether a conventional vent stack is accessible inside the wall or whether local code allows an approved AAV configuration.
- Determine the appropriate P-trap size: Select a 1¼-inch trap for standard bathroom lavatories or a 1½-inch trap for kitchen and utility sinks.
- Install approved fittings and connections: Cut out the old S trap and install a sanitary tee at the proper rough-in height.
- Verify proper slope and trap-arm arrangement: Ensure the horizontal trap arm slopes gently toward the drain (typically ¼ inch per foot) and stays within code-mandated length limits.
- Check for leaks: Run water at full flow and fill the sink basin to test all slip joints and solvent-welded seams under pressure.
- Confirm drainage and venting performance: Listen for smooth, quiet draining without gurgling and verify that standing water remains in the trap bend afterward.
Because modifying drain stacks and installing vents involves strict code measurements, cutting into walls or floors is best left to a licensed plumber rather than treated as a beginner DIY project.
READ MORE: Mold in HVAC Ductwork: Signs, Causes, and Solutions
P Trap Installation: What Homeowners Should Know
Whether you are replacing a worn-out P trap under a vanity or inspecting a contractor’s work, knowing the anatomy of a standard P trap installation helps you spot quality workmanship.
Basic Components of a P-Trap Assembly
- Trap bend (J-bend): The U-shaped bottom curve that holds the protective water seal.
- Trap arm (wall tube): The horizontal L-shaped pipe that connects the J-bend outlet to the drain adapter at the wall.
- Slip-joint nuts: Threaded plastic or metal rings that tighten down to hold the tubular pieces together.
- Beveled washers: Plastic or rubber compression rings placed beneath slip-joint nuts to create a watertight seal.
- Drain connection (trap adapter): The fitting glued or threaded onto the household drainpipe where the trap arm slides in.
- Vent connection: The sanitary tee behind or above the drain connection that links the fixture drain to the vent pipe.
S Trap vs P Trap: Which One Is Better?
When comparing P trap vs S trap under sink options across different rooms in your home, the P trap wins across the board—though each fixture has slightly different practical requirements.
Kitchen Sinks
Kitchen drains handle cooking oils, grease, coffee grounds, and food scraps every day, often alongside a garbage disposal or dishwasher discharge hose. An accessible 1½-inch slip-joint P trap makes it easy to place a bucket underneath, unscrew two nuts, and clear out a dropped utensil or grease buildup in five minutes. An S trap under a kitchen sink is especially problematic because draining a full sink of soapy dishwater creates strong suction that strips the trap seal dry.
Bathroom Sinks
Bathroom vanities typically use compact 1¼-inch P traps. Because bathroom sinks frequently drain large volumes at once such as emptying a basin after washing your face or shaving a properly vented P trap prevents the gurgling and sewer odors common in older bathrooms. If you have a pedestal sink where the pipes are visible, a chrome-plated brass P trap provides code-compliant protection with a clean, finished look.
Laundry and Utility Sinks
Washing machine standpipes and deep basement laundry tubs discharge high volumes of water at fast flow rates. Plumbing codes generally require 1½-inch or 2-inch P traps for these fixtures to handle rapid drainage without overflowing or siphoning. Because utility sinks are often located in basements where floor drains are tempting shortcuts, homeowners sometimes encounter illegal S traps there making proper P-trap and vent conversion especially important.
How Much Does It Cost to Replace an S Trap With a P Trap?
The cost to replace an S trap with a P trap in the United States depends heavily on what lies behind your cabinet wall or beneath the floor. Swapping out an existing P trap is a quick, inexpensive repair, whereas converting an S trap requires reworking the drain and vent geometry.
| Project Scope | Estimated Total Cost (Parts + Labor) | What Is Typically Included |
| DIY Basic P-Trap Replacement (existing compliant wall drain) | $10 – $45 | PVC, ABS, or chrome P-trap kit, washers, and basic hand tools |
| Simple S-Trap to P-Trap Conversion (accessible drain & approved AAV) | $150 – $500 | Licensed plumber visit, sanitary tee, P-trap assembly, vertical riser, and air admittance valve (where permitted) |
| Moderate Under-Sink Drain Rebuild (corroded piping or double-bowl sink) | $250 – $600 | Removing old metal/galvanized pipes, installing new continuous waste assembly, P trap, and wall adapter |
| Complex Retrofit With Vent Piping (opening walls or floors) | $600 – $2,000+ | Cutting drywall or subfloor, tying into an existing vent stack, new DWV piping, and local permit/inspection fees |
HailGeeks
Note: These figures represent realistic planning ranges based on current US residential plumbing rates, not guaranteed quotes. Final pricing varies by metropolitan labor rates, pipe accessibility, local permit fees, and whether walls or cabinetry must be modified.
READ MORE: Best Water Pressure Booster Pump: Review & Costs
When Should You Call a Professional Plumber?
While tightening a dripping slip-joint nut on an existing P trap is well within reach for most handy homeowners, S trap replacement and venting corrections carry higher stakes. Call a licensed and insured plumber if you encounter any of the following situations:
- Persistent sewer odors that return shortly after running water into the sink.
- Repeated loss of trap water or loud gurgling noises across one or more fixtures.
- An existing S trap that drains straight down through the floor without a visible wall vent connection.
- Corroded galvanized steel, cast iron, or brittle brass drainpipes that could crack or crumble when loosened.
- Leaks behind drywall or beneath the subfloor that require opening structural cavities.
- Bathroom or kitchen remodels that require local plumbing permits and municipal inspections.
- Uncertainty about local plumbing codes, especially regarding whether an air admittance valve is approved in your city.
How to Choose the Right Plumbing Trap for Your Home
If you are purchasing a replacement P trap or reviewing a plumber’s materials list, run through this practical checklist before buying:
- Confirm the correct pipe diameter: Measure your existing drain tailpiece. Bathroom lavatory sinks almost always use 1¼-inch traps, while kitchen sinks, utility tubs, and shower drains use 1½-inch or 2-inch traps.
- Match your existing pipe material: Stick with PVC for white plastic systems and ABS for black plastic systems, or use an approved shielded transition coupling if joining dissimilar materials. Choose heavy-gauge brass (17-gauge or 20-gauge) rather than thin tubular metal if the trap will remain visible.
- Verify sink drain configuration: Double-bowl kitchen sinks require a continuous waste assembly (end-outlet or center-outlet tee) feeding into a single P trap rather than two separate traps.
- Measure available cabinet space: Deep undermount sinks and garbage disposals reduce vertical clearance. Make sure the J-bend sits lower than the wall drain stub-out so water flows downhill naturally.
- Select smooth-walled, code-approved fittings: Choose rigid tubular or Schedule 40 DWV fittings bearing UPC or IPC approval stamps, and skip flexible accordion traps.
- Follow manufacturer instructions and local codes: Check gasket orientation and torque limits on slip joints, and confirm local venting requirements before starting work.
Final Verdict:
When weighing S trap vs P trap for your home, the answer is straightforward: a properly installed and vented P trap is the clear winner. While S traps were common in mid-century American construction, their downward-plunging design makes them prone to self-siphonage, dried-out water seals, and unwanted sewer gas odors which is why modern US model plumbing codes prohibit them.
If your older home still has an S trap that is draining quietly without odors, there is no need to panic, though you should plan to upgrade it during your next renovation or if you put the house on the market. On the other hand, if you are already noticing gurgling drains, foul smells, or leaks under the cabinet, take a quick look beneath your sink with a flashlight and contact a qualified local plumber to evaluate your drainage and venting setup.
Frequently Asked Questions
What is the main difference between an S trap and a P trap?
The main difference is the direction of the outlet pipe after the bottom U-bend. An S trap curves upward and immediately drops straight down through the floor, which can siphon the water seal dry. A P trap extends horizontally into a vented wall drain, breaking vacuum suction so the water seal stays intact.
Why are S traps illegal in the USA?
S traps are prohibited by modern US model plumbing codes—including the International Plumbing Code (IPC) and International Residential Code (IRC)—because their vertical drop causes self-siphonage. When water rushes down the vertical outlet, it sucks the protective standing water out of the trap, allowing sewer gases to enter your home.
Can I replace an S trap with a P trap myself?
Replacing an S trap with a P trap is rarely a simple part swap because an S trap lacks a proper horizontal trap arm and vent connection. Converting it usually requires installing a sanitary tee, a vertical riser, and either tying into a roof vent or adding a code-approved air admittance valve—work best handled by a licensed plumber.
How do I know if I have an S trap under my sink?
Open your sink cabinet and trace the pipe leaving the bottom U-shaped curve. If the pipe exits horizontally toward the back wall, you have a P trap. If it loops over a second curve and plunges straight down through the bottom of the cabinet floor, you have an S trap.
Does a P trap need a vent pipe?
Yes. Every P trap requires proper venting so atmospheric air can enter the drain line behind flowing water. Without a conventional vent pipe or an approved air admittance valve (where permitted by local code), negative air pressure can pull water out of a P trap just like an S trap.
Sources and References
- International Code Council (ICC): 2024 International Plumbing Code (IPC), Chapter 10 (Section 1002.3 – Prohibited Traps)
- International Code Council (ICC): 2024 International Residential Code (IRC), Part VII – Plumbing (Chapter 32 – Traps)
- International Association of Plumbing and Mechanical Officials (IAPMO): Uniform Plumbing Code (UPC), Chapter 10 – Traps and Interceptors
Disclaimer: Residential plumbing codes, permitting rules, and air admittance valve approvals vary by state, county, and municipality. This article is provided for general homeowner education only—always consult your local plumbing authority or a licensed, insured plumber before modifying drainage or venting systems.

