Are you tired of hot summers or stifling rooms in your home? Installing a ceiling fan could be the game-changer you need. These practical fixtures not only keep things cool by circulating air, but they also add flair and may even lower energy costs.
If you’re searching for “ceiling fan installation near me” in the USA, you’re in the right place. This comprehensive guide will walk you through everything from DIY installation steps to finding reliable local pros across the country. We’ll cover types of fans, safety tips, costs, and more all in an easy-to-read, straightforward way.
Whether you’re a homeowner in sunny Florida, chilly New York, or anywhere in between, ceiling fans are a smart addition to any space. They work year-round: cooling in summer by creating a wind-chill effect and distributing warm air in winter when reversed. Plus, with energy-efficient models, you could save up to 40% on cooling costs, according to Energy Star guidelines. But before you dive in, let’s explore why ceiling fans are worth the effort and how to get them installed right.
Why Install a Ceiling Fan? The Top Benefits for Homes
Ceiling fans aren’t just about aesthetics; they’re practical powerhouses for comfort and efficiency. In the USA, where climates vary from humid Southern states to dry Western deserts, a well-placed fan can make all the difference. Here’s why millions of Americans swear by them:
- Energy Savings: Running a ceiling fan costs pennies compared to cranking up the AC. It allows you to raise your thermostat by 4 degrees without feeling warmer, potentially saving $100+ annually on utility bills.
- Year-Round Comfort: In summer, fans create a cooling breeze. Flip the switch to reverse in winter, and they push warm air down from the ceiling perfect for drafty homes in the Midwest or Northeast.
- Improved Air Quality: Fans help circulate air, reducing stuffiness and even helping with allergies by keeping dust moving (pair it with an air purifier for best results).
- Style and Lighting Boost: Modern fans come with LED lights, remote controls, and designs that match any decor from rustic farmhouse to sleek contemporary.
- Increased Home Value: A professionally installed ceiling fan can add appeal to buyers, especially in hot regions like Texas or Arizona.
But not all fans are created equal. Choosing the right one depends on your room size, ceiling height, and needs. Let’s dive into the types available.
Types of Ceiling Fans: Finding the Perfect Fit for Your Space
Choosing a ceiling fan might be difficult due to the abundance of alternatives available. In the USA, names like Hunter, Hampton Bay, and Westinghouse dominate shelves at stores like Home Depot and Lowe’s. Here’s a breakdown to help you decide:
Standard Ceiling Fans
These are the classics great for medium-sized rooms (up to 400 sq ft). They hang from a downrod and work best on 8-9 foot ceilings. Ideal for living rooms or bedrooms.
Flush-Mount (Hugger) Fans
Perfect for low ceilings (under 8 feet), these sit close to the ceiling without a downrod. Common in basements or older homes in cities like Chicago or Boston.
Outdoor Ceiling Fans
Damp- or wet-rated for patios and porches. Look for UL-listed models to handle humidity in coastal areas like California or Florida.
Smart Ceiling Fans
Energy monitoring, voice control (Alexa/Google), and app integration. Tech-savvy homeowners enjoy brands like Hunter’s SIMPLEconnect series.
Energy-Efficient Models
Look for Energy Star certification these use 60% less energy. Great for eco-conscious folks in states like Oregon or Washington.
When shopping, measure your room: For spaces under 75 sq ft, a 29-36 inch fan; 76-144 sq ft, 36-42 inches; larger rooms need 52+ inches. Noise level (measured in sones) and airflow (CFM—cubic feet per minute) are key specs too.
READ MORE: Attic Fan Installation
Types of ceiling fan installations (so you pick the right approach)
- Replacement, same box & wiring — easiest, typically 30–90 minutes.
- Replacement requiring fan-rated box / brace — add 30–60 minutes for support installation.
- New ceiling fan where no fixture exists — may require running new wiring: 2–4+ hours (electrician recommended).
- High ceiling / vaulted / outdoor / dual motor — specialized hardware, longer time, higher cost.
DIY Ceiling Fan Installation: A Step-by-Step Guide for Beginners
If you’re handy and searching for “ceiling fan installation near me” but want to save money, DIY might be for you. It’s doable for most people with basic tools, but always prioritize safety electricity is involved! This guide assumes you’re replacing an existing light fixture; new installs may need wiring help from a pro.
Tools and Materials You’ll Need
Before starting, gather these:
- Screwdriver set (Phillips and flathead)
- Wire strippers and cutters
- Voltage tester
- Ladder or step stool
- Ceiling fan kit (fan, blades, mounting bracket, downrod if needed)
- Wire nuts and electrical tape
- Optional: Fan-rated electrical box if yours isn’t sturdy
Step 1: Turn Off Power and Prepare
Safety first! Head to your breaker box and flip off the power to the room. Use a voltage tester to confirm no juice is flowing. Remove the old fixture by unscrewing the canopy and disconnecting wires (white to white, black to black, green/ground to ground).
Step 2: Install the Mounting Bracket
If your ceiling has a joist, anchor the bracket there for support fans weigh 15-50 lbs! Screw it in securely. For no joist, install a fan-rated box (available at hardware stores).
Step 3: Assemble the Fan
On the ground, attach blades to the motor housing per the manual. Thread wires through the downrod (if using) and connect it to the fan.
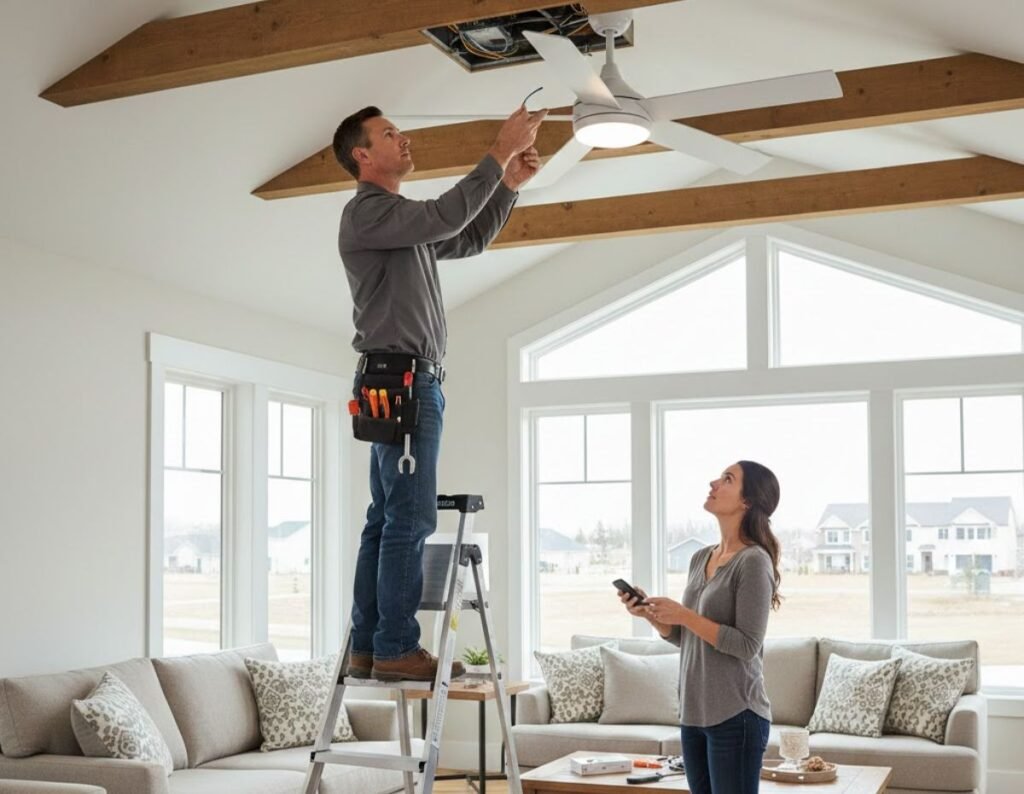
Step 4: Hang and Wire the Fan
Lift the fan to the bracket and hook it in place. Connect wires: Black (hot) to black/blue (fan/light), white (neutral) to white, ground to ground/green. Secure with wire nuts and tape.
Step 5: Attach the Canopy and Blades
Slide the canopy up and screw it tight. If blades aren’t attached, do so now. Install light kit if included.
Step 6: Test and Balance
Restore power and test speeds, lights, and direction. If it wobbles, use balancing clips (included in most kits) to even it out.
Total time: 1-2 hours for experienced DIYers. If wires don’t match or you’re unsure, stop and call a local electrician better safe than sorry!
READ MORE: Electrician Near Me
When to Hire Professional Ceiling Fan Installation Services
DIY isn’t for everyone. If your home has old wiring, high ceilings, or no existing fixture, pros are worth it. Searching “ceiling fan installation near me” in the USA? Here’s how to find reliable help:
- Use Online Directories: Sites like Angi (formerly Angie’s List), Thumbtack, or HomeAdvisor let you input your zip code for local quotes. For example, in Atlanta, GA, expect 50+ options.
- Big Box Stores: Home Depot and Lowe’s offer installation services starting at $100-200, often bundling with fan purchase.
- Local Electricians: Search Google for “licensed electrician near me” and specify ceiling fans. In rural areas like Montana, check Yelp reviews.
- Specialized Services: Companies like Mr. Electric or Handyman Connection handle fans nationwide.
Pros ensure code compliance (important in states like California with strict building regs) and handle tricky spots like sloped ceilings.
Ceiling Fan Installation Costs in the USA: What to Expect
Costs vary by location, fan type, and complexity. Nationally:
- DIY: $50-300 for the fan + tools.
- Professional: $150-450 for basic install; $300-800 for new wiring or high ceilings. Regional differences: Cheaper in the Midwest ($200 avg), pricier in coastal cities like NYC ($400+).
Factors influencing price:
- Fan size and features (smart fans add $50-100)
- Electrical upgrades (new box: $100-200)
- Labor rates (urban vs rural)
Comparison table — Common installation scenarios (fast glance)
| Scenario | Difficulty | Typical Time (pro) | Typical Cost (USA) | Notes |
| Replace existing fan/light (same box) | Easy | 30–90 min | $100–$250 | Quick swap if box is fan-rated. |
| Replace light fixture with fan (box not fan-rated) | Moderate | 1–2 hrs | $200–$400 | Requires fan-rated box or brace. |
| New fan (no existing fixture / new wiring) | Hard | 2–4+ hrs | $300–$700+ | New wiring and possibly permit. |
| High ceiling / vaulted / outdoor | Moderate–Hard | 2–4 hrs | $300–$800+ | Specialized hardware, safety gear. |
| Smart fan / remote + multi-speed integration | Moderate | 1–2 hrs | $150–$400+ | May need separate wiring for light/fan and remote module. |
READ MORE: HVAC Near Me
Comparison Table: DIY vs. Professional Installation vs. Top Brands
To help you decide, here’s a comparison table breaking down key aspects. We’ve included popular US brands for reference.
| Aspect | DIY Installation | Professional Installation | Hunter Fans | Hampton Bay (Home Depot) | Westinghouse |
| Cost | $50-300 (fan + tools) | $150-800 | $100-400 | $50-250 | $80-300 |
| Time | 1-3 hours | 1-2 hours (pro time) | N/A | N/A | N/A |
| Skill Level | Beginner-Intermediate | Expert | Easy assembly | Basic | Moderate |
| Warranty/Safety | Depends on your work | Often guaranteed + insured | Limited lifetime motor | 1-5 years | Lifetime motor warranty |
| Best For | Simple replacements | Complex setups, high ceilings | Quiet operation, styles | Budget-friendly | Energy-efficient models |
| Pros | Saves money, satisfying | Safe, quick, code-compliant | Durable, stylish | Affordable, widely available | Reliable, good airflow |
| Cons | Risk of errors, no warranty | Higher cost | Pricier | Basic features | Fewer smart options |
This table highlights why pros might be better for novices, while brands like Hunter excel in quality.
Safety Tips for Ceiling Fan Installation and Use
Don’t skip safety fans involve heights and electricity. Key pointers:
- Always Cut Power: Double-check with a tester.
- Secure Mounting: Use fan-rated boxes; standard light boxes can fail.
- Blade Clearance: At least 7 feet from floor, 18 inches from walls.
- Balance Check: Wobbly fans can loosen over time—fix immediately.
- Child/Pet Safety: Opt for enclosed blades in kids’ rooms.
In earthquake-prone areas like California, ensure secure anchoring.
READ MORE: Electric Company Near Me
Maintenance and Troubleshooting Your Ceiling Fan
Once installed, keep it running smoothly:
- Clean blades monthly with a soft cloth dust reduces efficiency.
- Lubricate motor yearly if not oil-free.
- Check for noises: Squeaks might need oil; hums could be wiring issues.
Common fixes: Slow speed? Clean or replace capacitor. No power? Check breaker or remote batteries.
FAQs on Ceiling Fan Installation
- How easy is a ceiling fan to install? It’s moderately easy for those with basic electrical knowledge. If replacing an existing fixture, it takes 1-3 hours. New installs are harder and may require a pro.
- Why does the ceiling fan make noise while running? Common causes include loose blades, unbalanced fans, or dirt buildup. Tighten screws, balance with clips, and clean regularly to quiet it down.
- Why isn’t the ceiling fan running? Check the power switch, remote batteries, or circuit breaker. If wired wrong, it might need rewiring call an electrician if unsure.
- Why is the ceiling fan running slow? This could be due to a faulty capacitor, low voltage, or overheating motor. Clean it first; if persists, replace parts or the fan.
- How hard is installing a ceiling fan? Not very hard if you follow instructions, but challenging for high ceilings or old wiring. Many homeowners do it successfully with online tutorials.
Conclusion:
Whether you’re going DIY or searching for “ceiling fan installation near me” in the USA, a new fan can transform your home’s comfort. From energy savings to stylish upgrades, the benefits are clear. Remember to prioritize safety, choose the right type, and get quotes if needed. If you’re in a major city like Los Angeles or Dallas, local services are plentiful just search and read reviews.
Ready to beat the heat (or cold)? Head to your nearest store or online retailer and start your project. With this guide, you’re set for success. Stay cool!