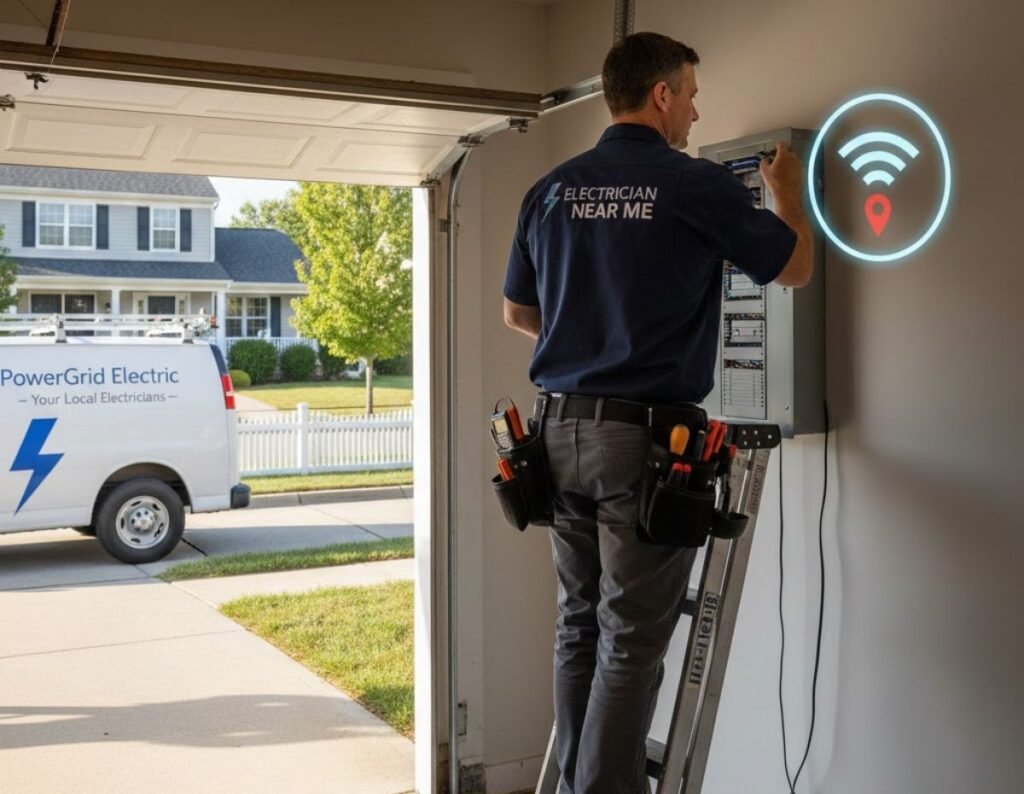
You’ve tripped over one too many power strips, your phone charger monopolizes the only nearby plug, and that extension cord spiderweb across the living room makes you nervous every time you step on it. Adding or replacing electrical outlets is one of the most practical upgrades a homeowner can make it improves safety, convenience, and the value of your home but it’s also work that interacts with the house wiring and the electrical panel. That means mistakes can be dangerous, and local rules often require permits and inspections.
This guide gives clear, homeowner-friendly information on outlet types, typical costs and timelines, code and permit basics (NEC highlights), safety cautions, when it’s reasonable to DIY, and how to plan a project. You’ll also find a practical checklist, a comparison table for common outlet types, and five SEO-style FAQs to answer the questions most homeowners search for. Read this before you pull a screwdriver: we’ll tell you what you can do safely, what to leave to a licensed electrician, and how to get accurate quotes. (Do not touch live wiring see safety section.)
Quick contents
- Types of outlets explained
- Why add or replace outlets
- Cost & timeline (ranges and factors)
- Permits, inspections & code basics (NEC highlights)
- Safety, tools, and when DIY is risky
- Hiring a licensed electrician what to ask
- Step-by-step planning checklist & sample timeline
- Comparison table (at a glance)
- 5 FAQs
- Conclusion & call to action
Types of outlets explained
Outlets (also called receptacles) come in several standard forms. Choosing the right one depends on where it’s installed and what you’ll plug in.
1. Standard duplex 120V outlet (plain old receptacle)
- What: Two outlet openings stacked vertically (120-volt, 15A or 20A).
- Best use: Most general rooms living rooms, bedrooms, hallways, offices.
- Notes: Tamper-resistant (TR) versions are required in new residential construction and are a low-cost safety upgrade for homes with kids.
2. Tamper-Resistant (TR) outlets
- What: Internally spring-loaded shutters block insertion of foreign objects unless both prongs are used.
- Best use: Everywhere children might access outlets (required for new installs under NEC).
- Why: Small extra cost; big reduction in risk for children.
3. GFCI outlets (Ground-Fault Circuit Interrupter)
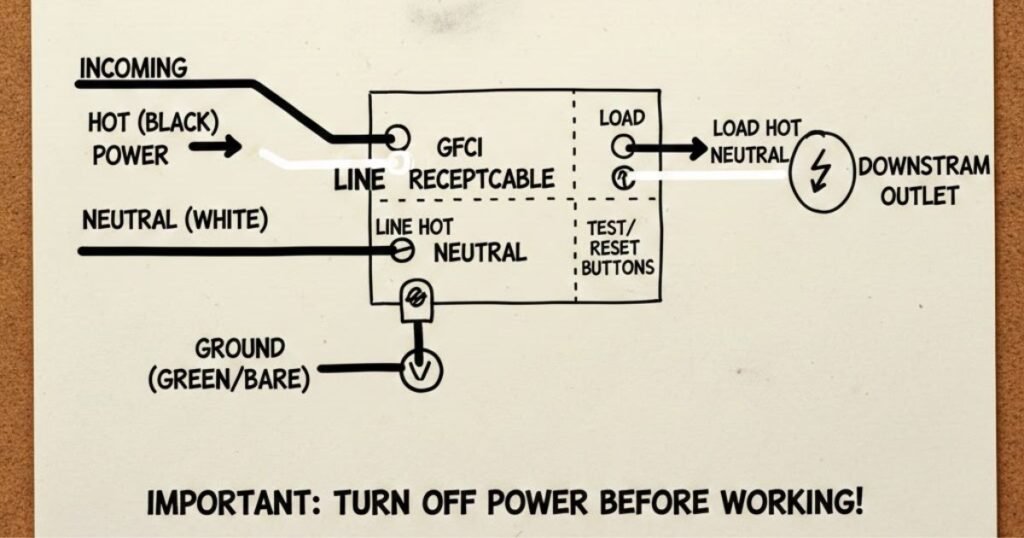
- What: Receptacles with Test and Reset buttons that quickly shut off power if current leaks to ground.
- Where required: Bathrooms, kitchens (countertops), garages, outdoor outlets, laundry rooms, near pools the NEC expands and clarifies these locations in recent cycles. GFCI protects against life-threatening ground-fault shocks in wet/damp locations.
4. AFCI protection (Arc-Fault Circuit Interrupter)
- What: Detects dangerous electrical arcs that can start fires. AFCI protection is typically provided by breakers in the panel or by combination AFCI receptacles.
- Where required: Most living areas and sleeping areas (bedrooms, living rooms, dens, etc.) per NEC 210.12; the exact adoption varies by jurisdiction and code cycle. AFCI is about fire prevention rather than shock protection.
5. Integrated USB / USB-C outlets
- What: Standard receptacle with built-in USB-A or USB-C ports for charging phones and small devices.
- Best use: Home office, kitchen charging stations, bedside. Replace a duplex with a combination device or install additional receptacle.
6. 240V / dedicated outlets (dryer, range, EV charger, NEMA outlets)
- What: Larger outlets on dedicated circuits (240V, higher amps) for heavy appliances (clothes dryer, electric range, EV chargers, welders).
- Best use: Laundry, range, garage (EV charger). These require proper breaker sizing, cable, and often a panel capacity check — typically a job for a licensed electrician.
7. Weatherproof / outdoor outlets
- What: Outdoor-rated, GFCI-protected, and installed in weather-resistant boxes and covers (in-use covers for when a cord is plugged in).
- Best use: Patios, yard, exterior walls must be installed to protect against moisture and corrosion.
8. Specialty outlets (isolation transformers, hospital grade, floor outlets, surge-protected)
- What: Niche uses such as commercial/hospital grade devices, floor boxes for open plan spaces, or outlets with integrated surge protection for electronics.
Lifespan & maintenance notes: standard outlets last many years (10–30+ years) but wear, cracked faces, loose connections, or discoloration are signs to replace. GFCI devices should be tested monthly (press TEST/RESET) and replaced if they fail to trip or reset correctly. For AFCI and more technical protective devices, follow electrician advice and panel labeling.
READ MORE: Electrical Wiring Installation: Costs, Types & How to Plan
Reasons to add or replace outlets
Homeowners add or replace outlets for many practical reasons:
- Convenience & functionality. Too few outlets cause unsafe extension cord use. Adding outlets where you need them (home office, island, TV wall) reduces tripping hazards and overloaded strips.
- Safety upgrades. Swap old two-prong outlets for grounded three-prong or add GFCI where code requires it. Tamper-resistant outlets reduce risk for kids.
- New equipment / appliances. EV chargers, ranges, and dryers often need dedicated 240V circuits and appropriately rated receptacles.
- Remodels and rearrangement. New layouts (kitchens islands, wall-mounted TVs) often require relocated or additional outlets.
- Code compliance & resale value. Updated electrical work (AFCI/GFCI, grounded outlets) helps during inspections and appraisals and can be required when you pull permits for other work.
- Aging infrastructure. Old outlets that flicker, overheat, or are loose indicate worn contacts or loose wiring and should be replaced promptly.
When deciding, consider whether the project is simply swapping a worn device (cheap and quick) or adding new wiring / circuits (more complex, likely permit required). Evidence from national cost guides shows single-outlet installs often fall in the low-hundreds per outlet for typical conditions, but complexity raises costs.
Cost & timeline (with clear ranges and factors)
Typical price ranges (national averages / guidance):
- Replace an existing receptacle (same box, same circuit): $50–$200 (parts + service call/labor). Many basic swaps are on the low end if the homeowner provides parts and the job is straightforward.
- Install a new outlet on an existing accessible circuit: $100–$300 per outlet (labor + materials).
- GFCI outlet installation (replacement or new): $130–$300 per outlet typical.
- Add outlet requiring new circuit / fish through walls / attic or basement work: $200–$600+ per outlet complexity, drywall work, and panel work increase costs.
- 240V dedicated outlet (dryer, range, EV charger branch circuit): $200–$1,000+ depending on distance from panel, need to upgrade panel or add breakers, or trenching for exterior EV charger circuits.
What changes the price?
- New circuit vs existing circuit: Running a new circuit (new breaker, new cable, possibly conduit) is the biggest cost driver.
- Access & wall type: Fishing cable through finished walls, tile, brick, or concrete raises labor. Attic/basement access lowers it.
- Panel capacity & upgrades: If your panel has no spare spaces or insufficient capacity, you may need a subpanel or a service upgrade a major cost.
- Device type: Smart outlets, integrated USB-C, weatherproof in-use covers, and heavy-duty 240V receptacles cost more.
- Local labor rates: Urban areas and high-cost regions charge more per hour. Estimate $50–$150/hr plus a service call fee in many markets.
Timeline (typical time estimates):
- Swap an outlet (same box): 15–60 minutes (one outlet).
- Add an outlet on an existing circuit with easy access: 1–2 hours per outlet.
- Install new circuit / run cable through finished walls or long distances: several hours to a full day depending on obstacles, drywall repair, and inspection timing.
- Major work (panel upgrade, multiple new circuits): 1–3 days (or longer if permitting and parts are required).
Money-saving tip: Bundle multiple outlet installs in the same service call electricians often charge a base service fee plus per-outlet labor that drops when multiple items are done together.
Permits, inspections & code basics (NEC highlights + local tips)
NEC is the starting point, local authority enforces it. The National Electrical Code (NEC, NFPA 70) sets the model rules; local jurisdictions adopt and sometimes modify those rules. Always check with your local building department before starting work.
Common permit rules:
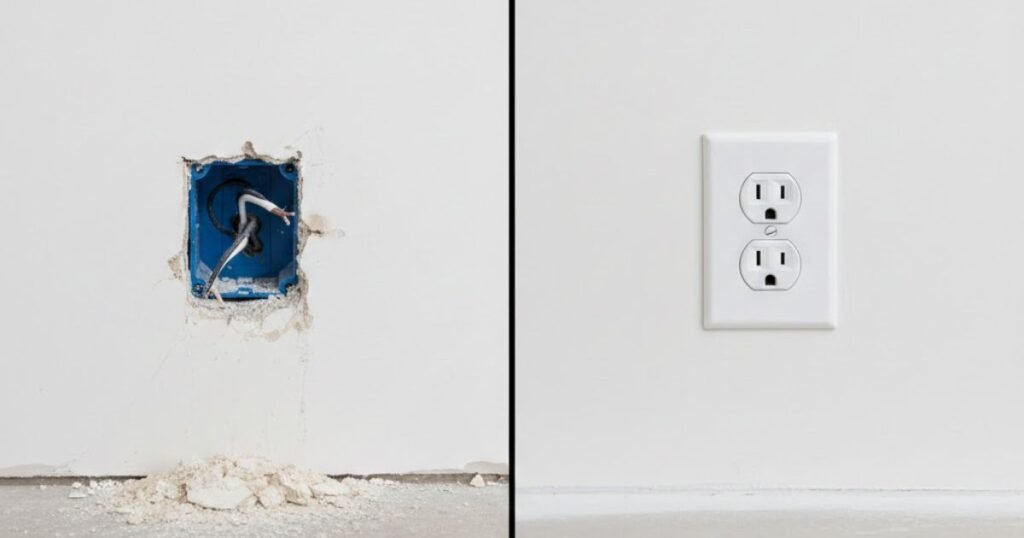
- Likely to require a permit: Adding a new circuit, installing a 240V outlet, major rewiring, or moving a junction box typically requires a permit and inspection. Many jurisdictions allow homeowners to do minor repairs (device replacement) without a permit, but this varies.
- Less likely to require a permit: Replacing a receptacle in the same location (same box, same circuit) often doesn’t need a permit but if you change wiring or create a new box, you probably need one.
- Inspection: If a permit is pulled, an inspector will verify correct wiring, grounding, proper device types (GFCI/AFCI where required), and safe terminations.
NEC highlights homeowners should know (2020/2023 updates matter):
- GFCI protection is required in wet/damp locations and its scope expanded in recent NEC cycles bathrooms, kitchens, garages, outdoors, and for certain appliance outlets. Check local adoption of the 2023 NEC changes.
- AFCI protection is required for many 15A and 20A branch circuits serving living areas and bedrooms (fire prevention). Exact rooms and methods (breaker vs outlet) depend on code cycle and local adoption.
- Tamper-resistant outlets are required in new dwelling unit installations.
- Dedicated circuits: Major appliances require dedicated circuits sized and protected correctly; you can’t just piggyback multiple heavy loads on one small branch circuit.
How to check your local rules (script suggestion):
Call or email your local building department and say: “Hi — I’m planning to add a new electrical outlet in my home at [city/county]. Will I need a permit if I (a) replace an outlet in the same box, (b) add a new receptacle on an existing circuit, or (c) add a new circuit? Also, which NEC edition is enforced locally?” That phrasing gets you the specific answer quickly.
Why permits matter: Safety and insurance. Work done without permits can create problems selling the home, and insurers sometimes reduce coverage if an unpermitted electrical fire occurs.
READ MORE: Electrician Cost Per Hour: How Much Homeowners Pay in the U.S.
Safety, tools, and why DIY can be risky
Safety first: do not touch live wiring. If you are uncomfortable or uncertain about the wiring, stop and call a licensed electrician. Never assume a wire is dead just because a switch is off. Always test circuits with a proper voltage tester before touching wiring but if you don’t know how to test safely, call a pro.
When a homeowner might safely DIY (limited, cautious cases):
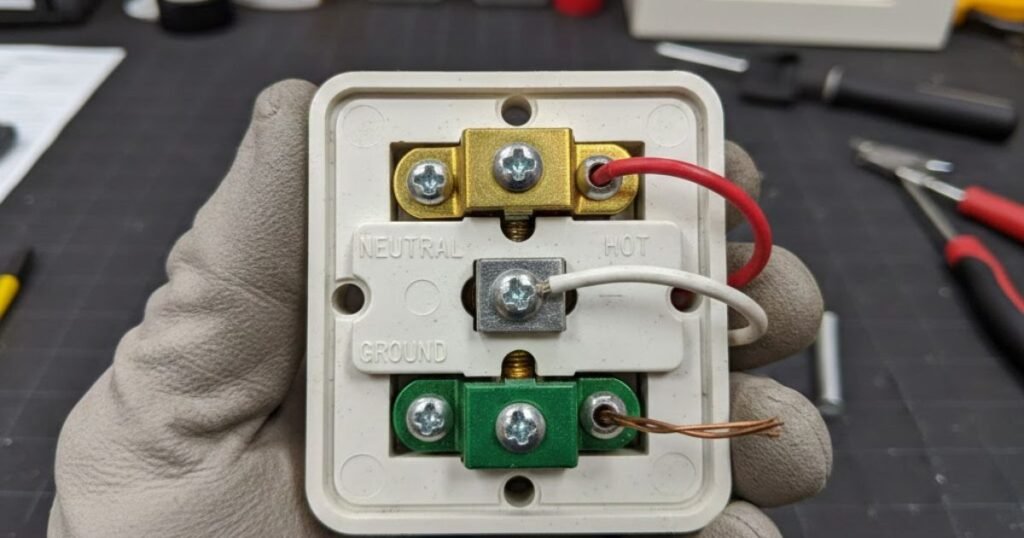
- Swapping a damaged outlet for the same type in an accessible box on a clearly identified, de-energized circuit if you know how to shut off the right breaker and verify power is off with a tester. Use tamper-resistant devices and follow manufacturer instructions.
- Replacing faceplates or tightening a loose receptacle after turning off power at the breaker.
When to hire a licensed electrician (you should hire them):
- Adding new outlets that require running cable, cutting into walls, or installing a new circuit/breaker.
- Working on multi-wire branch circuits, old ungrounded two-wire systems, knob-and-tube wiring, or aluminum wiring. These are higher risk and often require specialized remediation.
- Any work that may require a permit or inspection licensed electricians know the process and typically handle permitting.
- Installations involving 240V or high-amp circuits, EV chargers, ranges, or panel changes.
Tools homeowners sometimes use (but only after training): non-contact voltage tester, multimeter, screwdriver set, wire strippers, outlet tester. If you plan to use them, read instructions and safety guides; but remember tools don’t replace code knowledge.
Common dangers of DIY electrical work: electric shock, fire from poor connections, overloaded circuits, improper grounding, and code violations that could void insurance. Several consumer sources and electrical pros recommend hiring licensed electricians for everything beyond simple swaps.
Testing & verification: After any professional installation, the electrician should test circuits, demonstrate GFCI devices trip/reset, label breakers, and leave a written estimate & invoice showing work done. If you DIY, have someone inspect the work if required by code.
Hiring a licensed electrician: what to ask, vetting, quotes
A good electrician saves money, ensures safety, and navigates permits and inspections.
Questions to ask on the first call (phone or message):
- “Are you licensed in [my city/state]? Can you provide your license number?”
- “Do you carry liability insurance and worker’s compensation?”
- “Will you pull permits and schedule inspections if required?”
- “Can you provide a written estimate and a clear scope of work?”
- “Do you offer a warranty on labor and parts? How long?”
- “Can you provide references or examples of similar work?”
Red flags: No license or insurance, vague pricing, reluctance to provide written estimates or references, requests for large cash-only up front.
Comparing quotes: Ask electricians to price the same scope so you can compare apples-to-apples: (1) parts list, (2) labor hours, (3) permit fees (if any), (4) cleanup/drywall patching costs, (5) warranty. Get at least two written estimates. Be aware the lowest price isn’t always best check credentials and reviews.
What a professional estimate usually includes: device types (GFCI, AFCI, tamper-resistant), panel check, breaker type, permit handling, hourly rate and estimated hours, and a start/completion window.
Hiring tips: Ask if the electrician uses AFCI breakers (for AFCI requirements) vs. combination devices, and whether GFCI devices will be wired on the line and load correctly (if protecting downstream receptacles). A competent pro will explain these choices without jargon.
Sample question to request on estimate: “Please break out costs for: (A) replacing X outlets (same box), (B) adding Y new outlets on existing circuits, and (C) installing Z new dedicated circuits including breakers and any required panel work.”
READ MORE: Commercial Electrical Contractors: Services, Costs & How to Hire
Step-by-step planning checklist & sample project timeline
Before you call anyone — “Before you call an electrician” checklist
- Take clear photos of the wall and the electrical panel (labelings on breakers if present).
- Note the age of the home and any known wiring type (knob-and-tube, aluminum, etc.).
- Make a short list of where you want outlets (height, facing wall, island, garage).
- Identify nearby access: unfinished attic, basement, or crawlspace access makes work easier.
- Note any desired device types (GFCI, USB-C, tamper-resistant, smart outlet).
- Prepare a schedule window for work (weekend vs weekday).
Sample project timeline for adding 3 outlets (typical single-family home):
- Day 0: Planning photos & list; call 2–3 electricians for estimates.
- Day 1–3: Receive written estimates; choose electrician. Decide whether to bundle with other minor electrical work.
- Day 4–10: Electrician pulls permit (if required). Permit timelines vary by jurisdiction some same-day, some take days.
- Day X (work day): Electrician installs outlets (1 day). If drywall patching needed, allow time for mud/dry/paint.
- Day X+1–3: Drywall finish & paint (if performed). Inspector does final inspection (if permit required).
- After completion: Ask for labeled panel updates and post-work test demonstration (GFCI/AFCI tests).
Notes: Some projects require multiple trips (panel work first, final wiring later) depending on inspector schedules and material availability.
Comparison table — Outlet types at a glance
| Outlet Type | Typical Cost (parts + labor) | Best Use / Where | Installation difficulty | Code/Permit notes | Common lifespan / maintenance tips |
| Standard duplex 120V | $15–$75 (replace) / $50–$200 (install) | Bedrooms, living rooms, hallways, offices | Easy | Replacing same device usually no permit; adding new box may require permit | 10–30+ yrs; replace if loose or discolored |
| Tamper-Resistant (TR) | +$2–$10 device cost; labor same as duplex | Anywhere (required in new dwellings) | Easy | Required in new residential installations per NEC | Low maintenance; test visually |
| GFCI outlet | $20–$50 device; $130–$300 installed | Bathrooms, kitchens, garages, outdoors, laundry | Moderate | Required in wet/damp locations; follow NEC 210.8 (scope expanded in 2023 in many areas). Permits if new circuit or box added. | Test monthly; replace if trip/reset fail |
| AFCI (breaker or outlet) | Breaker: $40–$150; installed extra labor | Bedrooms, living rooms, many living spaces | Moderate–Complex (panel work) | NEC 210.12 requires AFCI protection for many dwelling circuits; often handled at panel. | Test per manufacturer; replacement at panel as needed |
| USB / USB-C integrated | Device $20–$80; installs like duplex | Home office, bedside, kitchen charging | Easy–Moderate | No special permit usually if same box; new circuits may require permit | Replace as tech ages; internal ports wear |
| 240V / dedicated circuit (NEMA outlets) | $200–$1,000+ depending on run & panel work | Dryer, range, EV charger, heavy appliances | Complex | New circuit and breaker required; permit & inspection almost always required | Periodic inspection; larger appliances may require 10–20+ yr life on receptacle |
| Weatherproof / outdoor | Device $20–$100; $150–$400 installed | Exterior walls, patios, garages | Moderate | Must be GFCI protected and installed in weatherproof boxes; use in-use covers for plugged cords | Use corrosion-resistant boxes; inspect seals yearly |
Practical homeowner note: If installing outdoors: use a weather-rated GFCI in a weather-resistant box with an in-use cover and proper conduit/connector where required.
READ MORE: Heat Exchangers Explained | Types, Uses, Efficiency & Benefits
5 FAQs
How much does it cost to install an electrical outlet?
Typical installs range widely. Basic replacement often costs under $200; installing a new outlet on an existing circuit commonly runs $100–$300; installing a new circuit or dedicated 240V outlet can cost several hundred to over $1,000 depending on distance to the panel and required upgrades. Labor rates, device type (GFCI, AFCI, USB), drywall repair, and local permit costs change the price get at least two written estimates. National cost guides show average single-outlet installs often in the low-hundreds.
Can I install an outlet myself, or do I need an electrician?
You can safely replace a receptacle in the same box if you know how to de-energize the circuit and use a tester but do not work on live wiring. For adding outlets, running new circuits, 240V work, multi-wire circuits, older ungrounded systems, or anything that needs a permit/inspection, hire a licensed electrician. DIY in those cases risks shock, fire, code violations, and insurance problems. When in doubt, hire a pro.
What’s the difference between a GFCI outlet and a standard outlet?
A GFCI (Ground-Fault Circuit Interrupter) detects small differences in current between hot and neutral that indicate current is leaking to ground (through water or a person) and quickly shuts off power to prevent shock. GFCI outlets have TEST and RESET buttons on their face. Standard outlets do not provide this protection. The NEC requires GFCI protection in wet/damp locations (bathrooms, kitchens, outdoors, garages, etc.); GFCIs are life-saving devices.
Do I need a permit to add a new outlet in my home?
It depends on local rules. Many jurisdictions require permits for adding new outlets when you run new wiring, install a new circuit, or make structural changes. Simple replacements in the same box often don’t require a permit. Always check with your local building department tell them exactly what you plan (replace vs add vs new circuit) and ask whether a permit and inspection are required. Unpermitted electrical work can cause problems with insurance and resale.
How long does it take to install an outlet?
Swapping a single outlet (same box) can take 15–60 minutes. Adding a new outlet on an existing accessible circuit is often 1–2 hours. Running a new circuit, working through finished walls, or installing a dedicated 240V circuit can take several hours to a full day or more, especially if drywall patching and inspections are required. Panel upgrades or permits can extend the schedule by days.
Conclusion
Adding or replacing outlets improves safety and convenience but the work ranges from quick, low-risk swaps to complex panel and circuit projects that are best left to licensed electricians. Start by taking photos, deciding where you want outlets and what type (GFCI, AFCI, dedicated 240V, USB), and calling 2–3 licensed electricians for written estimates. If the job requires new circuits, panel work, or a permit, hire a licensed pro to avoid safety and legal issues. Need help drafting your call script or comparing two estimates side-by-side? Paste the estimates here and I’ll help you compare them.
What I cited
Key supporting sources used for costs and code notes: HomeAdvisor cost guides and GFCI cost pages; Angi cost pages; HomeWyse estimates; NFPA/NEC documentation summaries and industry commentary (Mike Holt/technical resources) explaining where GFCI/AFCI are required. Specific source citations were placed next to the relevant sections above.