If one bedroom never gets comfortable while the rest of the house is fine, your ducts may be part of the problem. According to ENERGY STAR, in a typical house about 20 to 30 percent of the air moving through the duct system is lost to leaks, holes, and poorly connected ducts. That is conditioned air you paid for, heading into an attic or crawlspace instead of your living room.
The fix often starts with an HVAC ductwork sealer. The right one depends on your duct material, where the leak is, how big it is, and what the product label allows. This guide covers the options, costs, and when to call a pro. Lets deep dive into “HVAC Ductwork Sealer: Types, Best Materials, Cost & How to Seal”
What Is an HVAC Ductwork Sealer?
An HVAC ductwork sealer (also called HVAC duct sealant or an air duct leak sealer) is a material that closes seams, joints, gaps, and small openings in heating and cooling ducts. It keeps conditioned air inside the duct until it reaches a register.
Sealing and insulating are not the same job:
- Sealing reduces air leakage.
- Insulation reduces heat transfer through the duct wall.
A leaky, insulated duct still wastes air, and a sealed, bare duct in a hot attic still loses heat. Ducts in unconditioned spaces often need both.
Common residential uses include sealing joints at the furnace or air handler, boot connections at registers, takeoff collars, and seams along metal trunk lines. The sealer must be compatible with the duct material and the intended use. A product made for metal seams may not be appropriate for flexible duct or fiberglass duct board.
READ MORE: Mold in HVAC Ductwork: Signs, Causes, and Solutions
Signs Your HVAC Ductwork Needs Sealing
Watch for these clues:
- Rooms that stay too hot or too cold
- Weak airflow from certain supply registers
- High heating or cooling bills with no obvious cause
- Visible gaps, loose joints, or disconnected duct sections
- Dusty or stuffy rooms
- Ducts running through hot attics, crawlspaces, garages, or unconditioned basements
These symptoms do not prove leakage. Dirty filters, poor system balancing, damaged ducts, or equipment problems can look the same. Check the simple things first, and consider testing if the cause isn’t clear.
Types of HVAC Ductwork Sealers
When you visit a home improvement store or supply house looking for HVAC duct sealing products, you will encounter several distinct categories. Understanding how each one works will help you choose the right material for your repair project.
1. Duct Sealing Mastic
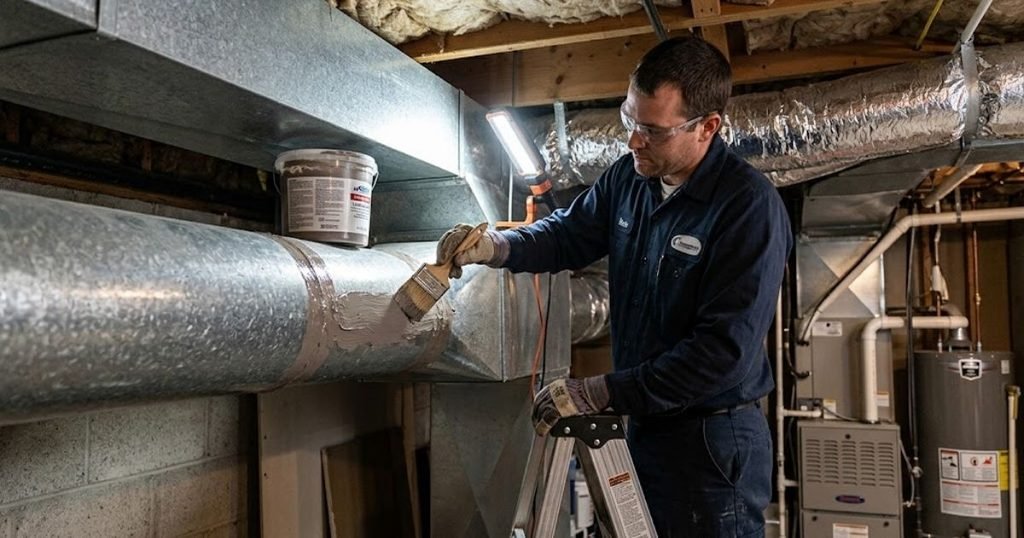
Duct sealing mastic is a thick, paste-like adhesive compound applied with a brush, caulking gun, or gloved hand. It is widely considered the gold standard for sealing rigid metal duct joints and seams.
- Suitable Applications: Excellent for sheet metal ductwork, trunk lines, plenums, and rigid connections.
- Advantages: Once cured, high-grade mastic forms a permanent, rock-solid seal that can withstand high static pressure and building vibrations without cracking. It creates an airtight bond that outperforms almost any tape.
- Limitations: Mastic requires drying or curing time, which can range from 24 to 72 hours depending on humidity and temperature. It can be messy to apply in tight spaces, and it is not designed to bridge massive structural gaps without reinforcing fabric.
- Manufacturer Guidance: Always check the container for specific curing parameters and temperature thresholds. Never apply water-based mastic if freezing temperatures are expected before it cures.
2. UL 181-Compatible Metal-Backed Foil Tape
When people talk about duct tape, they often picture the gray cloth tape found in kitchen drawers. However, standard cloth tape is completely unsuitable for HVAC work. Instead, professionals use UL 181-compliant metal-backed foil tape often categorized as metal foil duct tape or specialized duct sealing tape.
- Ease of Application: Foil tape is clean, fast, and easy to apply to clean metal surfaces, making it a favorite for quick repairs and accessible joints.
- Appropriate Uses: Designed specifically for sealing rigid metal ducts and securing certain approved flexible duct jackets when paired with mechanical fasteners.
- Surface Preparation: The metal surface must be completely free of oil, dust, and moisture for the aggressive acrylic or rubber adhesive to bond properly.
- Temperature Limitations: Quality foil tapes maintain their integrity across wide temperature swings in attics and basements, but cheap, unrated tapes will dry out, curl up, and fall off within a few months.
3. Mastic With Reinforcing Mesh
For wider seams, slight joint separations, or larger gaps that exceed standard tolerance, technicians often use duct sealing mastic in combination with a fiberglass reinforcing mesh.
- Application Process: The technician applies a base layer of mastic, presses the open-weave fiberglass mesh firmly into the wet paste, and then applies a second topcoat of mastic over the mesh.
- When It Is Useful: This method adds incredible tensile strength to the repair, preventing the mastic from sagging or pulling apart as the house expands and contracts with seasonal temperature changes.
- Important Caveat: Neither mesh nor mastic should ever be used to bridge large, gaping holes where duct metal is completely missing. Those sections require mechanical repair or replacement.
4. Aerosol-Based or Internal Duct Sealing Systems
For hidden ducts located inside walls, between floors, or deep within inaccessible attic runs, exterior sealing is impossible without tearing open drywall. For these scenarios, advanced air duct leak sealer technologies such as specialized aerosol-based internal sealing systems are available.
- How It Works: A computer-controlled machine pressurizes the duct network from the inside and aerosolizes a specialized vinyl polymer sealant. As the air rushes out of leaks and micro-gaps, the sealant particles collect at the edges, building up layer by layer until the hole is completely sealed from the inside.
- Professional Requirement: This method requires specialized commercial equipment, trained technicians, and pre- and post-sealing leakage testing. It is an exceptional solution for hard-to-reach ductwork but must be performed by certified professionals.
READ MORE: Cost to Install HVAC Ductwork
Comparison of HVAC Duct Sealing Products
| Method | Typical application | Advantages | Limitations | Generally DIY? |
| Mastic | Metal seams, boots, collars | Durable when applied correctly | Messy; needs cure time | Yes, for accessible leaks |
| Listed foil tape | Smooth, clean metal joints | Fast, clean application | Needs clean surface; must be the right listing | Yes, for accessible leaks |
| Mastic with mesh | Wider seams and gaps | Bridges small gaps | Not for large openings | Yes, for minor gaps |
| Aerosol/internal | Hidden leaks inside the system | Reaches inaccessible leaks | Needs special equipment; can’t fix major damage | No |
What Is the Best HVAC Ductwork Sealer?
There is no single best ductwork sealer for every home, and I wouldn’t trust anyone naming one without knowing your ducts. Weigh these factors:
- Duct material and joint type (metal, fiberglass duct board, flexible duct)
- Size and location of the leak
- Temperature and environmental conditions
- UL 181 marking and product labeling
- Application method, drying time, and accessibility
- Manufacturer instructions and intended use
In practice:
- Small, accessible metal seams: mastic, or a listed foil tape on clean, flat joints.
- Properly prepared connections with minor gaps: mastic with mesh.
- Hidden, widespread, or damaged ducts: professional attention.
The same logic applies to the duct sealant for metal ducts versus the duct sealant for flexible ducts: read the label to confirm the product is rated for your duct type.
How to Choose a Duct Sealant for Your Home
- Identify the duct material: sheet metal, fiberglass duct board, or flexible duct.
- Inspect the leak: note its size and whether you can safely reach it.
- Read the label for compatible applications.
- Confirm any required listing, such as the UL 181 marking.
- Estimate quantity from the number of joints and seams.
- Review application, ventilation, curing, and safety instructions.
- Decide whether sealant is enough. Disconnected, crushed, badly torn, or structurally damaged ducts may need mechanical repair or replacement first.
READ MORE: American Standard Heat Pump: Models, Costs & Buying Guide
How to Seal HVAC Ductwork Step by Step
If you have identified accessible, minor air leaks in your basement, crawlspace, or garage, sealing them yourself is a rewarding weekend project. Here is how to do it correctly:
Step 1: Turn Off the HVAC System
Before touching your ductwork, turn off your furnace or air conditioner at the thermostat and the main breaker. This prevents the blower fan from blowing dust into your face while you work and ensures you aren’t fighting positive air pressure pushing against your fresh sealant.
Step 2: Inspect the Ductwork
Safely access your duct system using a flashlight or work light. Walk along the runs and inspect every accessible joint, take-off, plenum connection, and end cap. Look for streaks of dust—airflow carries fine particles that leave dark trails right where air is escaping.
Step 3: Clean and Prepare the Surface
This is where many DIYers fail. Dust, grease, rust, and moisture prevent adhesives and mastics from bonding. Wipe down metal surfaces with a clean rag and a mild degreaser if necessary. Ensure the metal is completely dry before applying any product.
Step 4: Apply the Appropriate Sealer
- Using Mastic: Stir the paste gently. Using a paintbrush or a gloved hand, apply a generous layer (about 1/16 to 1/8 inch thick) directly over the joint or seam, ensuring it bridges both sides of the connection by at least an inch.
- Using Foil Tape: Cut a strip of metal foil duct tape slightly longer than the joint. Peel the backing, center it over the seam, and press it down firmly. Use a squeegee or roller to smooth out bubbles and ensure complete adhesion.
Step 5: Allow the Sealer to Cure
Give the sealant adequate time to dry and cure according to the manufacturer’s instructions. Do not turn the HVAC system back on prematurely, as high static air pressure can blow out wet mastic or disrupt curing tape.
Step 6: Inspect the Repair
Once cured, perform a visual check. Gently tug on foil tape edges or press on cured mastic to ensure a rock-solid bond. If you want to verify your overall duct leakage and energy efficiency improvements, you can hire a professional to perform a duct leakage test.
Tools and Materials Checklist
- Flashlight or portable work light
- Clean rags and mild surface cleaner
- Wire brush (for removing light rust)
- Duct sealing mastic and paintbrush OR UL 181 metal foil tape
- Utility knife and measuring tape
- Sturdy ladder (if working overhead)
- Safety glasses and dust mask
Important Reminder: Never use ordinary cloth-backed household duct tape for HVAC ductwork. The adhesive dries out rapidly under attic heat, causing the tape to peel away within weeks, leaving your ducts just as leaky as before.
READ MORE: Carrier Heat Pump Reviews — Models, Costs, Pros & Cons
Common HVAC Duct Sealing Mistakes to Avoid
- Using ordinary household duct tape
- Choosing a sealer without checking material compatibility
- Applying sealant over dirty or wet surfaces
- Ignoring loose or disconnected joints
- Sealing without addressing missing or damaged insulation
- Blocking airflow openings or equipment access
- Using interior duct sealants without confirming the product and method are approved
- Entering unsafe attics or crawlspaces without precautions
- Ignoring combustion safety in homes with fuel-burning equipment
Sealing should improve performance without compromising airflow, ventilation, or appliance safety. In homes with gas or oil equipment, changes to duct leakage can affect pressures around that equipment, which is one reason a professional should evaluate if you have any doubts.
HVAC Ductwork Sealer Cost
Duct sealing cost depends on:
- Type and quantity of materials
- Accessibility of the ducts
- Number and size of leaks
- Condition of existing ducts and insulation
- Whether testing or specialized equipment is needed
- Local labor rates and repair scope
| Item | What it covers | Estimate |
| DIY materials | Materials only: mastic, listed tape, mesh, tools | Depends on quantity and brand; check current retail prices |
| Professional duct sealing | Labor and materials, full service | Angi’s 2026 guide reports a typical range of about $500 to $4,000, averaging roughly $2,250, or about $0.50 to $1.50 per square foot |
| Diagnostic testing | Duct-leakage test or energy audit | Varies by region and provider; ask for an itemized quote, as some utility programs offer audits |
| Damaged duct repair | Replacing or reconnecting sections | Varies widely; Angi notes that ducts in poor condition may need repairs before sealing, which raises the total |
Published figures vary by source and by region, so treat these as starting points and get several local quotes. I haven’t listed prices for testing or repairs because I couldn’t verify reliable national figures.
DIY Duct Sealing vs. Hiring an HVAC Professional
| Factor | DIY | Professional |
| Typical scope | Minor, visible leaks in accessible ducts | Whole-system sealing, hidden or widespread leaks |
| Equipment and skill | Basic tools; patience | Testing equipment, training, possibly aerosol systems |
| Access and safety | Limited to areas you can reach safely | Handles tight attics, crawlspaces, and combustion-safety concerns |
| Finding and measuring leaks | Visual inspection, feel for airflow | Blower and pressure testing can quantify leakage |
| Verification | Visual check | Can verify results with testing |
| Best value when | Few, obvious, reachable leaks | Leakage is widespread, concealed, or damage is extensive |
Homeowners can often handle minor, visible leaks. Widespread leakage, concealed ducts, extensive damage, or combustion-safety concerns warrant professional evaluation.
When interviewing contractors, ask whether they:
- Inspect the entire duct system, not just the obvious spots
- Repair disconnected or damaged sections
- Evaluate airflow
- Verify the results after sealing
READ MORE: Carrier Heat Pump Repair Near Me: Homeowner Guide
Benefits of Properly Sealed HVAC Ductwork
Realistic benefits include:
- Less conditioned air lost through leaks
- More consistent comfort from room to room
- Better delivery of heated or cooled air
- Less energy waste where significant leakage exists
- Fewer chances for attic or crawlspace air to be pulled in through leaking return ducts
Results depend on your existing ducts, leak severity, insulation, equipment, and home conditions. Duct sealing is not a guaranteed savings number, and it won’t solve every indoor air-quality problem on its own.
Frequently Asked Questions
What is the best sealer for HVAC ductwork?
When rigid metal joints are involved, high-grade duct sealing mastic or UL 181-listed metal foil tape are generally appropriate choices. The right selection depends heavily on your specific duct material, joint type, and product technical specifications.
Can I use regular duct tape to seal HVAC ducts?
Conventional cloth-backed duct tape is not recommended as a durable long-term duct seal. The adhesive breaks down rapidly under attic and crawlspace temperature swings. Appropriate alternatives include UL 181-listed metal foil tape and professional duct sealing mastic.
How do you seal HVAC ductwork in an attic?
Sealing attic ductwork involves turning off the HVAC system, cleaning dust and debris from accessible joints, and applying a compatible sealer such as mastic or UL 181 metal foil tape. Be sure to check insulation, wear appropriate safety gear, and take precautions against attic hazards.
Is HVAC duct sealing worth the money?
Sealing is often worthwhile when significant duct leakage exists, as it reduces energy waste and improves comfort. Professional inspection or leakage testing can help determine the exact value and necessity for your specific home.
How long does HVAC duct sealant last?
Service life depends on the product formula, surface preparation, installation quality, environmental conditions, and manufacturer guidance. High-grade mastic and proper foil tapes can provide durable, long-lasting performance when correctly installed on clean surfaces.
Final Verdict:
- Choose materials made for your duct system and application.
- Prefer suitable mastic or listed metal-backed tape over ordinary duct tape.
- Seal leaks before adding or repairing insulation.
- Fix disconnected or damaged ducts rather than covering them up.
- Consider a professional inspection when leaks are widespread, hidden, or hard to diagnose.
Start by safely inspecting the ducts you can reach, and note anything loose, disconnected, or damaged. If the job looks bigger than a weekend project, a qualified HVAC professional can test, repair, and seal the system properly.