A leaking electric water heater pressure relief valve is something you should never ignore. This small part, often called the T&P valve or temperature and pressure relief valve, is a safety device designed to protect the tank from dangerous pressure buildup. If it starts leaking, it may be telling you that the valve is worn out, the water pressure is too high, the tank is overheating, or another part of the system needs attention.
The good news is that not every leak means a major emergency. Some leaks are simple, like a loose fitting or a valve that has reached the end of its life. Others point to more serious issues that should be handled quickly. In this guide, you will learn what the valve does, why it leaks, how to inspect it safely, and how to decide whether a repair or full replacement makes the most sense. Lets deep dive into “How to Fix a Leaking Electric Water Heater Pressure Relief Valve?”
READ MORE: Why Is My Water Heater Temperature Fluctuating? Causes & Fixes
What a Pressure Relief Valve Is and Why It Matters
The pressure relief valve is one of the most important safety parts on a water heater. Its job is to open if the water temperature or pressure inside the tank gets too high. That release protects the tank from damage and helps prevent dangerous conditions.
Here is what it does:
- Relieves excess pressure before it builds to unsafe levels
- Releases hot water if the tank overheats
- Helps protect the water heater from bursting or rupturing
- Gives homeowners an early warning that something is wrong
On an electric water heater, this valve matters even more because the heating elements can continue to raise water temperature if the thermostat or other parts fail. A leaking valve may not always mean danger right away, but it does mean the system should be checked.l
⚠️ CRITICAL SAFETY WARNING: Never, under any circumstances, cap, plug, or tape a leaking lT&P valve. Sealing this valve shut eliminates your water heater’s only mechanical safety release, turning a simple plumbing issue into a catastrophic safety hazard.
Common Reasons a Pressure Relief Valve Leaks
A leaking water heater safety valve can happen for several reasons. Some are minor, while others need prompt repair.
Common leak causes
- Excess water pressure in the home
- Overheating inside the water heater
- A faulty or worn-out valve
- Sediment buildup inside the tank
- Thermal expansion as water heats and expands
- A bad or missing expansion tank
- Loose valve fitting or loose discharge pipe connection
- Corrosion, rust, or age-related wear
- Debris caught in the valve seat
- A damaged tank or internal problem
A small drip may only mean the valve is aging or under light stress. A steady leak usually means the problem is not going away on its own.
READ MORE: What Are the Signs of a Failing Water Heater: Is It Time to Replace?
Signs the Leak Is a Small Problem vs. a Serious Problem
Not all leaks are equal. The pattern of leaking can tell you a lot.
Usually a smaller issue
- An occasional drip
- A tiny amount of water that appears only when the heater is running
- A leak that stops after a loose fitting is tightened
More serious warning signs
- Constant dripping
- Water spraying from the valve or discharge pipe
- Hot water leaking from the valve
- Rust-colored water
- A valve that keeps opening again and again
- Water leaking along with strange noises from the tank
- Moisture around the top of the water heater that does not go away
A serious leak may mean pressure is too high, the tank is overheating, or the valve itself is failing. In that case, the heater may need to be shut down and inspected right away.
What to Do Before Inspecting the Valve
Before you check anything, protect yourself and the home.
Safety checklist
- Turn off power to the water heater at the breaker
- Do not touch leaking water if it feels hot
- Keep hands away from electrical parts and wires
- Avoid opening or disassembling parts you are not trained to service
- Stand clear of the discharge pipe if water is actively spraying
- Check for steam, hissing, or signs that the tank is overheating
- Use caution on wet floors to prevent slips
If the water is extremely hot, the leak is heavy, or you smell burning or see electrical damage, stop and call a licensed plumber or electrician as needed.
READ MORE: What is a PRV in Plumbing?
How to Fix a Leaking Electric Water Heater Pressure Relief Valve: Step-by-Step
Now that the electrical power is safely cut off and the system has had some time to cool down, you can begin hunting for the exact cause of the leak. Follow these troubleshooting steps to determine if you can fix the leaking pressure relief valve yourself or if it is time to buy a replacement part.
Step 1: Isolate the Leak Source
Take a close look at the valve. Is the water leaking directly out of the open bottom of the long discharge tube? Or is it seeping out from the threaded connection where the valve screws into the body of the water heater tank?
- If it’s leaking from the bottom of the pipe, the valve is open.
- If it’s seeping from the tank threads, the valve simply needs to be resealed or tightened.
Step 2: Perform a Fast Flush Test
Often, a tiny grain of sand or rust is holding the valve open. You can try to clear it using the valve’s manual test lever. Locate the small metal flip-lever on top of the T&P valve. Briefly lift the lever to wide open for two to three seconds, allowing a burst of hot water to rush through the discharge line, then let it snap shut sharply.
The rushing water can wash away trapped debris, and the sharp snap can help the rubber gasket seat properly. Watch it for a few minutes to see if the dripping stops.
Step 3: Test Your Home’s Water Pressure
Screw a standard water pressure gauge onto an outdoor hose bibb or your washing machine’s cold water faucet. Turn the water tap on fully to read the pressure.
- If the gauge reads between 40 and 60 PSI, your home’s pressure is perfect.
- If the reading climbs above 80 PSI, your home’s main pressure-reducing valve (PRV) has likely failed. This high pressure is what is forcing your T&P valve open.
Step 4: Check Your Temperature Settings
Unscrew the two small metal access panels on the side of your electric water heater tank to expose the thermostats (make absolutely sure the breaker is off before doing this). Peel back the insulation and look at the dial settings.
- The U.S. Department of Energy recommends setting your water heater to 120°F (49°C).
- If you find that a thermostat is cranked up past 140°F or 150°F, turn it down using a flathead screwdriver. If the water remains scalding hot despite turning the dial down, that thermostat is broken and must be replaced.
How to Fix the Problem
Once you have identified the culprit behind the leak, you can deploy the appropriate solution. Here are the most effective ways to solve a leaking water heater valve problem, ranging from simple tweaks to component replacements.
Fix A: Tightening or Resealing a Loose Valve Fitting
If your troubleshooting in Step 1 revealed that water is oozing out around the tank threads rather than down the pipe, the fix is straightforward.
- Shut off the cold water inlet valve leading to the water heater.
- Drain the water level in the tank down a few inches so it sits below the valve height.
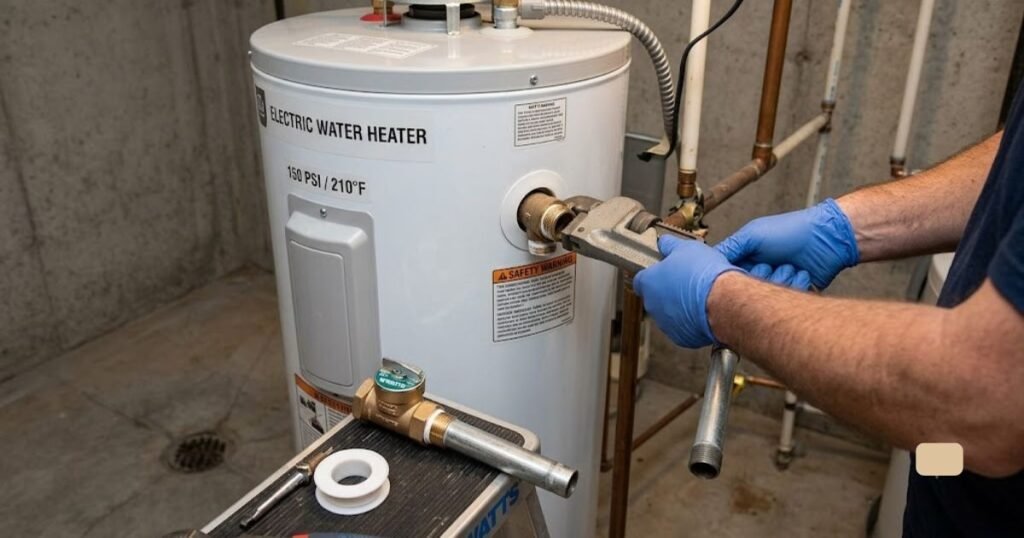
- Use a pipe wrench to gently unscrew the T&P valve from the tank.
- Clean the old crusty pipe dope or tape off the brass threads using a wire brush.
- Wrap the threads clockwise with 5 to 6 wraps of high-quality Teflon tape (PTFE tape) or apply a smooth layer of plumbing pipe joint compound.
- Thread the valve back into the tank and tighten it firmly with your wrench, making sure the discharge opening points straight down toward the floor.
Fix B: Adjusting Home Water Pressure
If your pressure test showed your home water pressure is tracking above 80 PSI, adjusting or replacing your home’s main Pressure Reducing Valve (PRV) is the only true fix. The PRV is typically located near your main water shut-off valve where the water line enters your home. Turning the bolt on top counter-clockwise will lower the pressure. If turning the bolt does nothing, the internal diaphragm of the PRV is spent, and a new one must be installed to protect your appliances.
Fix C: Replacing a Defective T&P Valve
If you have tried flushing the valve with the flip-lever and your home’s water pressure and temperature settings are verified as normal, the valve itself is defective. Fortunately, a water heater pressure valve replacement is a highly affordable, accessible DIY project.
READ MORE: How to Get Air Out of Plumbing Lines: A Simple Step by Step DIY Guide
How to Replace a Worn-Out T&P Valve (DIY Instructions)
If you have decided to handle the valve replacement yourself, here is a clear roadmap to getting the job done safely.
Tools and Materials You May Need
- A new T&P Valve (Make sure the shank length and thread size match your old one—bring the old valve to the hardware store if you are unsure)
- Pipe wrench or a large adjustable wrench
- Teflon thread sealing tape
- A standard garden hose
- A bucket
Step-by-Step Replacement Sequence
1.Confirm Power and Water Shutdown:
Double-check that the electric breaker is OFF. Next, locate the cold water supply valve directly above the water heater and turn it completely clockwise to shut off the incoming water.
2.Partial Tank Drainage:
Thread your garden hose onto the brass drain valve located at the very bottom of the water heater tank. Run the other end of the hose to a nearby floor drain or out into the yard. Open a hot water faucet upstairs to break the vacuum seal, then open the tank’s drain valve. Drain out roughly 2 to 3 gallons of water until the water level inside drops below the level of the T&P valve, then close the drain valve.
3.Remove the Discharge Tube:
Use your wrench to unthread the long metal or plastic discharge pipe connected to the outlet of the leaking T&P valve. Set this pipe aside, as you will need to reattach it later.
4.Unscrew the Defective Valve:
Fit your pipe wrench securely around the brass body of the old T&P valve. Turn it counter-clockwise to unscrew it from the water heater tank. Some rust or mineral buildup might make it stubborn, so apply firm, steady pressure.
5.Prep and Install the New Valve:
Clean the tank threads thoroughly. Wrap the threads of your new T&P valve with 5 to 6 layers of Teflon tape. Screw the new valve into the tank clockwise by hand, then finish tightening it with your wrench until it is snug and the discharge outlet faces straight down.
6.Reattach and Refill:
Screw the discharge pipe back onto the new valve outlet. Turn your cold water supply valve back on to refill the tank. Keep the hot water faucet upstairs open until water runs out of it smoothly without sputtering air—this confirms the tank is full. Check around your new valve for any micro-leaks. Once verified dry, flip your electrical breaker back on.
When the Valve Should Be Replaced
It can sometimes be tempting to try to nurse an old part along, but a T&P valve is not something you want to gamble on. You should proactively replace the valve immediately if you encounter any of the following scenarios:
| Observation | Immediate Action Required |
| Age of Component | The valve is more than 5 years old and has begun dripping constantly. |
| Physical Appearance | You see visible green corrosion, rust, or mineral crusting completely covering the exterior brass spring mechanism. |
| Mechanical Failure | When you lift the manual test lever, it feels loose, gets stuck open, or refuses to snap back down into place under its own spring pressure. |
| Post-Flush Leak | The valve continues to leak heavily even after you have performed multiple manual flush tests to clear out potential sediment. |
READ MORE: How Does an Electric Water Heater Work?
DIY or Call a Pro?
Deciding whether to fix a leaking relief valve on water heater yourself or hand the job over to a licensed professional comes down to your personal comfort level around plumbing and tools. Use this quick comparison guide to help you make the right choice for your home.
🛠️ Go DIY If:
- You have basic tools like a pipe wrench, garden hose, and Teflon tape on hand.
- The leak is clearly limited to a worn-out valve body or a loose threaded connection.
- You can easily locate and shut off your main home circuit breaker and water valves.
- Your water heater tank is relatively new, structurally sound, and free of exterior rust.
📞 Call a Licensed Plumber If:
- Water is leaking directly from the metal seams, top, or bottom of the main tank body (this means the inner tank has ruptured, and the entire water heater must be replaced).
- You feel uncomfortable working around 240-volt electrical systems or handling boiling hot water.
- The old brass valve is completely rusted solid into the tank, and you risk cracking the water heater body trying to force it loose with a wrench.
- Your home water pressure is excessively high, and you need a new main system pressure regulator installed.
Prevention and Maintenance Tips
The best way to fix a leaking relief valve on water heater is to stop it from happening in the first place. Adding a few simple checkpoints to your annual home maintenance checklist can extend the lifespan of your electric water heater by years.
- Flush the Tank Every Year: Hook up a garden hose annually and drain your water heater completely. This flushes out the accumulation of heavy mineral sediment before it can float up and foul your T&P valve or coat your lower heating elements.
- Test the T&P Valve Twice a Year: Periodically lift the test lever briefly to ensure the internal spring moves freely and water flows out. Catching a stuck valve early keeps your home safe.
- Monitor Your Home’s Water Pressure: Keep a cheap water pressure gauge handy and check an outside spigot once a year to ensure your home’s main regulator is keeping your system under a safe 60 PSI.
- Keep Thermostats below 120°F: Lower temperatures reduce the speed of mineral scale buildup and prevent overheating issues while lowering your monthly electric utility bills.
- Replace Your Anode Rod: Check the sacrificial anode rod inside your tank every three years. Replacing a worn anode rod stops the interior tank wall from rusting, protecting both the tank and your valves from corrosion.
READ MORE: What to Do if Water Heater is Leaking from Bottom
Cost Overview for U.S. Homeowners
Understanding the financial side of this repair can help you plan your budget. Luckily, addressing a T&P valve issue is one of the more affordable plumbing fixes you can encounter.
- DIY Valve Replacement Cost: If you decide to tackle this project on your own, your total cost will range from $15 to $35. A brand-new, high-quality residential T&P valve costs around $12 to $25 at local home improvement centers, plus a few dollars for a fresh roll of thread tape.
- Professional Plumber Service Cost: Hiring a licensed plumber to diagnose the issue, source the correct replacement part, and install it typically ranges from $150 to $350. This fee largely covers their specialized labor, travel time, and operational warranty protection.
- Potential Auxiliary Expenses: If your troubleshooting uncovers wider systemic issues, you might face additional costs. Replacing a failed home pressure-reducing valve (PRV) generally runs between $250 and $450 professionally installed, while adding a thermal expansion tank averages around $200 to $400.
FAQs
Why is my electric water heater pressure relief valve leaking?
It may be leaking because of high water pressure, overheating, sediment buildup, thermal expansion, a worn valve, or a problem with the expansion tank. A leak is a sign that the system should be checked.
Can I replace a leaking water heater pressure relief valve myself?
Some homeowners can handle it if they are comfortable shutting off power, draining the tank safely, and working with plumbing connections. If you are unsure, or if the unit is old or corroded, a plumber is the safer choice.
Is it normal for a water heater relief valve to drip occasionally?
A very small, rare drip can happen, but it should not be ignored. Repeated dripping usually means the valve is under stress or failing and should be inspected.
How much does it cost to replace a water heater pressure relief valve?
The cost can vary, but a basic replacement is usually not extremely expensive. Professional service often costs more because of labor, travel, and any additional repairs needed.
What happens if a water heater pressure relief valve keeps leaking?
If it keeps leaking, the heater may have a pressure problem, an overheating issue, or a failing valve. Ignoring it can lead to more damage and may shorten the life of the water heater.
READ MORE: How to Replace an Electric Hot Water Heater: Step by Step
Conclusion
A leaking electric water heater pressure relief valve should always be taken seriously. Sometimes the cause is simple, like a loose fitting or an aging valve. Other times, the leak is a warning sign that the system has pressure, temperature, sediment, or expansion problems.
The safest approach is to shut off power, inspect carefully, and look for the source of the leak without forcing anything. Minor issues may be fixable with tightening, flushing, or replacement of the valve. More serious leaks, especially ones involving the tank, overheating, or electrical concerns, should be handled by a licensed plumber.

