If you have upgraded your home’s plumbing, you already know the incredible benefits of on-demand hot water. However, owning one of these highly efficient units comes with a specific maintenance requirement: you must periodically flush it to keep it running smoothly. Knowing how to flush a Rheem tankless water heater is an essential skill for any DIY-minded homeowner who wants to protect their investment and ensure endless hot showers.
Traditional storage-tank water heaters hold 40 to 50 gallons of water and are flushed to remove sediment from the bottom of the tank. Tankless units do not have a large storage tank. Instead, when we talk about tankless water heater flushing, we are actually talking about descaling the heat exchanger. This process removes mineral buildup and scale that accumulates inside the narrow copper or stainless-steel heating channels. Mineral buildup can severely affect water flow, heat transfer, efficiency, and overall performance.
According to Rheem’s official guidance, regular heat-exchanger flushing is necessary. The frequency depends heavily on your local water quality and daily household usage. While annual flushing is standard for many homes, hard water environments may require more frequent attention. Lets deep dive into “How to Flush a Rheem Tankless Water Heater: Step-by-Step Guide”
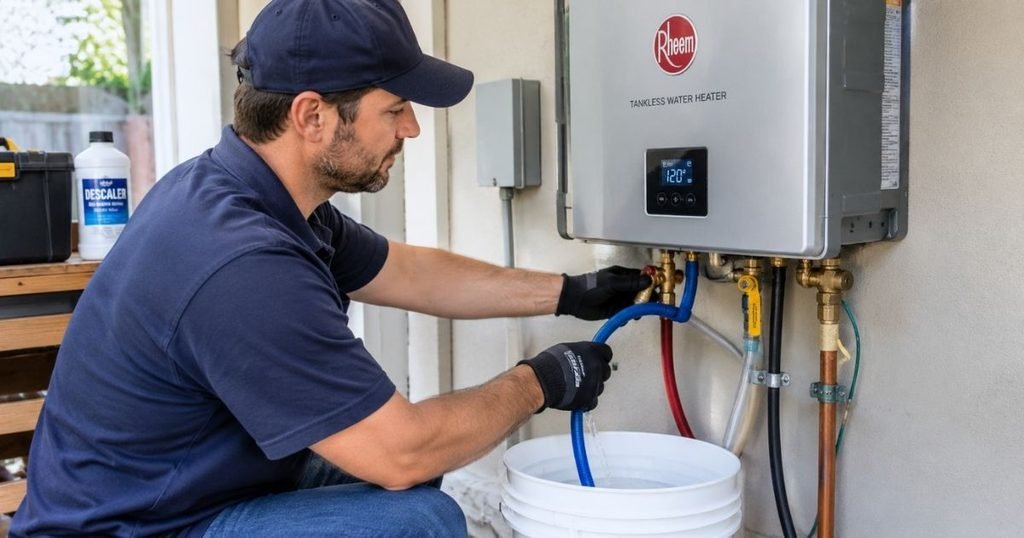
How Often Should You Flush a Rheem Tankless Water Heater?
There is no universal schedule that applies perfectly to every single home. The frequency of your Rheem water heater maintenance will depend on several unique factors:
- Water hardness: Homes with untreated well water or naturally hard municipal water will accumulate much faster.
- Household water usage: A family of six running multiple showers and washing machines daily will pass more water through the heater than a single occupant.
- Age of the unit: Older units might be more sensitive to scale buildup if they haven’t been meticulously maintained.
- Manufacturer recommendations: Your specific Rheem manual will offer baseline guidance.
Generally, Rheem documentation points to annual maintenance as a good starting point. However, homes with very hard water that lack a whole-house water softener may need to descale the unit every six to nine months.
| Home Condition | Possible Maintenance Frequency |
| Soft/treated water | Follow Rheem manual (often every 1–2 years) |
| Average water conditions | Around annually |
| Hard water | More frequently as recommended (every 6–9 months) |
| Heavy household usage | May require more frequent maintenance |
Note: This table provides general guidance. Always check the use and care manual for your exact Rheem model to determine the recommended maintenance schedule.
READ MORE: AO Smith vs. Rheem Water Heaters: Comparison & Expert Reviews
Signs Your Rheem Tankless Water Heater Needs Flushing
If you lose track of time, your water heater will often tell you it needs attention. Look out for these practical warning signs:
- Reduced hot-water flow: A noticeable drop in hot water pressure at your faucets or showerheads.
- Fluctuating water temperature: The water alternates between hot and cold during use (often called “cold water sandwiches”).
- Longer time to produce hot water: The unit seems to labor before delivering heated water.
- Error codes: The digital display on your unit or remote control may show a maintenance or scale-buildup error code. (Always check your Rheem manual to decode exact error codes).
- Unusual noises: Banging, popping, or groaning sounds coming from the unit as water struggles to pass through scaled passages.
- Known hard-water conditions: If you constantly scrub white crust off your showerheads, your water heater is dealing with the same buildup internally.
- Overdue maintenance: If it has been well over a year since your last heat exchanger flush.
What You Need to Flush a Rheem Tankless Water Heater
Before you begin, gather the necessary tools and supplies. Having everything on hand makes the process smooth and straightforward. You will need:
- Rheem tankless flush kit: A commercial kit that includes the pump and hoses.
- A circulation pump: Usually a submersible utility pump (around 1/6 horsepower is common).
- Two hoses: Standard washing machine hoses or short garden hoses suitable for the flush process.
- Five-gallon bucket: Or a similar sturdy container if using a DIY pump setup.
- Descaling solution: A manufacturer-approved tankless water heater cleaning solution (or food-grade white vinegar, if permitted by your manual).
- Adjustable wrench or channel locks: To help loosen and tighten hose connections if necessary.
- Towels or rags: To catch minor drips when disconnecting hoses.
- Safety gloves and glasses: To protect your skin and eyes from cleaning solutions.
Your installation should ideally have Rheem tankless isolation valves installed. These valves allow you to shut off the home’s water supply to the heater and easily connect your flush hoses via dedicated service ports.
READ MORE: Best Rheem Tankless Gas Water Heater: Review, Cost & Comparison
Before You Start: Important Safety Precautions
When performing any water heater maintenance, safety is the absolute highest priority. Never work on a hot system without thoroughly understanding the manufacturer’s procedure.
- Turn off the unit: Shut down the water heater exactly according to the manufacturer’s instructions.
- Disconnect electrical power: Unplug the unit or turn off the breaker before servicing where required.
- Shut off gas supply: For gas models, follow the manufacturer’s specific shutdown instructions for the gas valve.
- Let it cool: Allow the system to cool completely before touching any pipes or working on it.
- Keep the area clear: Keep children and pets well away from the work area and the bucket of cleaning solution.
- Protect your space: Place down towels to protect flooring from potential water spills and acidic cleaning solutions.
- Never bypass safety devices: Do not tamper with the pressure relief valve or other built-in safety mechanisms.
- Do not alter gas lines: Never alter gas connections or combustion components as part of a routine flush.
If you discover damaged valves, leaking gas lines, electrical problems, or any other unsafe conditions, stop immediately and contact a qualified plumber.
How to Flush a Rheem Tankless Water Heater Step by Step
This sequence covers the general procedure for descaling a heat exchanger. However, exact valve positions, control-panel steps, and error-code resets will depend on your exact Rheem model. Always keep your owner’s manual nearby.
Step 1: Turn Off the Water Heater
Begin by safely shutting down the unit. Turn off the power to the tankless water heater. If it plugs into a wall outlet, simply unplug it. If it is hardwired, flip the corresponding circuit breaker. For gas-powered Rheem models, locate the gas shutoff valve on the gas line leading into the unit and turn it to the “off” position (the handle should be perpendicular to the pipe).
Step 2: Shut Off the Water Supply and Isolation Valves
Locate the hot and cold isolation valves under your water heater. Turn both the main cold-water inlet valve and the hot-water outlet valve to the closed position. This isolates the water heater from the rest of your home’s plumbing, ensuring that cleaning chemicals do not enter your household water lines.
Step 3: Connect the Flush Hoses
Identify the service ports on your isolation valves. Remove the protective caps from the hot and cold service ports. (Keep a towel handy, as a small amount of trapped water may drip out). Attach one hose to the cold-water service port—this will be your inlet. Attach the second hose to the hot-water service port—this will be your return line.
Step 4: Connect the Circulation Pump
Place your submersible circulation pump into your five-gallon bucket. Connect the other end of the hose attached to the cold-water service port directly to the circulation pump. Take the other end of the hose attached to the hot-water service port and simply drop it into the bucket.
Step 5: Add the Appropriate Descaling Solution
Fill the bucket with your chosen descaling solution, ensuring the circulation pump is fully submerged. Always use a manufacturer-approved or compatible tankless-water-heater descaling solution. While food-grade white vinegar is widely used, do not automatically assume vinegar is approved for your specific Rheem model. Verify the approved cleaning method in your model-specific manual to ensure you do not void your warranty or damage the internal sensors.
Step 6: Begin Circulating the Cleaning Solution
Open the service ports on both the hot and cold isolation valves. Plug in your circulation pump to turn it on. You should see the solution travel up the inlet hose, through the water heater’s heat exchanger, and out the return hose back into the bucket. As the solution circulates, you may notice it turning a slightly blue or cloudy color; this is the dissolved scale and minerals flushing out. Follow the Rheem manual and your descaling-solution instructions for the exact circulation time.
Step 7: Flush the Heat Exchanger With Fresh Water
Once the circulation time is complete, turn off and unplug the pump. Close the cold-water service port and remove the inlet hose. Remove the pump and the bucket of used cleaning solution. Place the return hose (still connected to the hot service port) into an empty bucket or direct it to a nearby floor drain. Open the main cold-water inlet valve to allow fresh household water to rush through the heat exchanger and exit out the hot service port hose. Let this run for at least five minutes to completely rinse out any remaining acidic cleaning solution.
Step 8: Disconnect the Flush Equipment
After the system is thoroughly rinsed, turn off the main cold-water inlet valve again. Close the hot-water service port and disconnect the return hose. Replace and securely tighten the protective caps on both the hot and cold service ports.
Step 9: Restore Water and Power
With the service ports closed and capped, open both the main cold-water inlet valve and the main hot-water outlet valve to restore normal water flow to your house. Turn the gas valve back to the open position. Finally, restore electrical power by plugging the unit in or flipping the breaker.
Step 10: Check for Leaks and Proper Operation
Go inside your home and turn on a hot water faucet to bleed any trapped air out of the lines. Once the water runs smoothly, head back to your Rheem water heater. Inspect all connections, especially the service port caps, to ensure there are no drips. Monitor the unit as it fires up to verify normal hot-water operation. Keep an eye out for unusual noises, new error codes, or temperature problems over the next 24 hours.
READ MORE: Carrier Heat Pump Reviews— Models, Costs, Pros & Cons
How to Use a Rheem Tankless Water Heater Flush Kit
If you are intimidated by sourcing individual parts, purchasing a dedicated Rheem tankless flush kit takes the guesswork out of the process. A standard kit typically includes a perfectly sized submersible pump, two heavy-duty hoses, and a bottle of commercial-grade descaling solution.
Rheem documentation identifies specific flush-kit and isolation-valve accessories for applicable models. However, it is important to note that not every Rheem tankless model uses the exact same kit, configuration, or chemical. Always ensure the kit you purchase explicitly states compatibility with your specific Rheem model number. The major benefit of a kit is convenience: the hoses are precut to the right length, and the pump is calibrated to push fluid at a safe, effective pressure for a tankless heat exchanger.
Can You Flush a Rheem Tankless Water Heater With Vinegar?
Vinegar is highly popular in DIY circles because its mild acidity (acetic acid) is excellent at naturally breaking down calcium and magnesium scale. It is cheap, safe to handle, and non-toxic.
However, homeowners should not assume vinegar is approved for every Rheem model. Some modern tankless units have delicate internal flow sensors or copper configurations that require a specific commercial tankless-water-heater descaling solution. Always check your owner’s manual first. If vinegar is approved, you must use undiluted food-grade white vinegar (typically 5% acidity). Regardless of what liquid you use, the most critical step remains the same: the solution must be completely rinsed out with fresh water afterward to stop the acidic reaction from degrading internal metal parts.
How Long Does It Take to Flush a Rheem Tankless Water Heater?
Setting aside the time needed to gather tools and read your manual, the physical process of flushing the unit takes most homeowners between 1 to 2 hours.
The total maintenance time depends on your specific model, the severity of the scale buildup, the cleaning solution used, and the strength of your pump. The actual circulation phase usually lasts anywhere from 30 to 60 minutes. The remaining time is spent safely shutting down the unit, connecting hoses, performing the fresh-water rinse, and testing for leaks. Always base your circulation time on the Rheem manual and the instructions on your descaling product rather than an arbitrary universal number.
READ MORE: Ecobee vs Honeywell vs Nest: Which Smart Thermostat Is Best?
What Happens If You Never Flush a Rheem Tankless Water Heater?
Ignoring this necessary chore will realistically lead to a cascading series of plumbing frustrations.
First, the heavy mineral buildup will drastically reduce the heat-transfer efficiency. Your water heater will have to work much harder and burn more fuel to reach your set temperature, causing your energy bills to creep up. Second, the scale will physically clog the narrow water pathways, leading to noticeably reduced water flow and temperature fluctuations in your shower. Eventually, this increased strain on the system leads to frequent performance problems, persistent error codes, and potential premature failure of internal components. Routine maintenance prevents this unnecessary wear and tear.
Flush vs. Descale: What’s the Difference?
Plumbers and homeowners often use these terms interchangeably, but they actually mean slightly different things in the context of plumbing maintenance.
| Maintenance Term | What It Generally Means |
| Flush | Running large amounts of water through a system to mechanically remove loose contaminants, sediment, or residue. |
| Descale | Using a suitable acidic cleaning solution to chemically dissolve hardened mineral deposits. |
| Heat exchanger flush | The specific maintenance procedure designed to circulate a descaling solution to remove scale from a tankless heat exchanger. |
Tankless water heaters are commonly described as being “flushed” even though the actual maintenance involves descaling the heat exchanger. You flush a tank; you descale a tankless heat exchanger.
Should You DIY or Hire a Plumber?
Deciding whether to tackle a Rheem heat exchanger flush yourself or hire a professional comes down to your comfort level with plumbing systems.
DIY may make sense when:
- You understand your home’s basic plumbing setup.
- Proper hot and cold isolation valves are already installed on the unit.
- You have the correct equipment (hoses, pump, bucket, safety gear).
- Your Rheem manual provides clear, easy-to-follow maintenance instructions.
- You are fully comfortable safely shutting down the electricity and gas, and restarting the unit.
Hire a professional when:
- The unit has no accessible service valves, meaning pipes would need to be cut or modified.
- You suspect a gas leak or electrical issue.
- The water heater is visibly leaking water from the cabinet.
- The isolation valves are corroded, damaged, or stuck in place.
- You cannot confidently identify the correct water and gas connections.
- There are persistent error codes that do not go away.
- The heat exchanger appears severely scaled or blocked.
- You are simply uncomfortable performing the procedure.
There is no shame in calling a licensed plumber. Paying for professional tankless water heater maintenance is significantly cheaper than replacing a unit damaged by improper DIY servicing.
READ MORE: How to Test a Water Heater Thermostat — Easy DIY Guide
Other Rheem Tankless Water Heater Maintenance You Should Not Ignore
Flushing the heat exchanger is the main event, but it is only one part of total system maintenance. To keep your Rheem unit running flawlessly, remember these other important tasks:
- Cleaning the inlet water filter: Most units feature a small mesh screen on the cold-water inlet that catches debris. This should be removed and rinsed regularly.
- Inspecting for leaks: Routinely check the pipes, valves, and the unit itself for any signs of water dripping.
- Checking venting: For gas models, visually inspect the PVC or metal exhaust venting to ensure it is secure and free of blockages like bird nests or debris.
- Inspecting condensate components: If you have a high-efficiency condensing model, ensure the condensate drain line is clear and flowing freely.
- Checking the pressure-relief valve: This should be tested according to manufacturer instructions.
- Inspecting the burner and ignition components: Rheem’s maintenance guidance includes periodic inspection of components such as burners, flame sensors, and igniters.
Keep in mind that while cleaning a water filter is a standard homeowner task, inspecting gas burners and testing pressure-relief valves is often better handled by a qualified technician during an annual tune-up.
Common Mistakes Homeowners Make When Flushing a Water Heater
Even well-meaning DIYers can make errors. Avoid these common pitfalls:
- Not turning off power and gas: Always isolate the unit from its energy sources to prevent accidental firing or electrical shocks.
- Working on a hot unit: Attempting to drain or uncap service ports right after a long hot shower can result in severe scalding. Always let the system cool.
- Using the wrong valves: Accidentally opening a pressure relief valve instead of a service port can cause a mess and damage the valve.
- Forgetting to isolate the unit: If you do not close the main inlet/outlet valves, you will pump cleaning solution straight into your home’s drinking water pipes.
- Using an unsuitable chemical: Using harsh industrial cleaners instead of an approved tankless water heater cleaning solution can strip the metal inside the heat exchanger.
- Not rinsing thoroughly: Leaving acidic solution inside the heater will slowly eat away at the internal copper.
- Ignoring the owner’s manual: Assuming all Rheem models use the exact same procedure is a recipe for error codes and potential damage.
When Should You Call a Professional?
While routine maintenance is safe for capable DIYers, certain red flags require immediate professional intervention. Stop working and call a licensed plumber if you experience any of the following:
- A distinct gas smell near the unit or gas line.
- Water pooling under the unit or actively leaking from inside the casing.
- Scorched wires or visible electrical damage.
- Persistent error codes that remain even after a successful flush and reset.
- Severe scale buildup that completely blocks the flow of the cleaning solution.
- Damaged, heavily corroded, or seized isolation valves.
- Abnormal combustion sounds (loud booming or whistling).
- Any venting concerns or exhaust smells indoors.
- A unit that absolutely will not restart after routine maintenance is completed.
When dealing with gas and high-voltage electricity, prioritizing safety is always the smartest choice.
Quick Maintenance Checklist
Save or print this checklist for your next maintenance weekend:
- [ ] Check your specific Rheem model number.
- [ ] Read the model-specific manual for cleaning requirements.
- [ ] Turn off the unit safely (power and gas/electricity).
- [ ] Allow the system to cool down completely.
- [ ] Close and isolate the main hot and cold water valves.
- [ ] Connect the correct flush hoses and pump to the service ports.
- [ ] Submerge the pump in an approved/compatible descaling solution.
- [ ] Open service ports and circulate solution according to manual instructions.
- [ ] Turn off pump, disconnect inlet hose, and rinse thoroughly with fresh water.
- [ ] Reconnect the plumbing and close service ports.
- [ ] Restore the main water supply and check for leaks.
- [ ] Restore power/gas according to the manual.
- [ ] Run hot water inside the home to verify operation.
- [ ] Record the maintenance date on a tag near the unit.
SEO FAQ Section
How often should you flush a Rheem tankless water heater?
You should generally flush a Rheem tankless water heater once a year. However, the exact frequency depends on your local water quality and household usage. If your home has hard water and no water softener, mineral scale builds up much faster, and you may need to perform tankless water heater descaling every six to nine months. Always check your specific Rheem manual for baseline guidance.
Can I flush my Rheem tankless water heater myself?
Yes, most homeowners can flush a Rheem tankless water heater themselves if the unit is equipped with proper isolation valves. You will need a flush kit, a submersible pump, and a compatible cleaning solution. However, if you are uncomfortable turning off gas and electricity, or if your unit lacks accessible service ports, it is safer to hire a qualified plumbing professional.
What can I use to flush a Rheem tankless water heater?
You should use a manufacturer-approved commercial tankless water heater descaling solution or, if permitted by your specific manual, undiluted food-grade white vinegar. Do not guess which chemical to use, as harsh chemicals can destroy internal sensors and copper tubing. Always verify the approved cleaning solution in your Rheem owner’s manual before beginning the flush.
How long does it take to flush a Rheem tankless water heater?
The entire process usually takes between one to two hours from start to finish. The actual circulation of the cleaning solution typically takes 30 to 60 minutes, depending on the severity of the scale buildup and the instructions on your descaling product. The rest of the time is spent safely shutting down the unit, setting up the equipment, rinsing with fresh water, and checking for leaks.
What happens if you don’t flush a Rheem tankless water heater?
If you never flush your Rheem tankless water heater, calcium and magnesium scale will rapidly accumulate inside the heat exchanger. This mineral buildup insulates the heating elements, forcing the unit to burn more energy to heat water. Over time, this causes reduced water flow, alternating hot and cold water temperatures, persistent error codes, and potentially premature, costly failure of internal components.

